首页 > Python资料 博客日记
Python更换国内pip源详细教程
2024-03-24 23:00:03Python资料围观191次
文章目录
Hello,大家好,我是景天,很多小伙伴在python中安装包的时候经常出现下载不了的情况,多半是pip源的问题,今天那我们就如何更换pip源详细讲讲。
一、国内常用镜像源
清华大学 :https://pypi.tuna.tsinghua.edu.cn/simple/

阿里云:http://mirrors.aliyun.com/pypi/simple/

中国科学技术大学 :http://pypi.mirrors.ustc.edu.cn/simple/

华中科技大学:http://pypi.hustunique.com/

豆瓣源:http://pypi.douban.com/simple/

腾讯源:http://mirrors.cloud.tencent.com/pypi/simple

华为镜像源:https://repo.huaweicloud.com/repository/pypi/simple/
查看当前pip源
pip config list
二、临时使用
格式:
pip install [包名] -i [pip源URL]
#示例
pip install -i https://pypi.tuna.tsinghua.edu.cn/simple pymysql
三、永久修改配置
1.pycharm终端命令行操作
pip config set global.index-url https://pypi.tuna.tsinghua.edu.cn/simple

生成的文件


2.Windows平台图形化操作
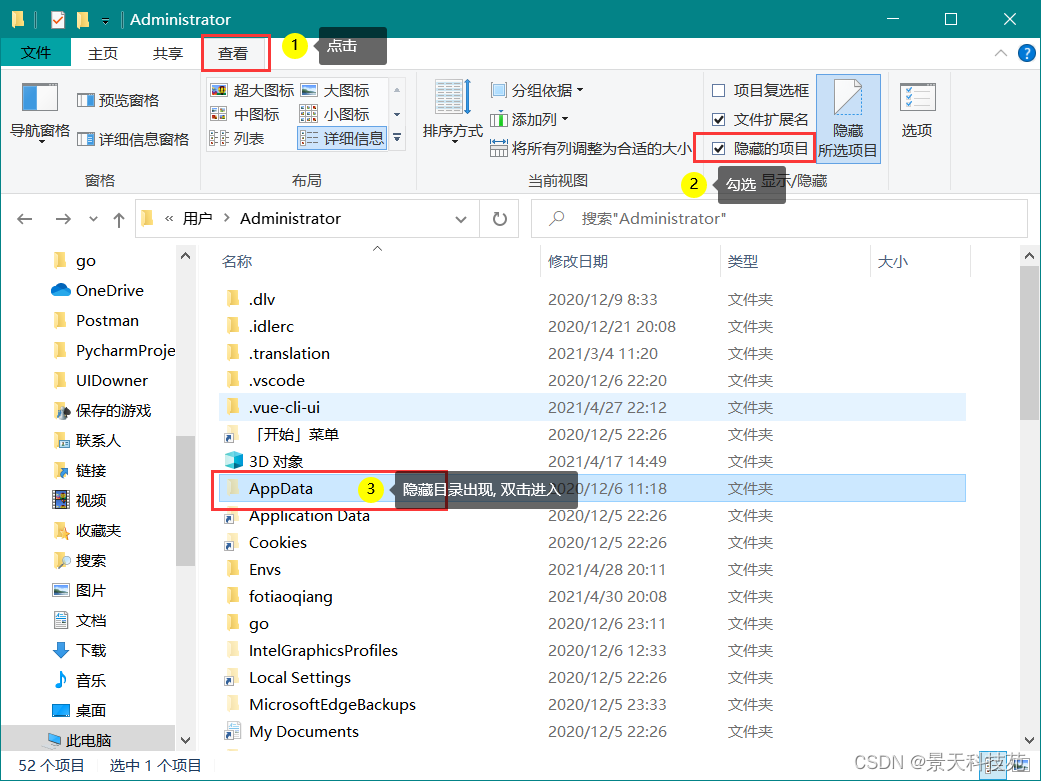
进入 : 文件管理器文件路径地址栏直接敲%APPDATA%回车,快速进入C:\Users[电脑用户]\AppData\Roaming 文件夹中
注意 : 有些电脑找不到 AppData 目录, 这是因为隐藏了, 点击左上角 “查看”, 勾选右边的 “隐藏项目” 可进行查看

新建 pip 文件夹并在文件夹中新建 pip.ini 配置文件
路径:

新增pip.ini 配置文件内容 (以清华源为例) :
[global]
index-url=https://pypi.tuna.tsinghua.edu.cn/simple
[install]
use-mirrors=true
mirrors=https://pypi.tuna.tsinghua.edu.cn/simple
trusted-host=pypi.tuna.tsinghua.edu.cn
查看源

3.MacOS、Linux 平台
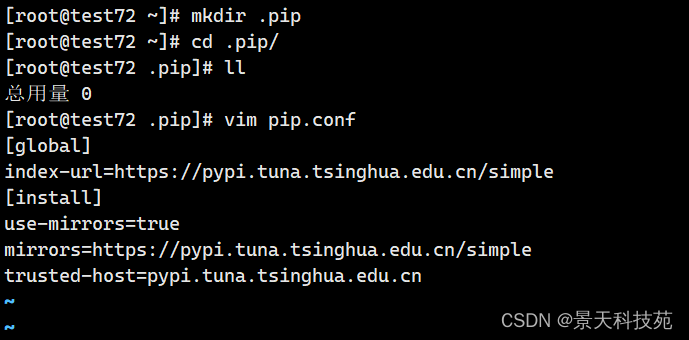
在用户根目录下 ~(家)目录 下创建 .pip 隐藏文件夹, 如果已经有了可以跳过
mkdir ~/.pip
进入 .pip 隐藏文件夹并创建 pip.conf 配置文件
cd ~/.pip; touch pip.conf
输入配置文件内容(以清华源为例)
[global]
index-url=https://pypi.tuna.tsinghua.edu.cn/simple
[install]
use-mirrors=true
mirrors=https://pypi.tuna.tsinghua.edu.cn/simple
trusted-host=pypi.tuna.tsinghua.edu.cn


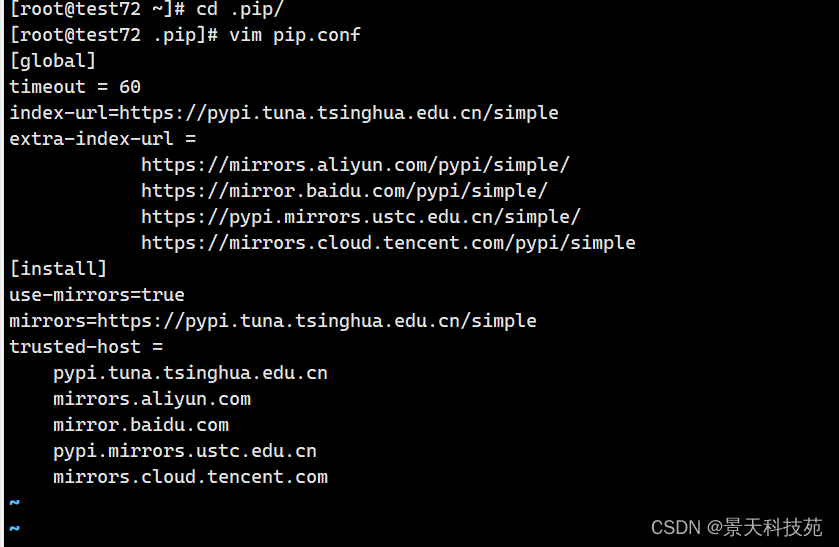
配置多个源:
优先查找index-url,找不到则从extra-index-url中查找。
[global]
timeout = 60
index-url = https://pypi.tuna.tsinghua.edu.cn/simple/
extra-index-url =
            https://mirrors.aliyun.com/pypi/simple/
            https://mirror.baidu.com/pypi/simple/
            https://pypi.mirrors.ustc.edu.cn/simple/
            https://mirrors.cloud.tencent.com/pypi/simple

[install]
trusted-host =
    pypi.tuna.tsinghua.edu.cn
    mirrors.aliyun.com
    mirror.baidu.com
    pypi.mirrors.ustc.edu.cn
    mirrors.cloud.tencent.com

查看配置的源:

四、安装和导出项目依赖包
1.使用pip命令自动生成requirement.txt项目依赖的模块
#查看pip安装的包
pip list
#注意: 先切换到到apps文件夹下, 在Terminal中执行以下命令. > 指向的是当前目录下将项目依赖的模块的文件
pip freeze >requirement.txt # 后面的文件名可以自定义
2.从文件中一键安装项目中使用到的所有依赖包
pip install -r requirement.txt -i [url源]
五、拓展
1.pip下载第三方包
pip download 你的包名 -d "下载的路径(windows下双引号来表示文件夹)"
#举个栗子:
pip download pymysql -d "D:\pipDownloadTest"
#pip离线安装
pip install <包名>
#举个栗子: 切换终端在待安装文件目录下(D:\pipDownloadTest)
pip install PyMySQL-0.9.3-py2.py3-none-any.whl
2.在pip安装失败的时候直接使用whl文件安装
提示: 其实本质上windows上安装的模块, 都是xxx.whl文件
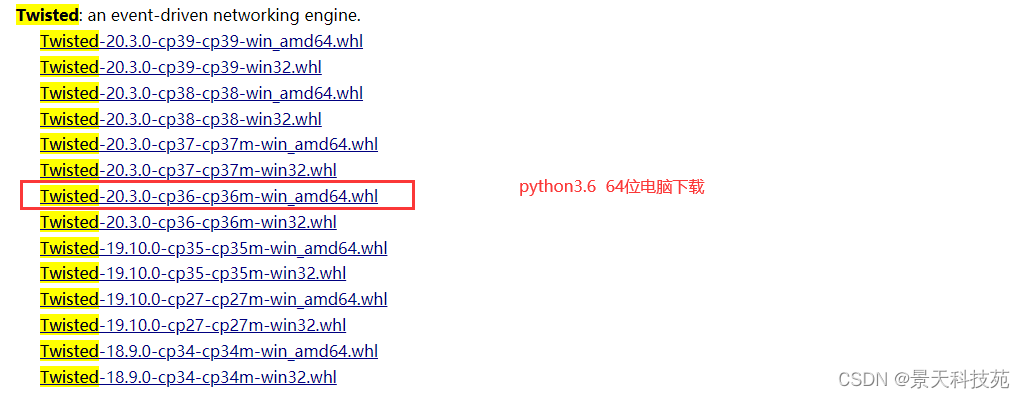
搜索网址: https://www.lfd.uci.edu/~gohlke/pythonlibs/#twisted
指定版本和平下载: 如图

安装:
Copy# 下载到本地以后直接使用如下命令:
pip install 你下好的.whl文件的路径
3.pip下载设置超时时间
pip install -U https://codeload.github.com/sshwsfc/xadmin/zip/django2 --default-timeout=1000
4.拓展: 使用pipreq下载项目依赖的模块
优点: 只会下载项目依赖的模块, 不会如pip freeze >requirement.txt命令一样将模块依赖的包全部都下载到文件中
Copy# 下载
pip3 install pipreqs
#windows中操作系统默认GBK编码, 需要指定编码
pipreqs ./ --encoding=utf-8
标签:
相关文章
最新发布
- 光流法结合深度学习神经网络的原理及应用(完整代码都有Python opencv)
- Python 图像处理进阶:特征提取与图像分类
- 大数据可视化分析-基于python的电影数据分析及可视化系统_9532dr50
- 【Python】入门(运算、输出、数据类型)
- 【Python】第一弹---解锁编程新世界:深入理解计算机基础与Python入门指南
- 华为OD机试E卷 --第k个排列 --24年OD统一考试(Java & JS & Python & C & C++)
- Python已安装包在import时报错未找到的解决方法
- 【Python】自动化神器PyAutoGUI —告别手动操作,一键模拟鼠标键盘,玩转微信及各种软件自动化
- Pycharm连接SQL Sever(详细教程)
- Python编程练习题及解析(49题)
点击排行
- 版本匹配指南:Numpy版本和Python版本的对应关系
- 版本匹配指南:PyTorch版本、torchvision 版本和Python版本的对应关系
- Python 可视化 web 神器:streamlit、Gradio、dash、nicegui;低代码 Python Web 框架:PyWebIO
- 相关性分析——Pearson相关系数+热力图(附data和Python完整代码)
- Anaconda版本和Python版本对应关系(持续更新...)
- Python与PyTorch的版本对应
- Windows上安装 Python 环境并配置环境变量 (超详细教程)
- Python pyinstaller打包exe最完整教程

