首页 > Python资料 博客日记
[Python] scikit-learn - 葡萄酒(wine)数据集和决策树分类器的使用
2024-06-01 16:00:07Python资料围观468次
葡萄酒(wine)数据集介绍
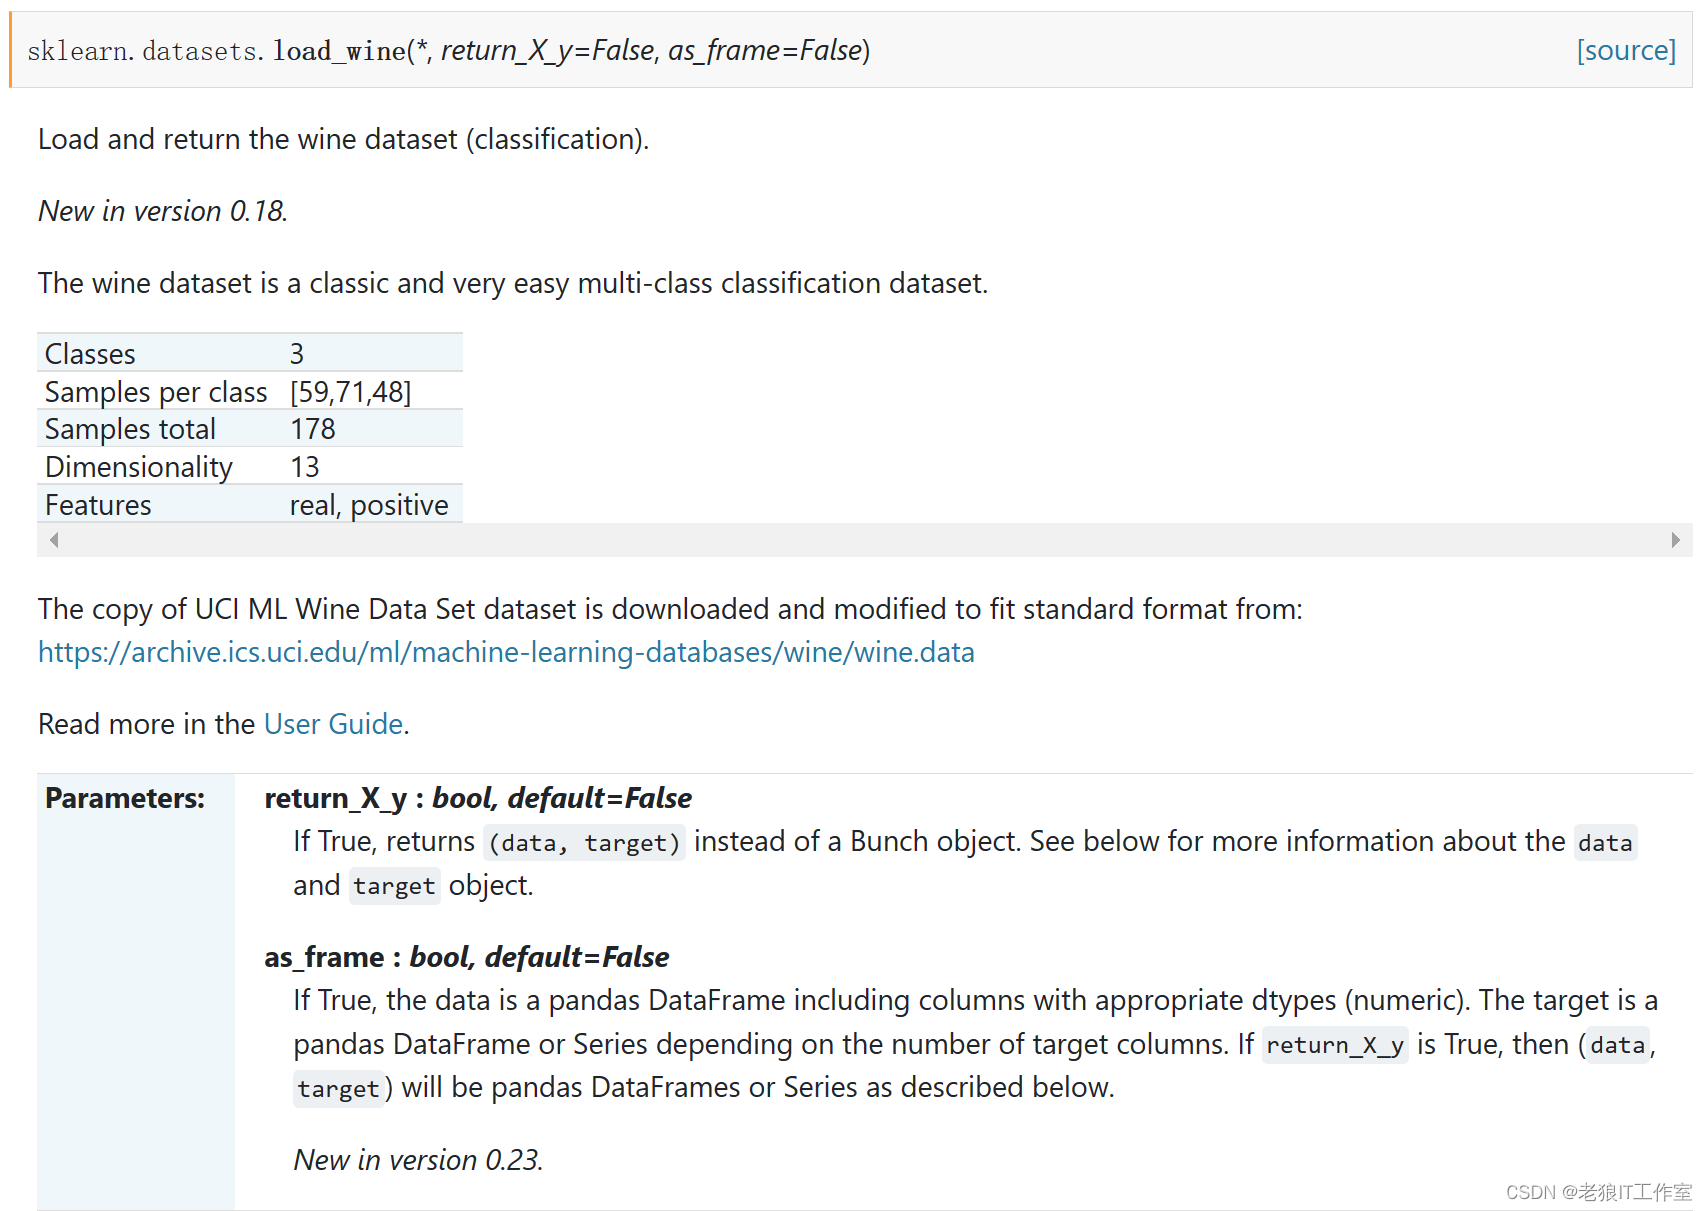
葡萄酒识别数据集(Wine Recognition dataset)通常用于多类别分类问题建模。数据集包括从三个不同的品种(类别)的葡萄酒中测得的13种不同的化学特征,共178个样本。这些化学特征包括酸度、灰分、酒精浓度等。
该数据集是由UCI机器学习库提供,并且已经被广泛用于分类和聚类任务,作为基准测试数据集之一。
sklearn.datasets.load_wine — scikit-learn 1.4.0 documentation
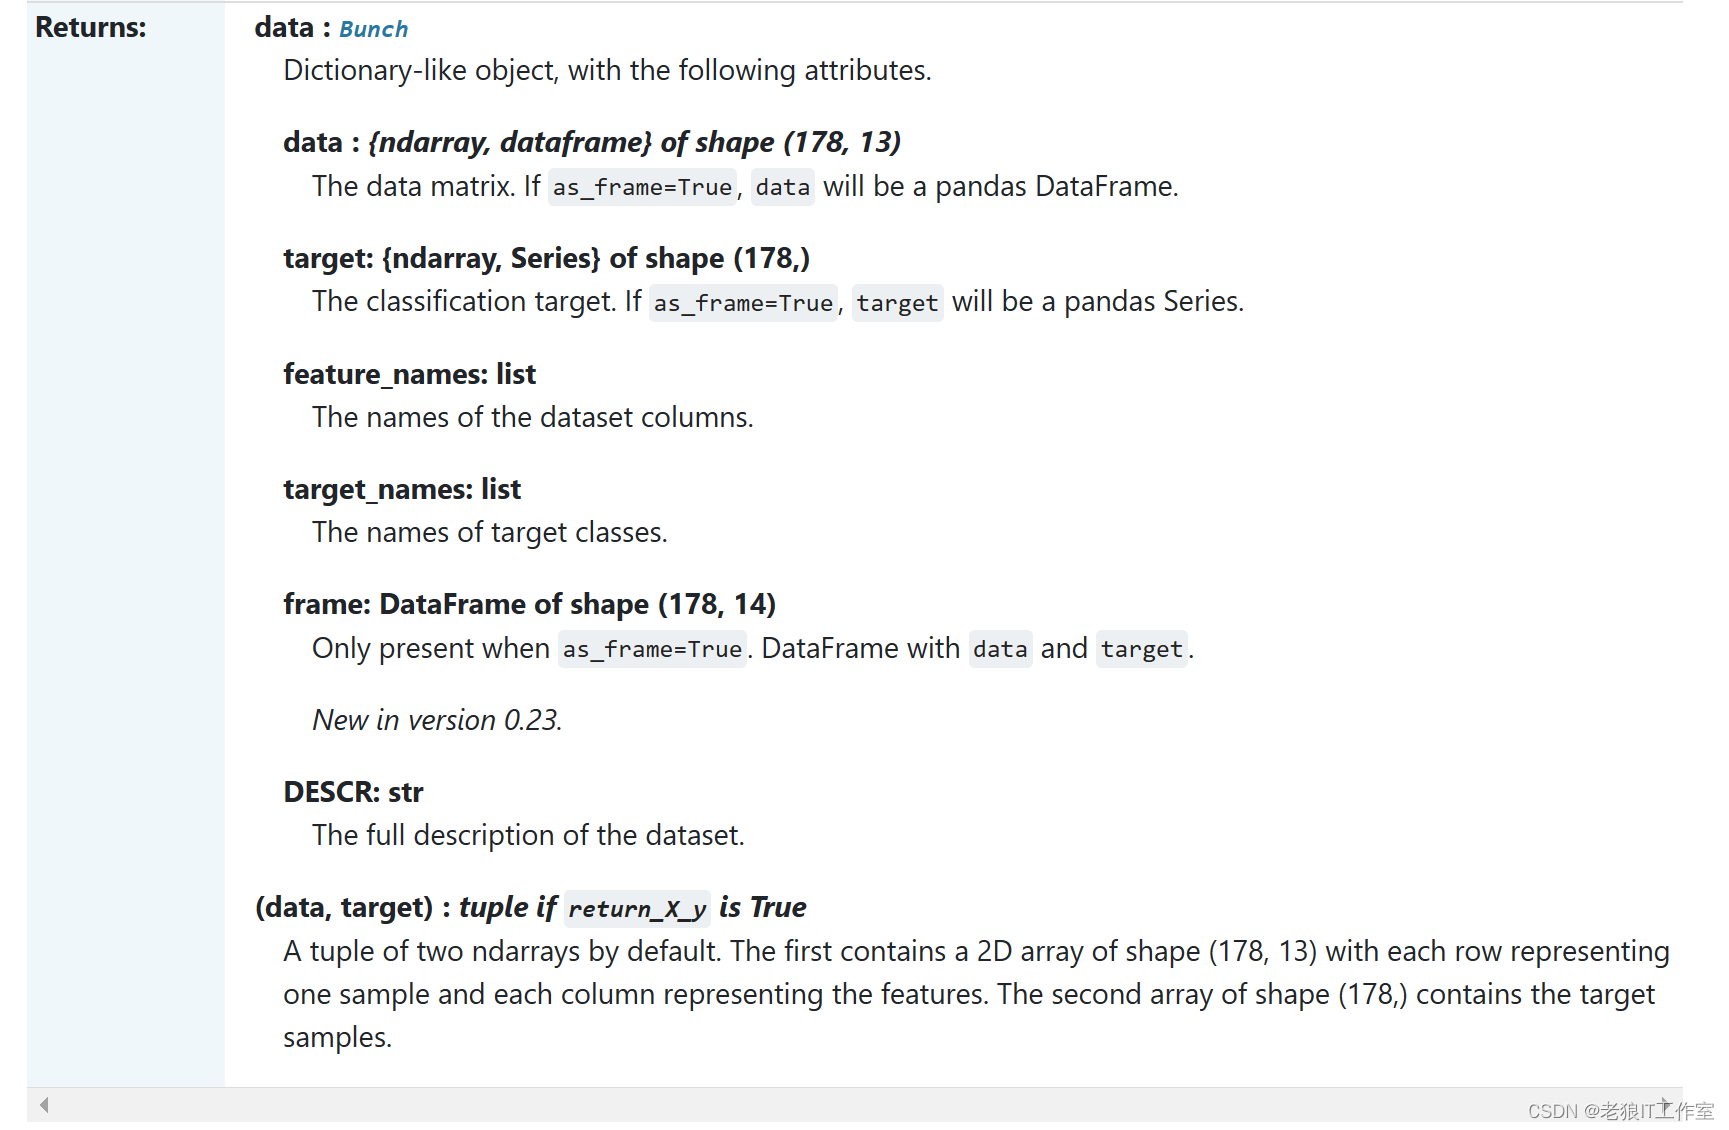
from sklearn.datasets import load_wine
wine_datas = load_wine()
print('wine_datas.data.shape:', wine_datas.data.shape)
print('wine_datas.data:', wine_datas.data[0:5])
print('wine_datas.feature_names:', wine_datas.feature_names)
print('wine_datas.target.shape:', wine_datas.target.shape)
print('wine_datas.target:', wine_datas.target[0:5])
print('wine_datas.target_names:', wine_datas.target_names)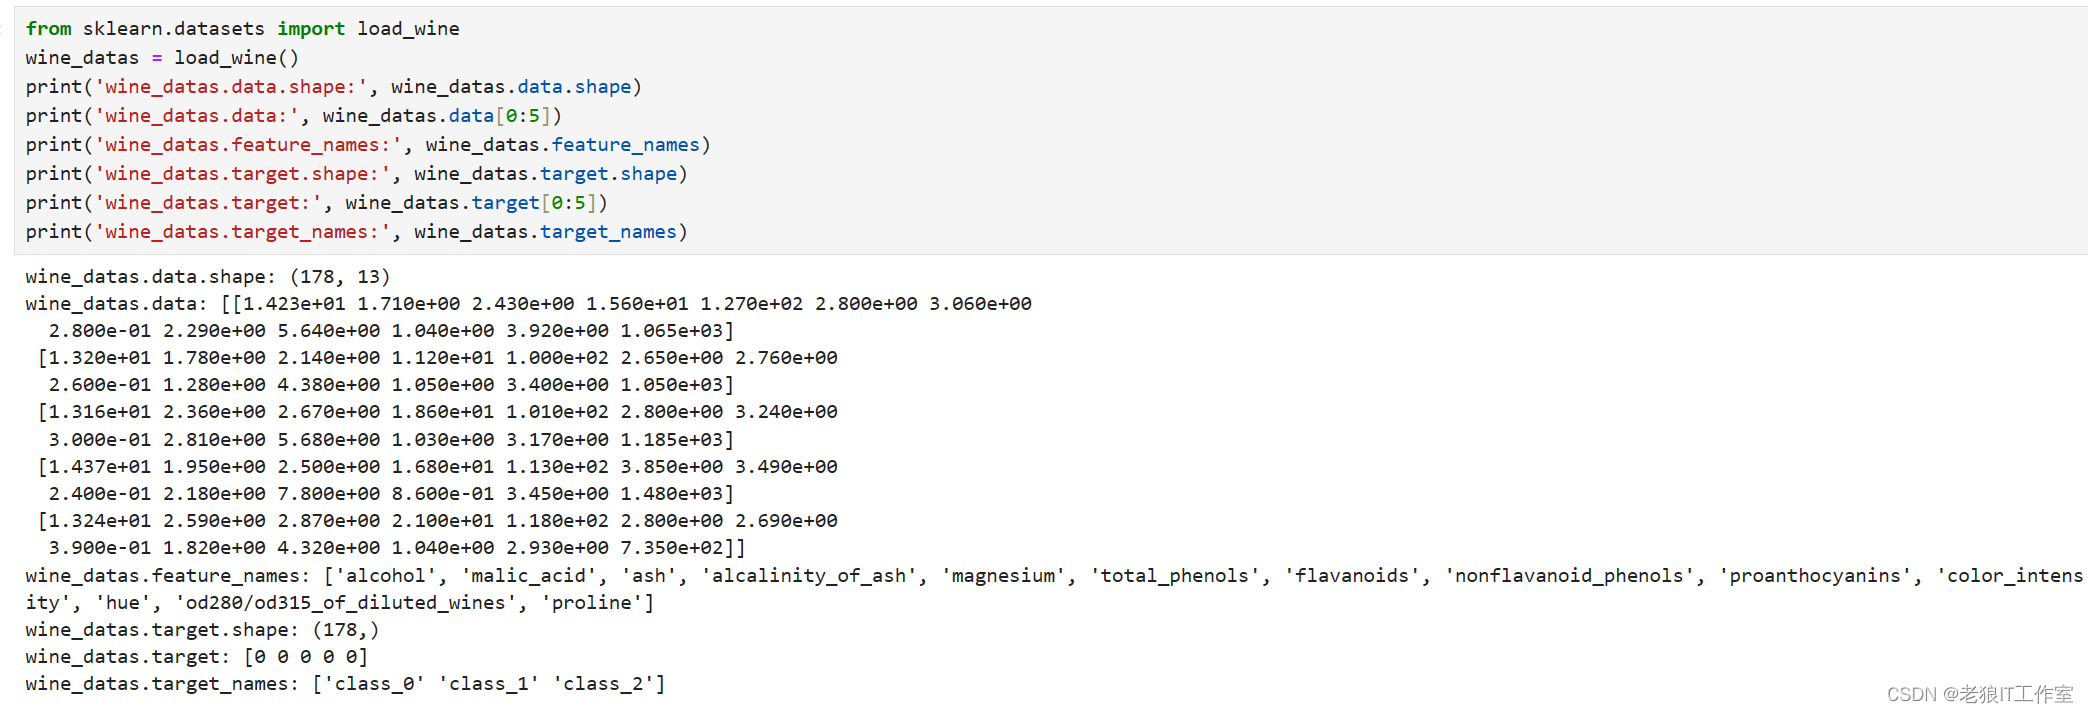
print('wine_datas.DESCR:', wine_datas.DESCR)wine_datas.DESCR: .. _wine_dataset:
Wine recognition dataset
------------------------
**Data Set Characteristics:**
:Number of Instances: 178
:Number of Attributes: 13 numeric, predictive attributes and the class
:Attribute Information:
- Alcohol(酒精)
- Malic acid(苹果酸)
- Ash(灰)
- Alcalinity of ash(灰的碱性)
- Magnesium(镁)
- Total phenols(总酚)
- Flavanoids(类黄酮)
- Nonflavanoid phenols(非黄烷类酚类)
- Proanthocyanins(花青素)
- Color intensity(颜色强度)
- Hue(色调)
- OD280/OD315 of diluted wines(OD280/OD315稀释葡萄酒)
- Proline(脯氨酸)
- class:
- class_0 (琴酒)
- class_1 (雪莉)
- class_2 (贝尔莫得)
:Summary Statistics:
============================= ==== ===== ======= =====
Min Max Mean SD
============================= ==== ===== ======= =====
Alcohol: 11.0 14.8 13.0 0.8
Malic Acid: 0.74 5.80 2.34 1.12
Ash: 1.36 3.23 2.36 0.27
Alcalinity of Ash: 10.6 30.0 19.5 3.3
Magnesium: 70.0 162.0 99.7 14.3
Total Phenols: 0.98 3.88 2.29 0.63
Flavanoids: 0.34 5.08 2.03 1.00
Nonflavanoid Phenols: 0.13 0.66 0.36 0.12
Proanthocyanins: 0.41 3.58 1.59 0.57
Colour Intensity: 1.3 13.0 5.1 2.3
Hue: 0.48 1.71 0.96 0.23
OD280/OD315 of diluted wines: 1.27 4.00 2.61 0.71
Proline: 278 1680 746 315
============================= ==== ===== ======= =====
:Missing Attribute Values: None
:Class Distribution: class_0 (59), class_1 (71), class_2 (48)
:Creator: R.A. Fisher
:Donor: Michael Marshall (MARSHALL%PLU@io.arc.nasa.gov)
:Date: July, 1988
This is a copy of UCI ML Wine recognition datasets.
https://archive.ics.uci.edu/ml/machine-learning-databases/wine/wine.data
The data is the results of a chemical analysis of wines grown in the same
region in Italy by three different cultivators. There are thirteen different
measurements taken for different constituents found in the three types of
wine.
Original Owners:
Forina, M. et al, PARVUS -
An Extendible Package for Data Exploration, Classification and Correlation.
Institute of Pharmaceutical and Food Analysis and Technologies,
Via Brigata Salerno, 16147 Genoa, Italy.
Citation:
Lichman, M. (2013). UCI Machine Learning Repository
[https://archive.ics.uci.edu/ml]. Irvine, CA: University of California,
School of Information and Computer Science.
|details-start|
**References**
|details-split|
(1) S. Aeberhard, D. Coomans and O. de Vel,
Comparison of Classifiers in High Dimensional Settings,
Tech. Rep. no. 92-02, (1992), Dept. of Computer Science and Dept. of
Mathematics and Statistics, James Cook University of North Queensland.
(Also submitted to Technometrics).
The data was used with many others for comparing various
classifiers. The classes are separable, though only RDA
has achieved 100% correct classification.
(RDA : 100%, QDA 99.4%, LDA 98.9%, 1NN 96.1% (z-transformed data))
(All results using the leave-one-out technique)
(2) S. Aeberhard, D. Coomans and O. de Vel,
"THE CLASSIFICATION PERFORMANCE OF RDA"
Tech. Rep. no. 92-01, (1992), Dept. of Computer Science and Dept. of
Mathematics and Statistics, James Cook University of North Queensland.
(Also submitted to Journal of Chemometrics).
|details-end|这是UCI ML Wine recognition数据集的CSV URL:
https://archive.ics.uci.edu/ml/machine-learning-databases/wine/wine.data
这些数据是对同一地区三种不同品种的葡萄酒进行化学分析的结果。对于三种葡萄酒中发现的不同成分,采取了十三种不同的测量方法。
# 读取UCI原始副本,原始副本中,第一列为类别,分别为1,2,3
import pandas as pd
csv_url = 'https://archive.ics.uci.edu/ml/machine-learning-databases/wine/wine.data'
names = ['Class', 'Alcohol', 'Malic acid', 'Ash', 'Alcalinity of ash', 'Magnesium', 'Total phenols', 'Flavanoids', 'Nonflavanoid phenols', 'Proanthocyanins', 'Color intensity', 'Hue',
         'OD280/OD315 of diluted wines', 'Proline']
wine_df = pd.read_csv(csv_url, names=names)
wine_df.head()
wine_df.info()
wine_df.describe()
决策树是什么? 有哪些应用场景?有哪些优缺点?
决策树是一种基于树状结构的机器学习模型,用于解决分类和回归问题。
决策树由根节点、内部节点和叶节点组成。根节点代表最重要的特征,内部节点表示某个特征的取值,叶节点表示一个类别或者数值。在决策树中,根据不同的特征值将数据集划分为不同的子集,直到每个子集的数据属于同一类别或达到预定的停止条件。
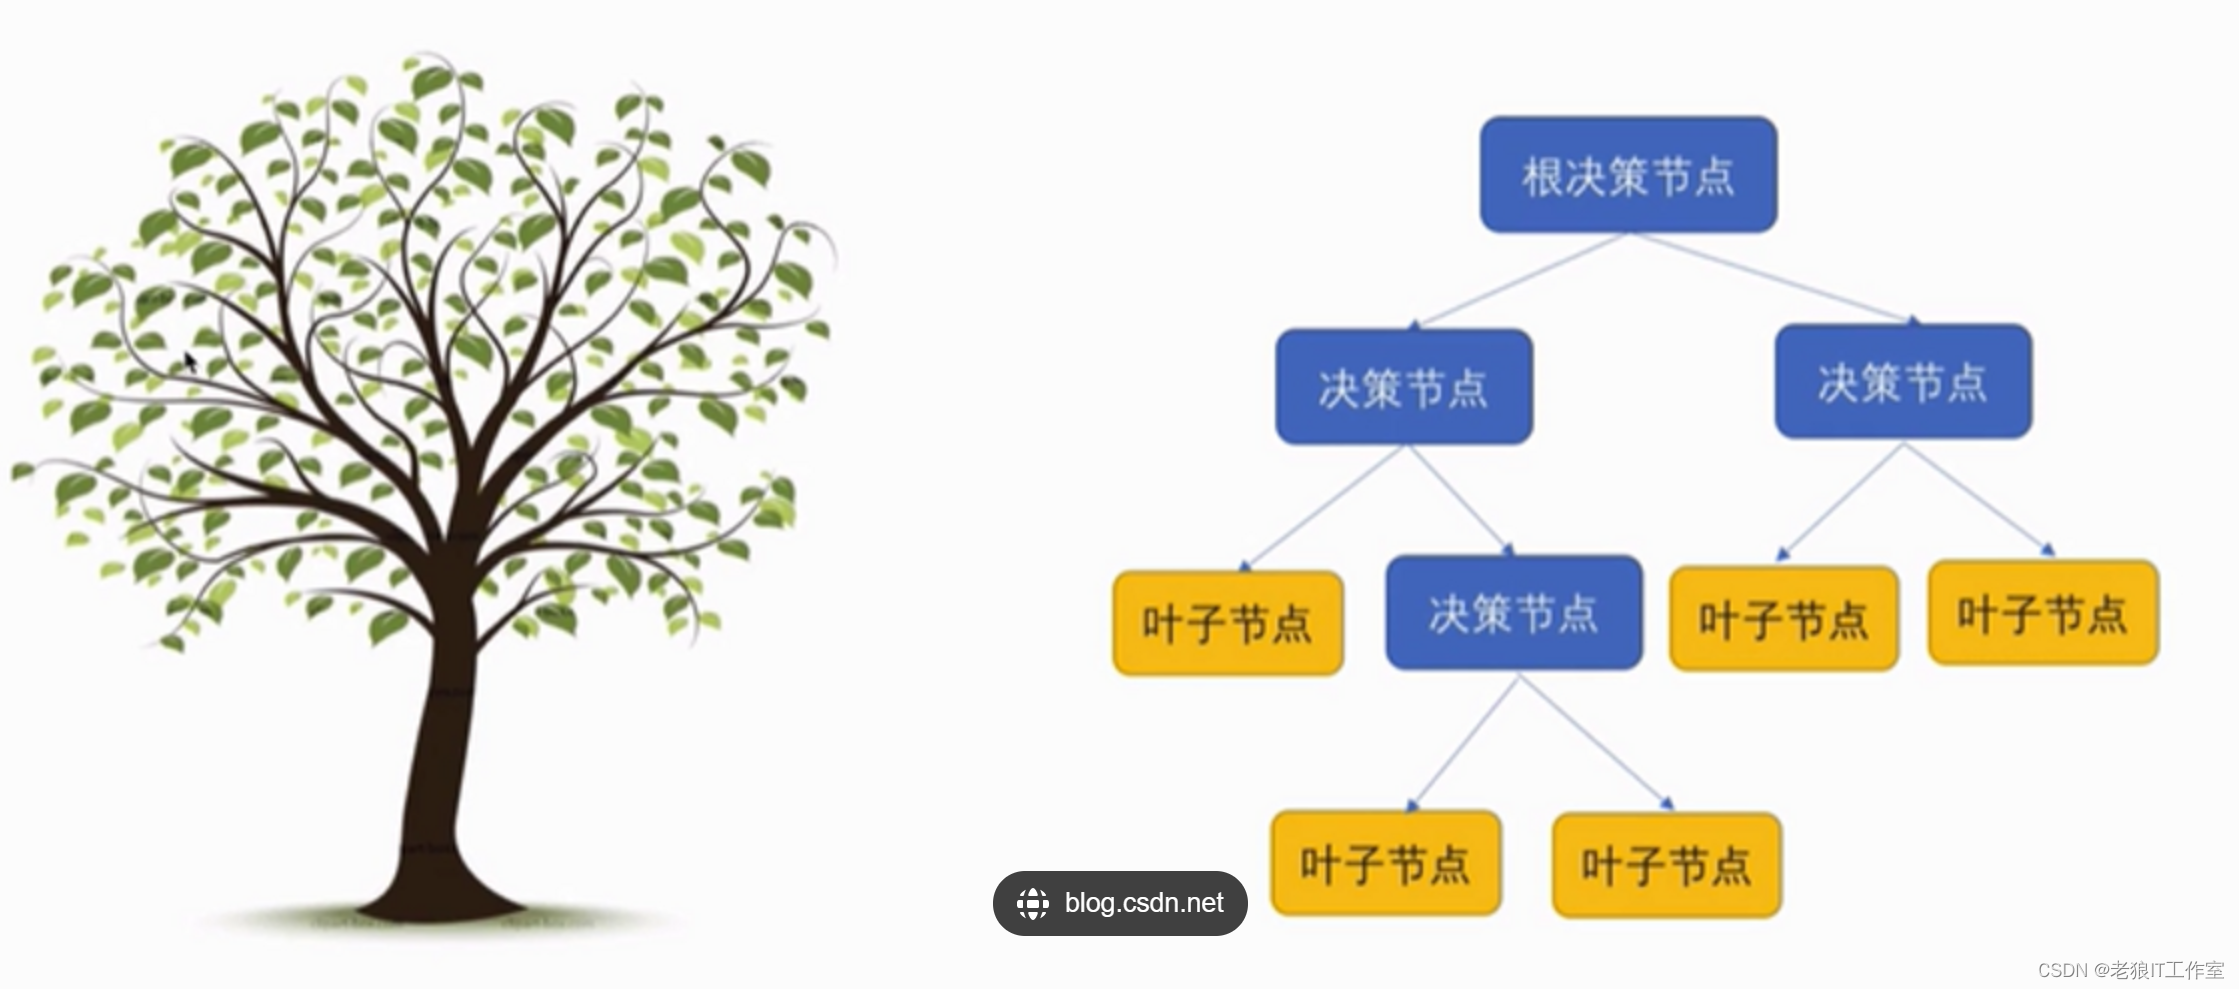

决策树的应用场景包括:
1. 分类问题:决策树可以用于对数据进行分类,如判断一封邮件是垃圾邮件还是非垃圾邮件。
2. 回归问题:决策树可以用于对数据进行回归分析,如根据房屋的特征预测房价。
3. 特征选择:决策树可以用于选择最重要的特征,帮助我们了解数据的特征重要性。
4. 异常检测:决策树可以用于检测异常数据,如判断信用卡交易是否存在欺诈行为。
5. 决策分析:决策树可以用于辅助决策制定,如制定营销策略时根据不同特征预测不同用户的购买概率。
决策树的优点包括:
-
直观易懂:决策树模型可视化,易于理解和解释。它们使用树状图来表示决策路径,使其对非专业人士也易于理解。
-
可处理多类型数据:决策树能处理包括离散型和连续型变量在内的多种类型的数据。
-
适用于大型数据集:决策树算法具有较高的计算效率,适用于处理大型数据集。
-
能够处理缺失值和异常值:决策树算法可以处理包含缺失值和异常值的数据集,并且对这些值具有较强的鲁棒性。
决策树的缺点包括:
-
容易过拟合:决策树模型容易过拟合训练数据,特别是在处理复杂问题时。
-
不稳定性:对于输入数据的小变化可能导致生成不同的决策树模型。
-
忽略关联特征:决策树算法通常只考虑单个特征的影响,而忽略了不同特征之间的相关性。
-
高度依赖于训练数据:决策树模型的性能很大程度上取决于训练数据的质量和数量。没有足够的训练数据可能导致模型的性能不佳。
-
非线性问题处理能力相对较弱:决策树算法不太适用于处理非线性问题,对于包含多个连续特征和复杂关系的问题可能效果较差。
scikit-learn中的决策树模块
1.10. Decision Trees — scikit-learn 1.4.0 documentation

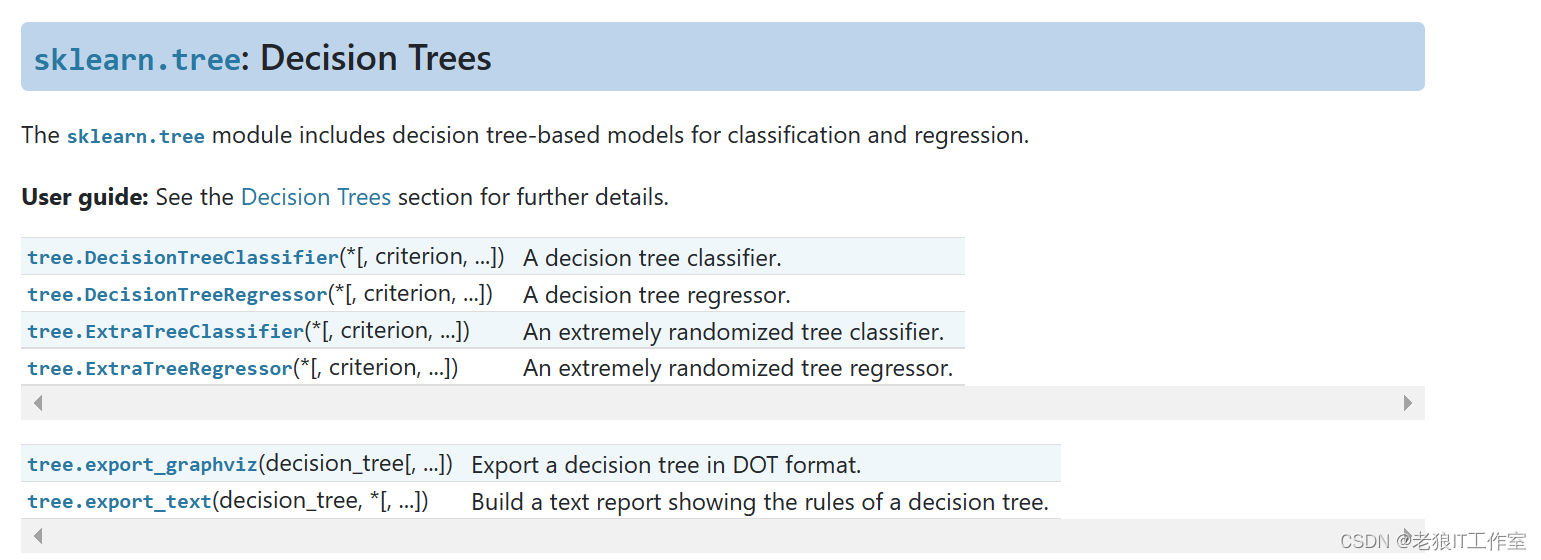
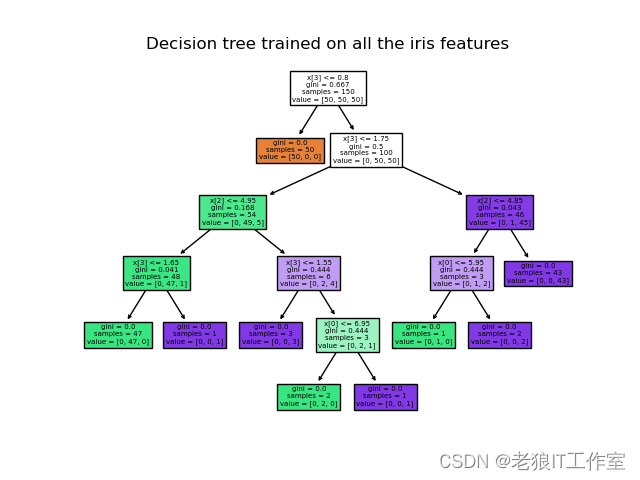
使用决策树进行分类任务:
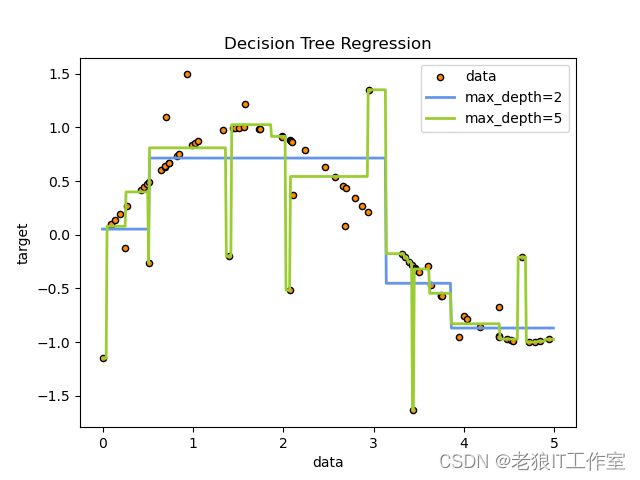
使用决策树进行回归任务:
使用决策树进行分类任务
安装JupyterLab
[Python] Jupyter Notebook(Jupyter Lab)介绍,安装,配置,启动及创建第一个notebook_python 启动jupyter lab-CSDN博客
安装依赖
pip install pandas scikit-learn graphviz matplotlibWindow下安装graphviz
[Python] 如何在Windows下安装graphviz-CSDN博客
sklearn.tree.DecisionTreeClassifier 类
1.10. Decision Trees — scikit-learn 1.4.0 documentation
sklearn.tree.DecisionTreeClassifier — scikit-learn 1.4.0 documentation
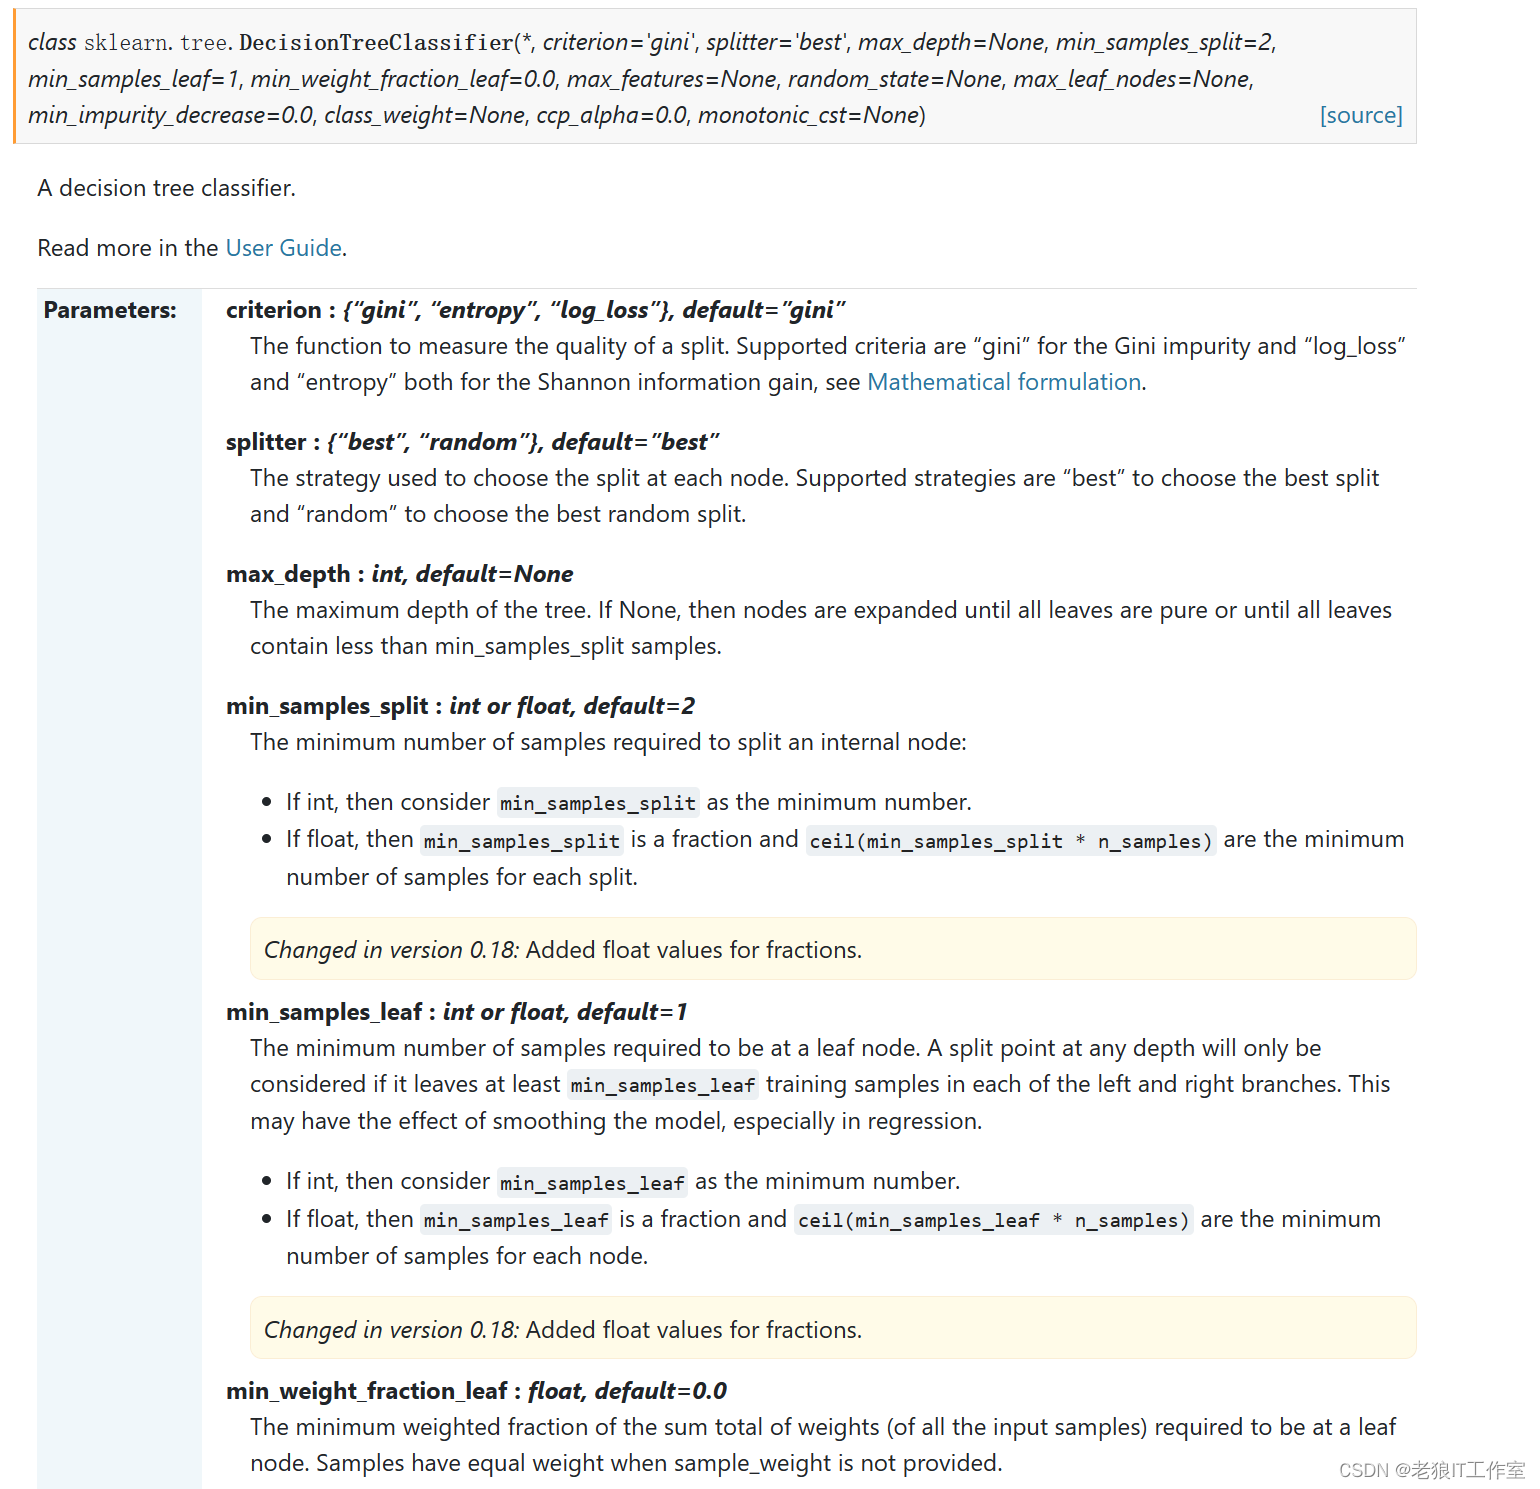
要使用决策树进行分类任务,我们可以使用 sklearn.tree.DecisionTreeClassifier 类。
sklearn.tree.DecisionTreeClassifier-scikit-learn中文社区
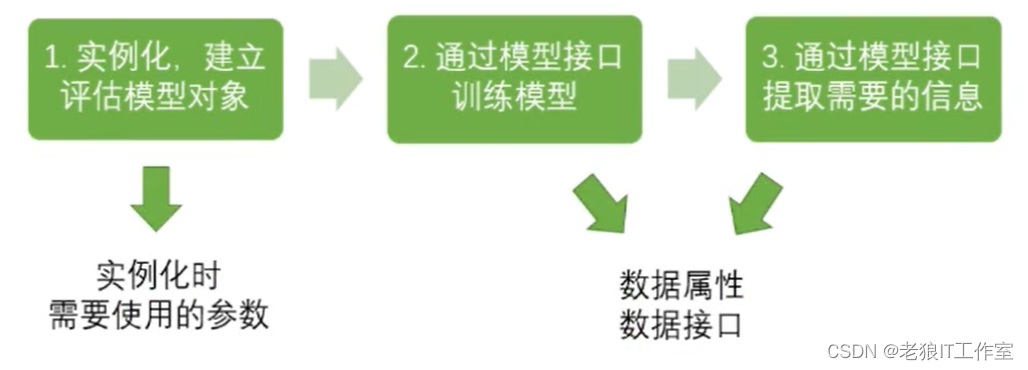
使用决策树建模基本流程
使用葡萄酒数据集进行训练(拟合)和验证
from sklearn.tree import DecisionTreeClassifier
from sklearn.model_selection import train_test_split
x_train, x_test, y_train, y_test = train_test_split(wine_datas.data, wine_datas.target, test_size=0.3, random_state=30)
print('x_train.shape:', x_train.shape)
print('x_test.shape:', x_test.shape)
print('y_train.shape:', y_train.shape)
print('y_test.shape:', y_test.shape)

clf = DecisionTreeClassifier()  # 实例化分类器
clf = classifier.fit(x_train, y_train)  # 通过模型接口fit使用训练集进行训练
fit_score = clf.score(x_test, y_test)  # 使用score方法输入测试集查看训练拟合度百分比
fit_score

Jupyter Notebook中输出决策树
sklearn.tree.export_graphviz — scikit-learn 1.4.0 documentation
我们可以通过sklearn.tree.export_graphviz函数导出graphviz图形,然后使用graphviz模块来进行输出:
import graphviz
import sklearn.tree as tree
feature_names = wine_datas.feature_names
target_names = wine_datas.target_names
tree_data = tree.export_graphviz(clf,
                                 feature_names = feature_names,
                                 class_names = target_names,
                                 filled=True,
                                 rounded=True)
print(tree_data)
graph = graphviz.Source(tree_data)
graph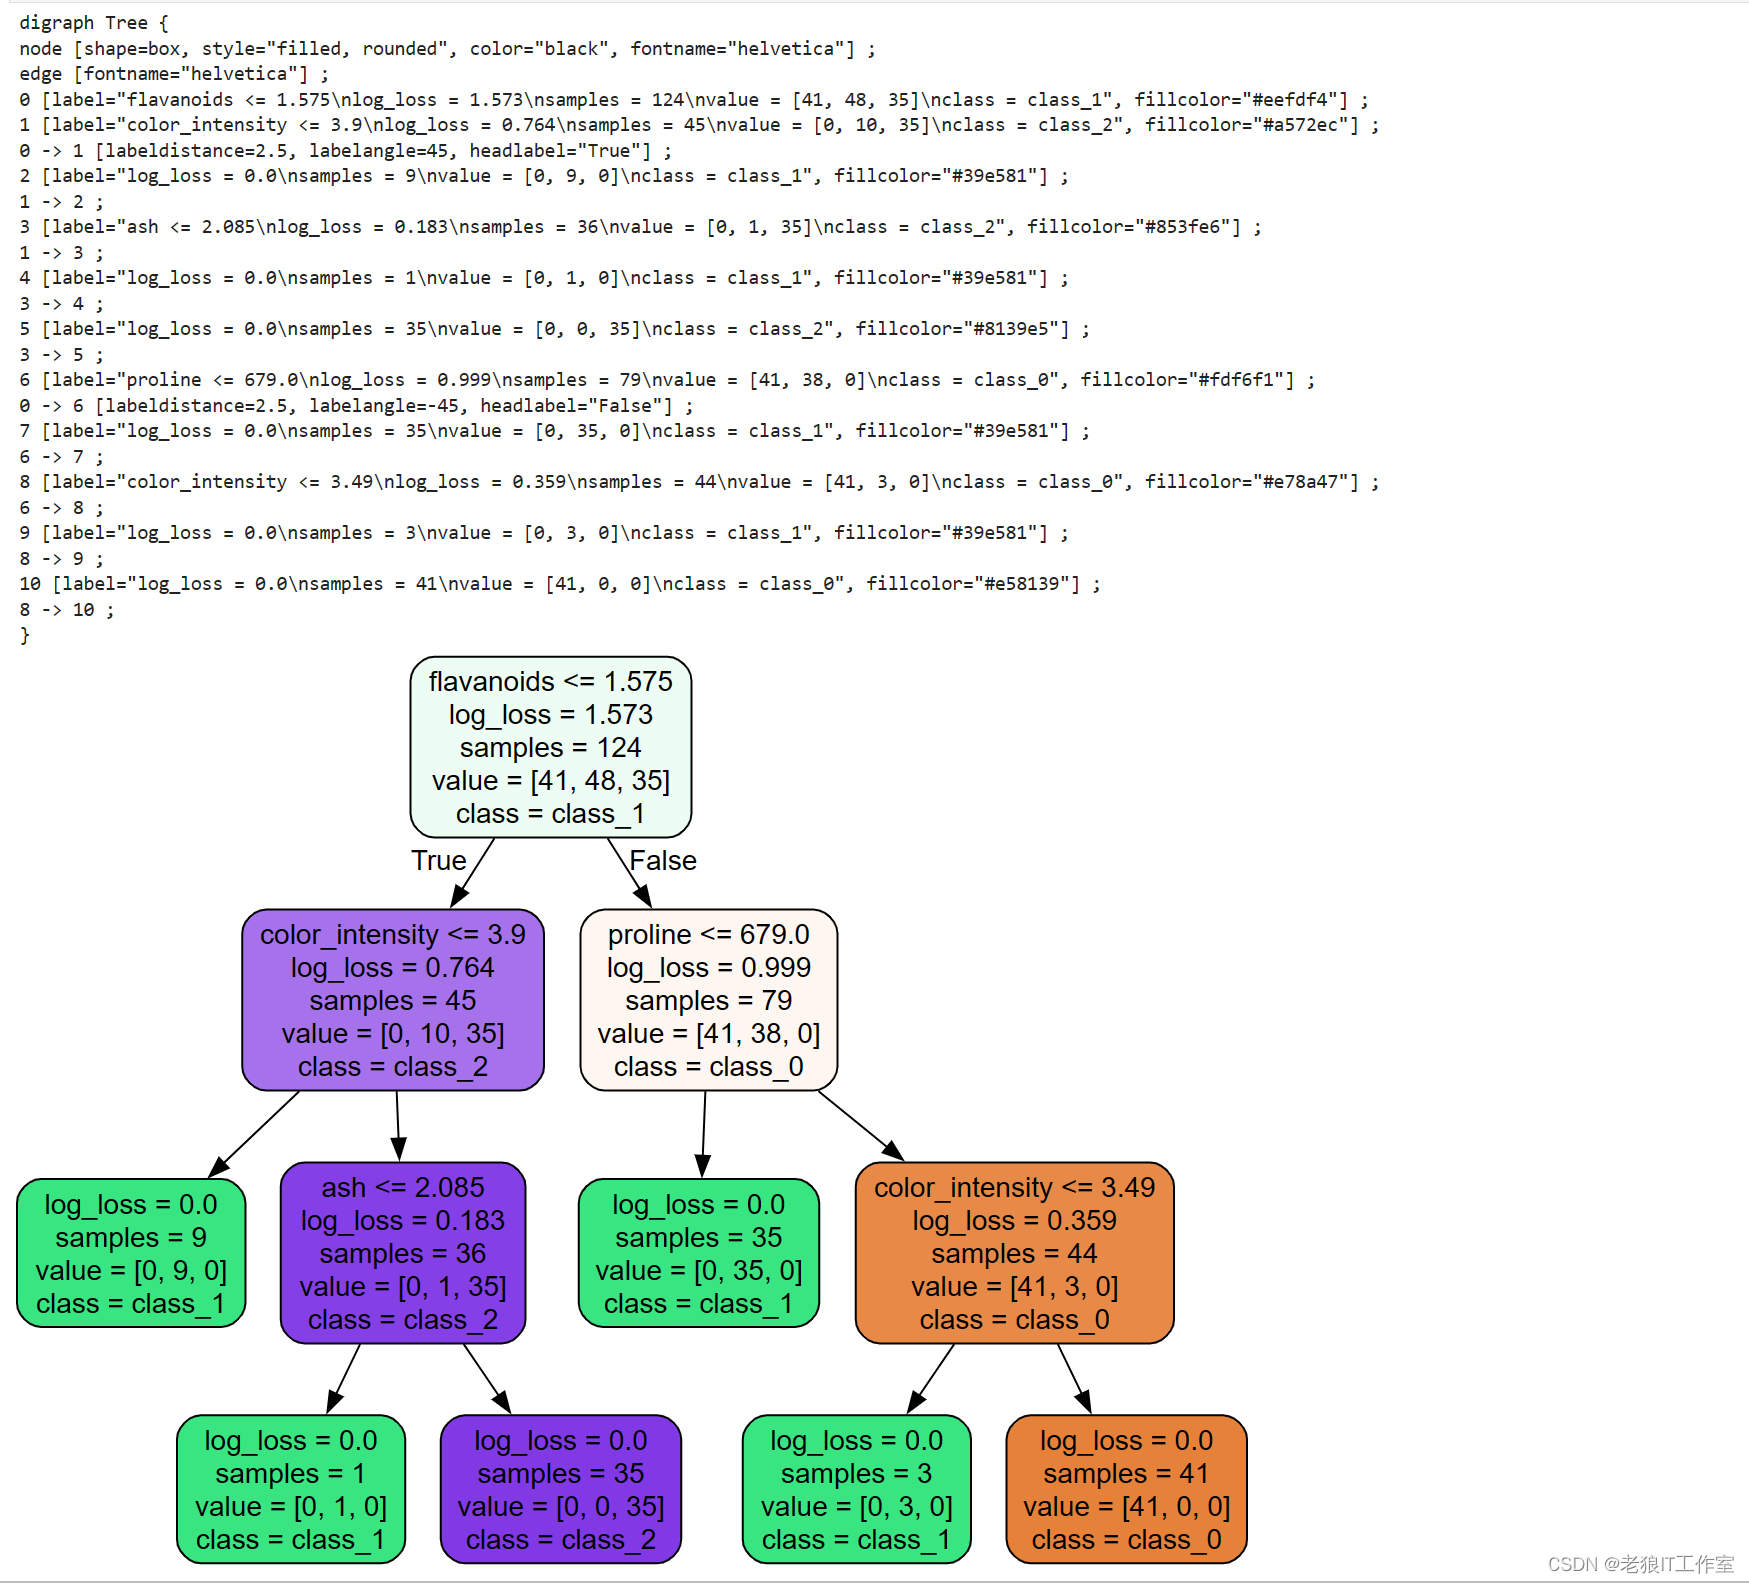
图解释:
1)图中的log_loss就是决策节点使用criterion=log_loss计算的不纯度值。叶子节点的不纯度一般都会为0,父节点的不存度一定大于子节点的不纯度值。
2)图一共有4层,上面的层的不纯度之和大于下面的层的不纯度之和。
3)samples为阶段对应的样本数,一共124个训练样本。子节点的samples之和等于父节点的samples。
4)value表示该节点中三个分类的每个分类对应的样本数。
5)class表示该节点对应的分类类别名称。
6)父节点的第一行表示使用了哪个特征列(比如flavanoids,color_intensity,ash),根据该特征列的什么值来进行分枝。叶子节点已经是最后分类的结果,因此不需要再做分枝,因此只有4行。
sklearn.tree.export_text — scikit-learn 1.4.0 documentation
你也可以使用sklearn.tree.export_text()函数导出文本树结构:
tree_text = tree.export_text(clf,  feature_names = feature_names,  class_names = target_names)
print(tree_text)
Jupyter Notebook输出模型的属性值
clf = DecisionTreeClassifier(criterion='log_loss', random_state=30)  # 实例化分类器
clf = clf.fit(x_train, y_train)  # 通过模型接口fit使用训练集进行训练
fit_score = clf.score(x_test, y_test)  # 使用score方法输入测试集查看训练拟合度百分比
print('score:', fit_score)
print('feature_importances_:', clf.feature_importances_)
to_feature_names = {feature_names[idx]:value for idx, value  in  enumerate( clf.feature_importances_)}
print('to_feature_names:', to_feature_names)
print('classes_:', clf.classes_)
print('n_classes_:', clf.n_classes_)
#print('feature_names_in_:', clf.feature_names_in_)
print('n_features_in_:', clf.n_features_in_)
print('max_features_:', clf.max_features_)
print('n_outputs_:', clf.n_outputs_)
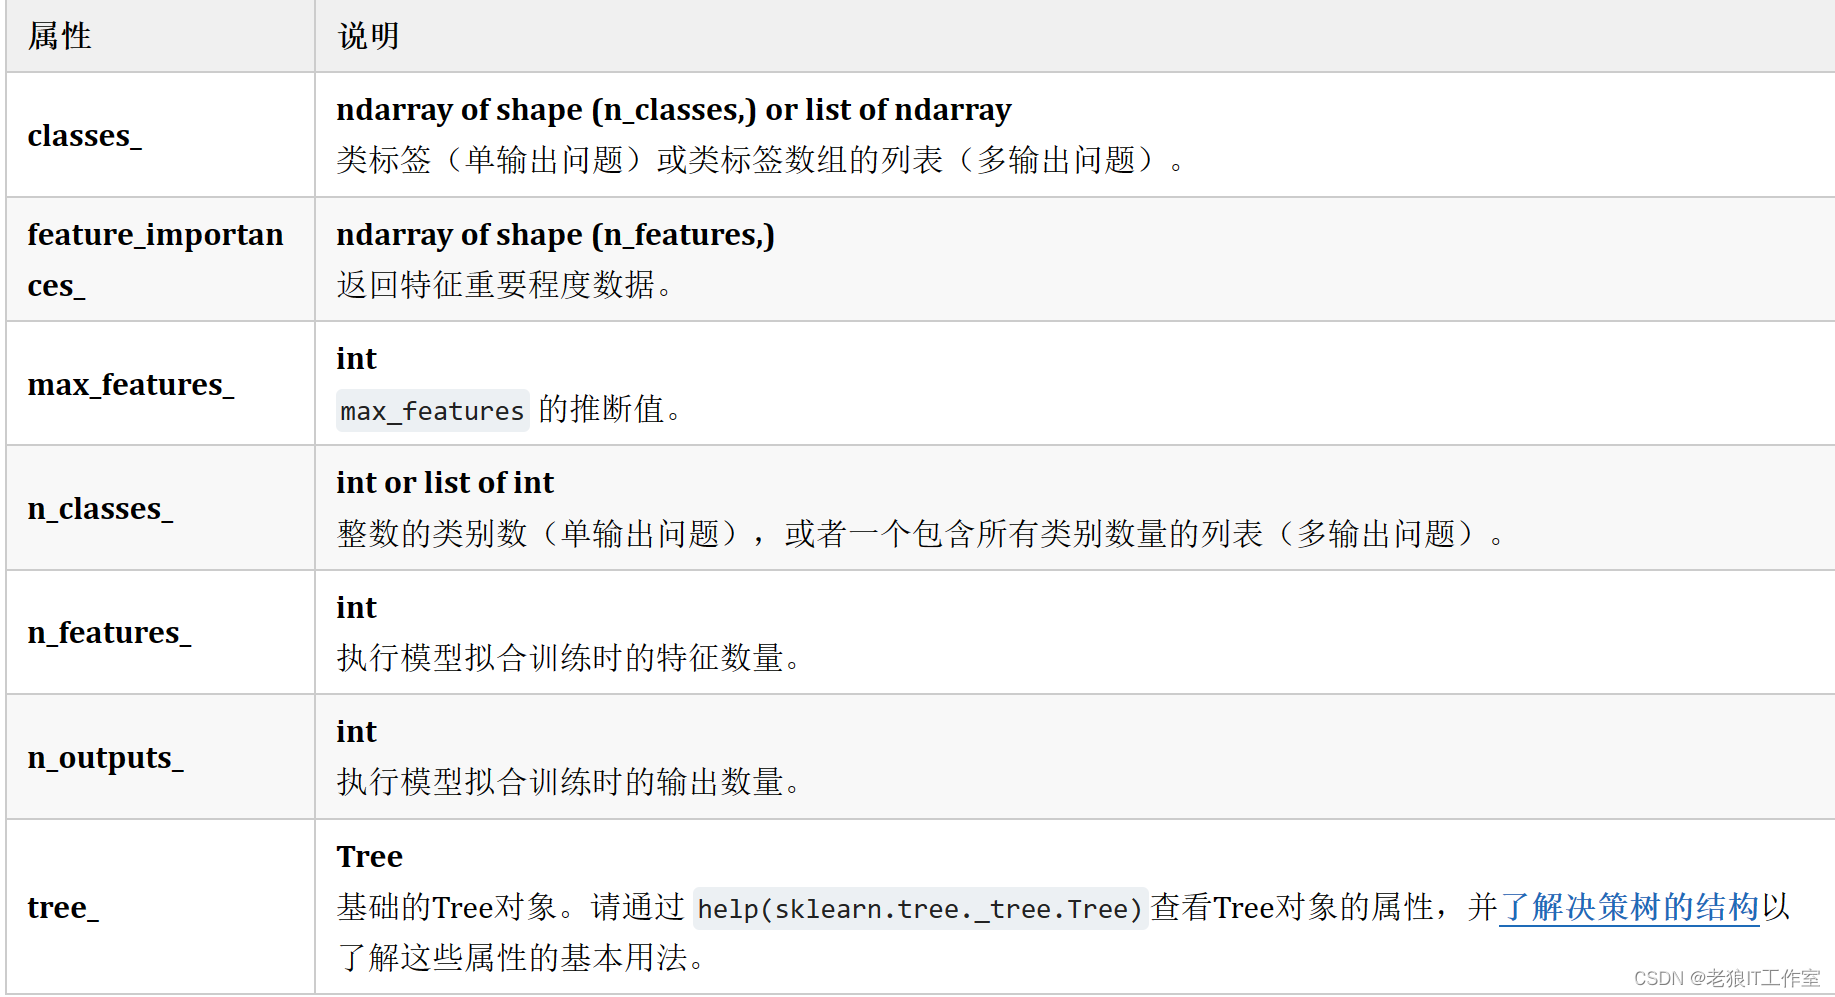
print('tree_:', clf.tree_)
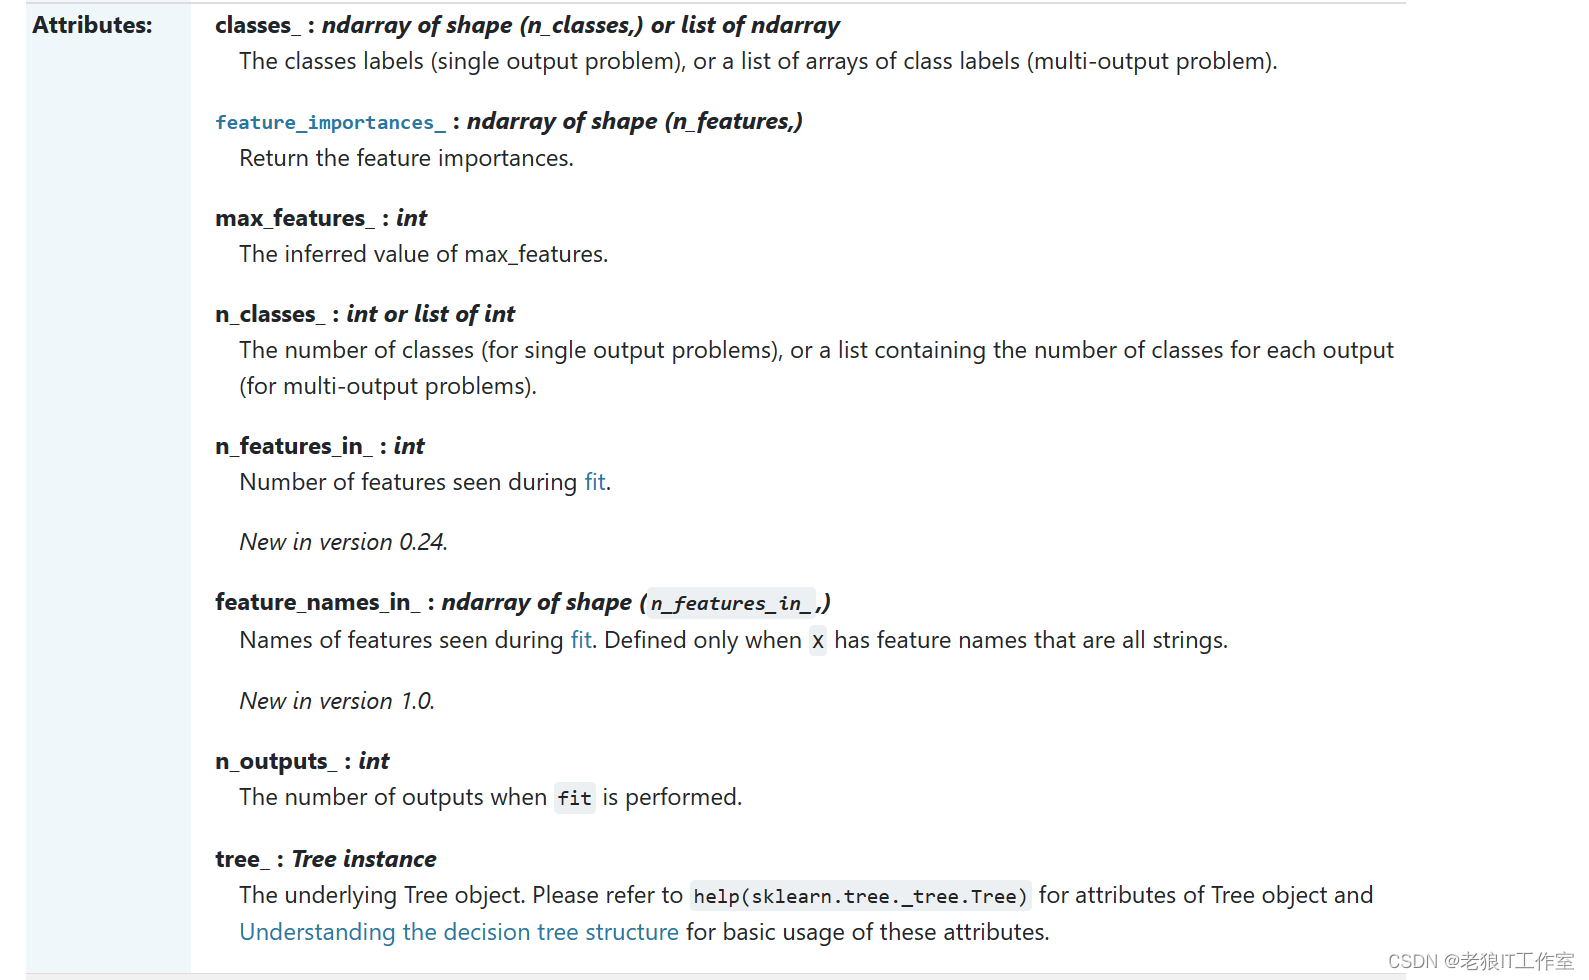
其中,最为重要的是“feature_importances_”属性值,它表示哪些特征列对决策树贡献最大。
参数使用说明
criterion

用于决策树的评估准则。可以选择"gini"或"entropy"或"log_loss"。默认值为"gini"。如果选择"gini",则使用基尼不纯度作为评估准则;如果选择"entropy"或"log_loss",则使用信息熵作为评估准则。
为了要将表格转化为一棵树,决策树需要找出最佳节点和最佳的分枝方法,对分类树来说,衡量这个“最佳"的指标叫做'不纯度''。通常来说,不纯度越低,决策树对训练集的拟合越好。现在使用的决策树算法在分枝方法上的核心大多是围绕在对某个不纯度相关指标的最优化上。
不纯度基于节点来计算,树中的每个节点都会有一个不纯度,并且子节点的不纯度一定是低于父节点的,也就是说,在同一棵决策树上,叶子节点的不纯度一定是最低的。
决策树基本流程:

criterion这个参数正是用来决定不纯度的计算方法的。sklearn提供了三种选择:
1 - "gini" 使用基尼不纯度(Gini Impurity);
2 - "entropy" - 使用信息熵(Entropy)增益;
3 - "log_loss" - 使用信息熵增益(Information Gain) = 父节点的信息熵 - 子节点的信息熵;
1.10. Decision Trees — scikit-learn 1.4.0 documentation
在机器学习中,不纯度(impurity)是衡量数据集中样本混合程度的度量指标。不纯度越高,表示样本混合程度越大。在决策树等算法中,不纯度通常用来选择最优的分割点。
常见的不纯度度量指标包括:
熵(Entropy):衡量样本的混合程度,熵越高表示混合程度越大。熵的计算公式为: Entropy(D) = - Σ(p_i * log2(p_i)) 其中,p_i 表示数据集 D 中第 i 类样本的占比。
基尼指数(Gini Index):衡量样本被错误分类的概率,基尼指数越高表示样本混合程度越大。基尼指数的计算公式为: Gini(D) = 1 - Σ(p_i^2) 其中,p_i 表示数据集 D 中第 i 类样本的占比。
分类误差(Classification Error):衡量样本被错误分类的概率,分类误差越高表示样本混合程度越大。分类误差的计算公式为: Error(D) = 1 - max(p_i) 其中,p_i 表示数据集 D 中第 i 类样本的占比。
这些不纯度度量指标都可以用来选择最优的分割点,以达到样本分离的最佳效果。
比起基尼系数,信息熵对不纯度更加敏感,对不纯度的惩罚最强。但是在实际使用中,信息熵和基尼系数的效果基 本相同。信息熵的计算比基尼系数缓慢一些因为基尼系数的计算不涉及对数。另外,因为信息熵对不纯度更加敏感,所以信息熵作为指标时,决策树的生长会更加''精细“,因此对于高维数据或者噪音很多的数据,信息熵很容易过拟合,基尼系数在这种情况下效果往往比较好。当然,这不是绝对的。
我们不要死背数学公式,都试试,那个拟合效果好,运行速度快就用那个:

random_state

用于指定随机数种子。默认值为None。在高维度特征值时随机性会表现更明显,低维度特征值的数据(比如鸢尾花数据集),随机性几乎不会显现,输入任意整数,会一直长出同一棵树,让模型稳定下来。
该参数主要控制分枝时使用的随机数,如何设置了,可以确保每次训练都使用相同的随机数,这样可以重复执行fit, score等方法产生同样的效果。
clf = DecisionTreeClassifier(criterion='entropy', random_state=30)  # 实例化分类器
clf = clf.fit(x_train, y_train)  # 通过模型接口fit使用训练集进行训练
fit_score = clf.score(x_test, y_test)  # 使用score方法输入测试集查看训练拟合度百分比
fit_score
这里的 fit_score 会保持不变,如果没有设置random_state,你会发现运行上述的代码,fit的训练过程都会有些微小的变化,因此fit_score都会有些变化。
splitter

用于指定选择特征的策略。可以选择"best"或"random"。默认值为"best"。
如果选择"best",则选择最优的特征进行分割;决策树在分枝时虽然随机,但是还是会优先选择更重要的特征进行分枝(重要性可以通过属性feature_importance_查看)。
如果选择"random",则随机选择一个特征进行分割。决策树在分枝时会更加随机,树会更深,对训练集的拟合将会降低。这也是防止过拟合的一种方式。当你预测到你的模型会过拟合,用这两个参数来帮助你降低拟合的可能性。
一般不需要设置,保持默认值"best"即可。
clf = DecisionTreeClassifier(criterion='log_loss', random_state=30, splitter='best')  # 实例化分类器
clf = clf.fit(x_train, y_train)  # 通过模型接口fit使用训练集进行训练
fit_score = clf.score(x_test, y_test)  # 使用score方法输入测试集查看训练拟合度百分比
print(fit_score)
tree_data = tree.export_graphviz(clf,
                                 feature_names = feature_names,
                                 class_names = target_names,
                                 filled=True,
                                 rounded=True)
graph = graphviz.Source(tree_data)
graph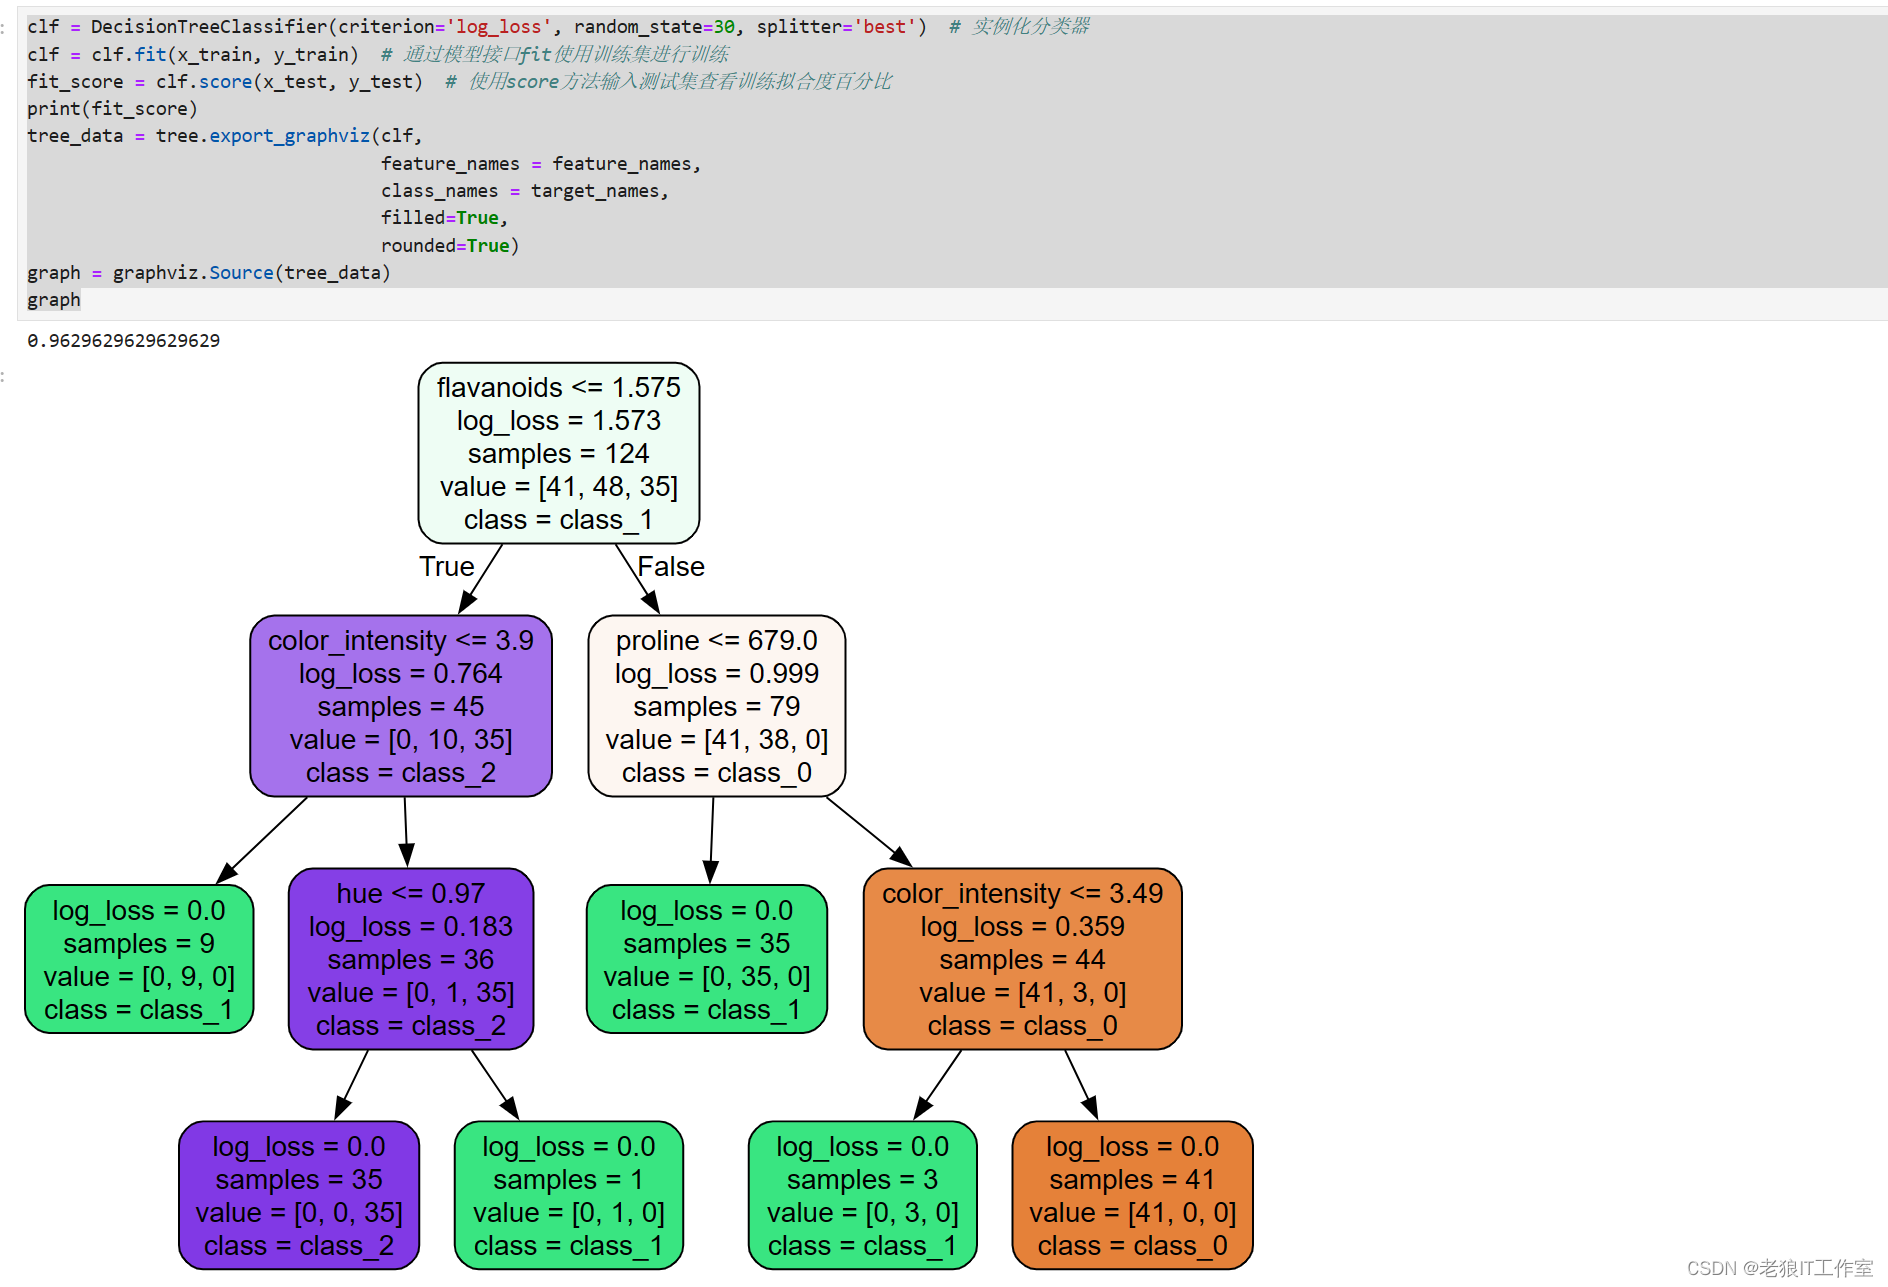
clf = DecisionTreeClassifier(criterion='log_loss', random_state=30, splitter='random')  # 实例化分类器
clf = clf.fit(x_train, y_train)  # 通过模型接口fit使用训练集进行训练
fit_score = clf.score(x_test, y_test)  # 使用score方法输入测试集查看训练拟合度百分比
print(fit_score)
tree_data = tree.export_graphviz(clf,
                                 feature_names = feature_names,
                                 class_names = target_names,
                                 filled=True,
                                 rounded=True)
graph = graphviz.Source(tree_data)
graph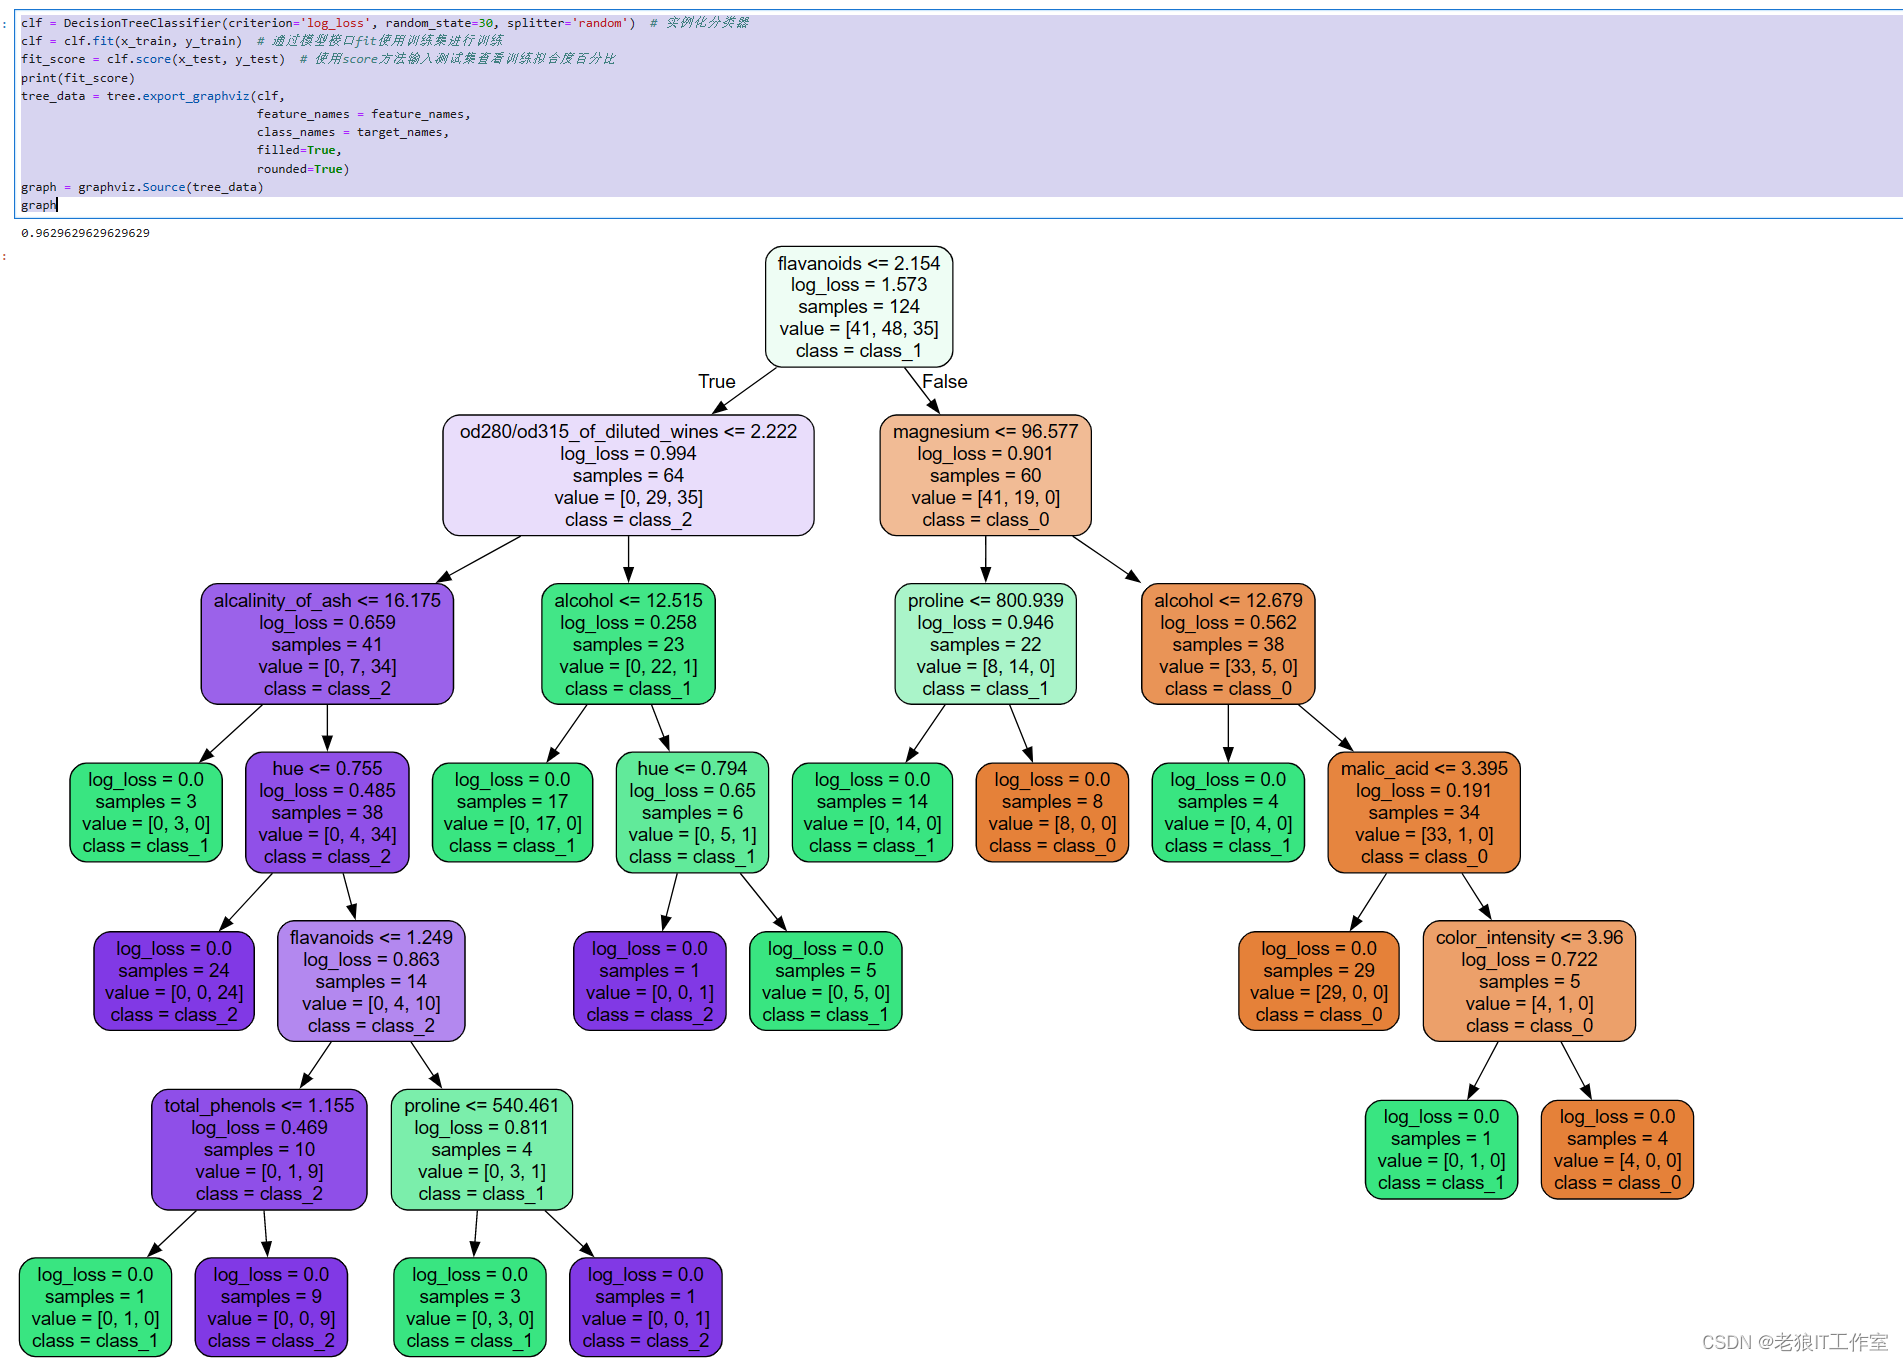
当splitter='random'时,获取同样的准确度值(0.9629..),但是层次更深,训练时间会更长。
为了让决策树有更好的泛化性,我们要对决策树进行剪枝。剪枝策略对决策树的影响巨大,正确的剪枝策略是优化决策树算法的核心。
剪枝策略参数 - max_depth

用于指定决策树的最大深度。默认值为None,表示决策树可以无限深度。如果设置一个正整数,表示决策树的最大深度不能超过该值,超过设定深度的树枝全部剪掉。
在高维度低样本量时非常有效,决策树多生长一层,对样本量的需求会增加一倍,所以限制树深度能够有效地限制过拟合。实际使用时,建议从3开始尝试,看看拟合的效果来决定是否增加该值。
clf = DecisionTreeClassifier(criterion='log_loss', random_state=30, max_depth=2)  # 实例化分类器
clf = clf.fit(x_train, y_train)  # 通过模型接口fit使用训练集进行训练
fit_score = clf.score(x_test, y_test)  # 使用score方法输入测试集查看训练拟合度百分比
print(fit_score)
tree_data = tree.export_graphviz(clf,
                                 feature_names = feature_names,
                                 class_names = target_names,
                                 filled=True,
                                 rounded=True)
graph = graphviz.Source(tree_data)
graph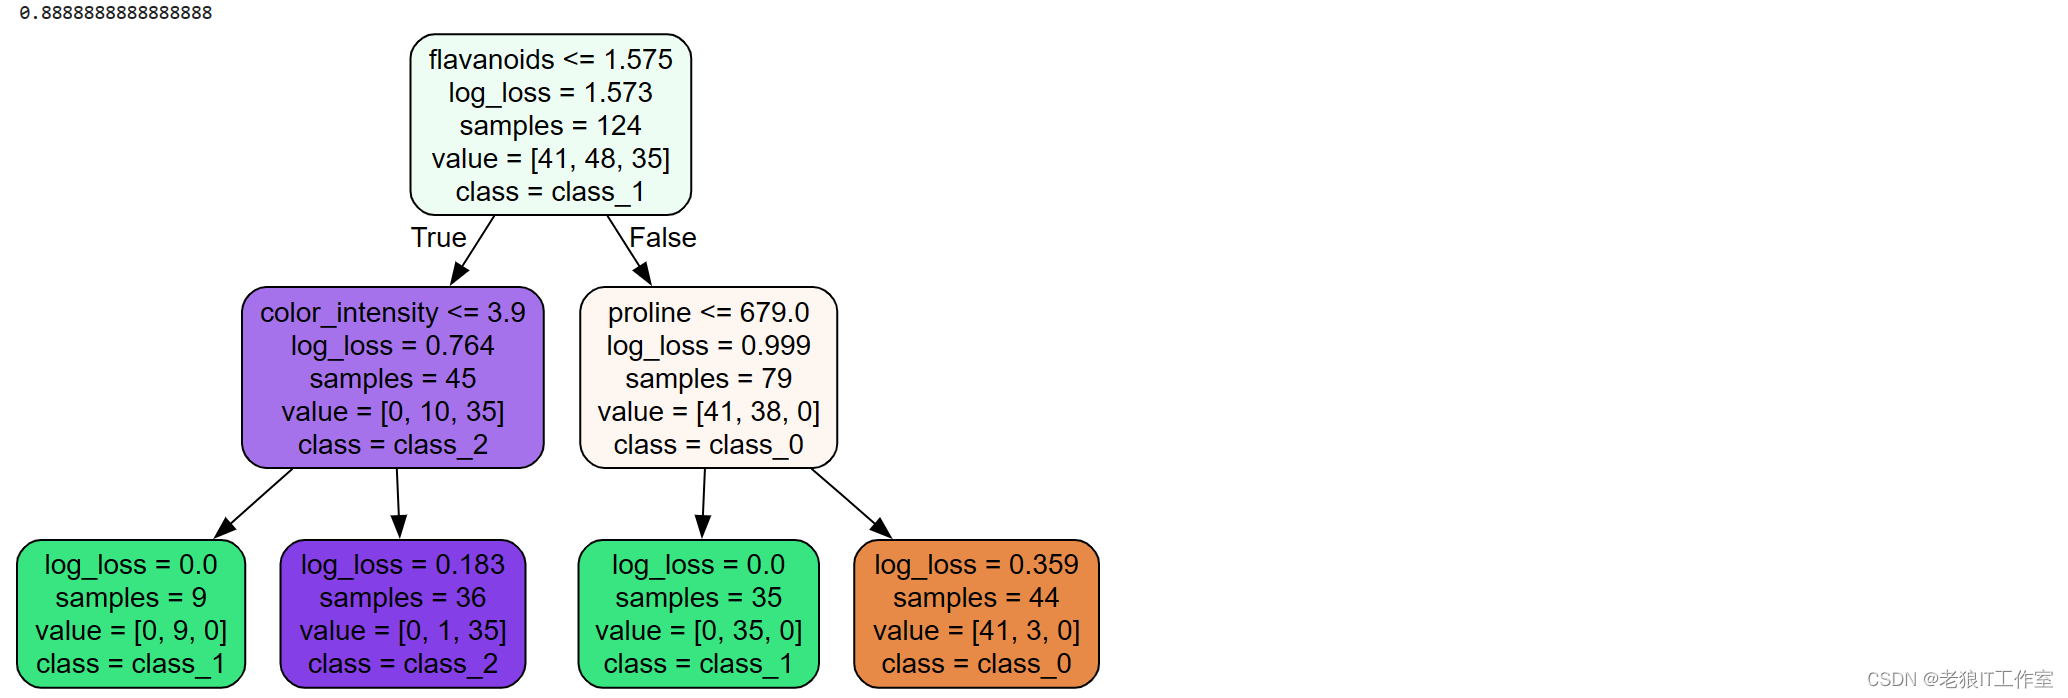
clf = DecisionTreeClassifier(criterion='log_loss', random_state=30, max_depth=3)  # 实例化分类器
clf = clf.fit(x_train, y_train)  # 通过模型接口fit使用训练集进行训练
fit_score = clf.score(x_test, y_test)  # 使用score方法输入测试集查看训练拟合度百分比
print(fit_score)
tree_data = tree.export_graphviz(clf,
                                 feature_names = feature_names,
                                 class_names = target_names,
                                 filled=True,
                                 rounded=True)
graph = graphviz.Source(tree_data)
graph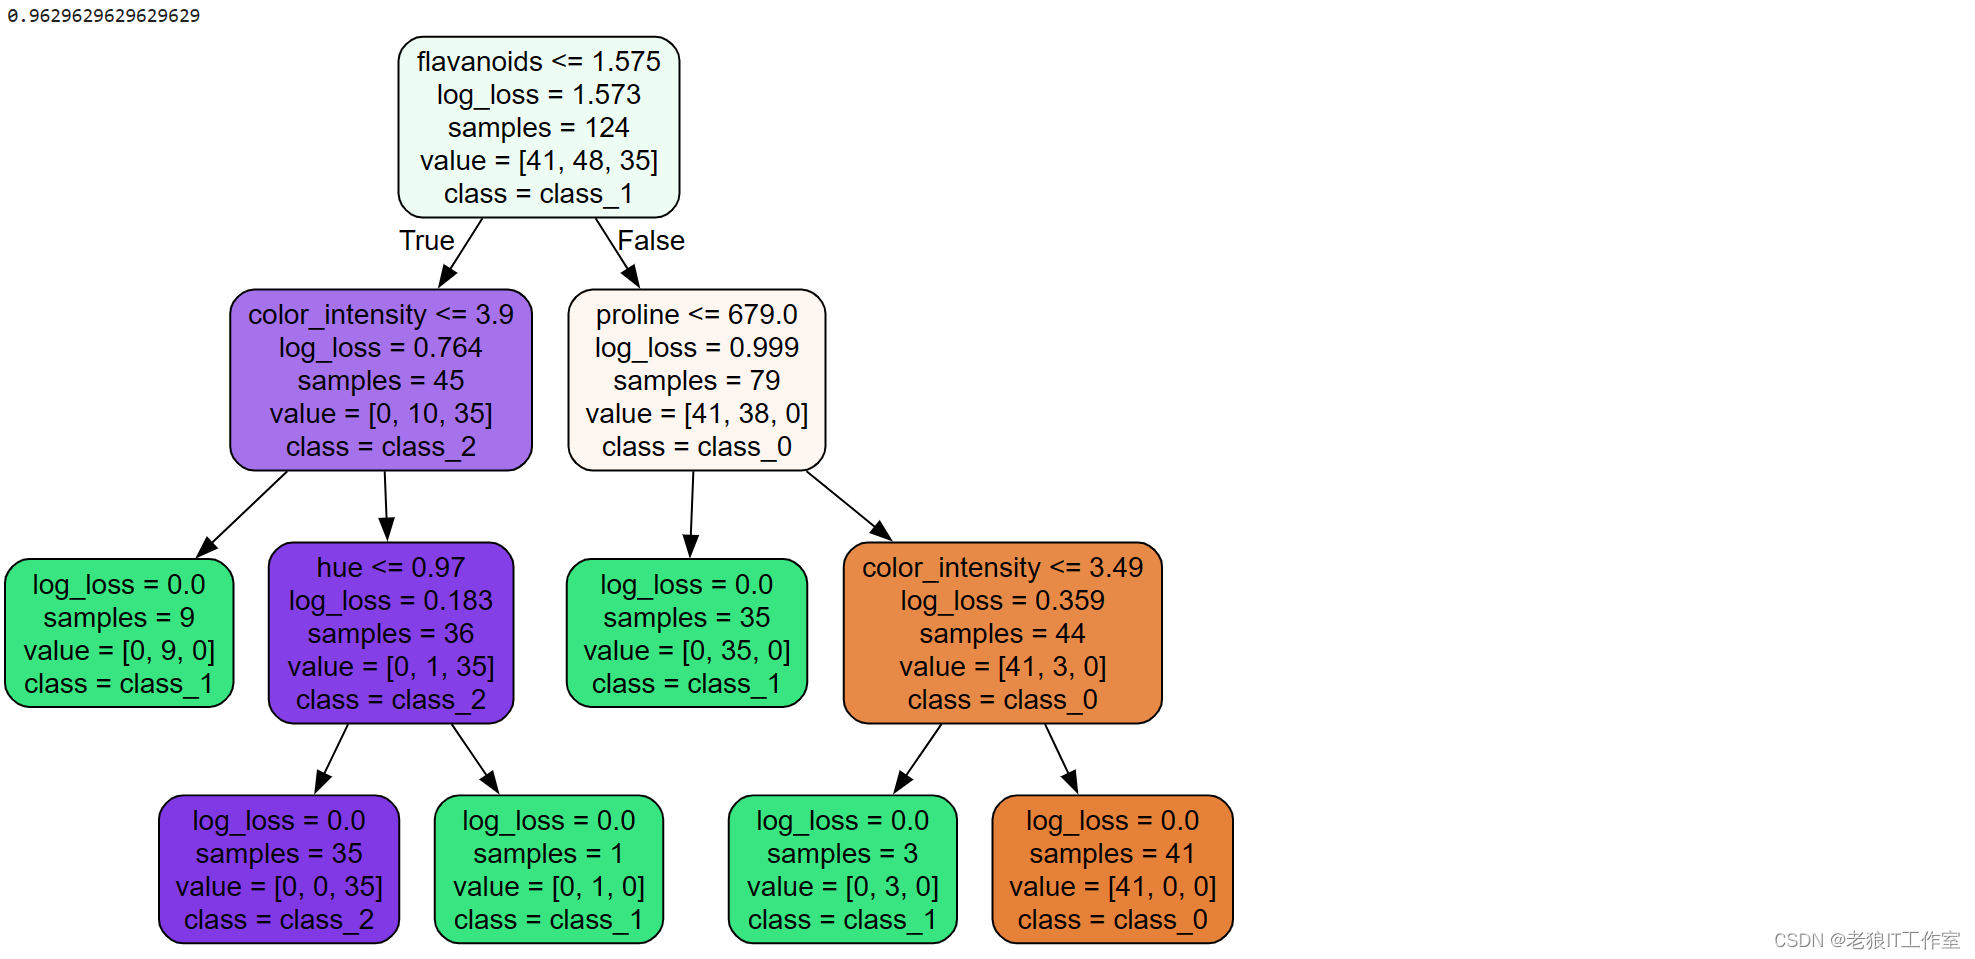
剪枝策略参数 - min_samples_split

用于指定每个分割节点上最少样本数。可以是一个整数,表示最少样本数;也可以是一个浮点数,表示最少样本数的百分比。默认值为2。
一个节点必须要包含至少min_samples_split个训练样本,这个节点才允许被分枝,否则分枝就不会发生。
clf = DecisionTreeClassifier(criterion='log_loss', random_state=30, min_samples_split=10)  # 实例化分类器
clf = clf.fit(x_train, y_train)  # 通过模型接口fit使用训练集进行训练
fit_score = clf.score(x_test, y_test)  # 使用score方法输入测试集查看训练拟合度百分比
print(fit_score)
tree_data = tree.export_graphviz(clf,
                                 feature_names = feature_names,
                                 class_names = target_names,
                                 filled=True,
                                 rounded=True)
graph = graphviz.Source(tree_data)
graph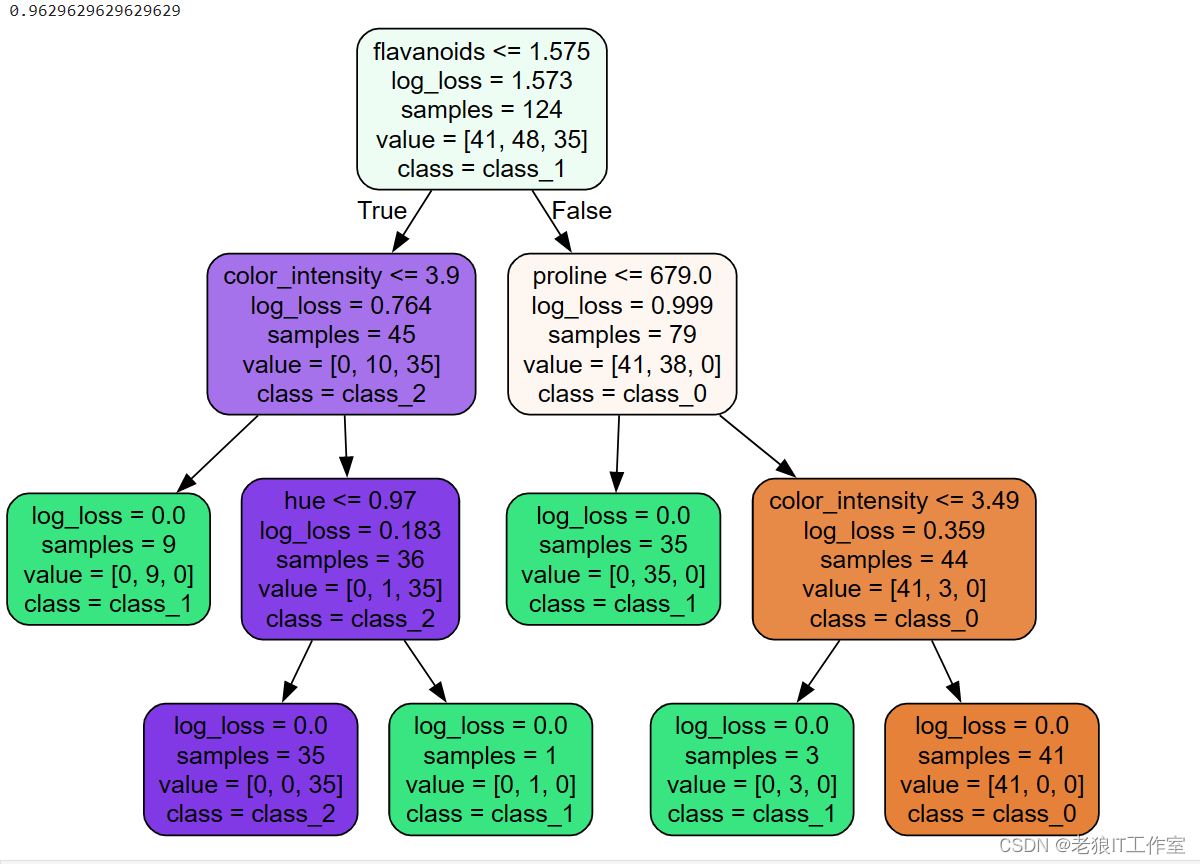
clf = DecisionTreeClassifier(criterion='log_loss', random_state=30, min_samples_split=50)  # 实例化分类器
clf = clf.fit(x_train, y_train)  # 通过模型接口fit使用训练集进行训练
fit_score = clf.score(x_test, y_test)  # 使用score方法输入测试集查看训练拟合度百分比
print(fit_score)
tree_data = tree.export_graphviz(clf,
                                 feature_names = feature_names,
                                 class_names = target_names,
                                 filled=True,
                                 rounded=True)
graph = graphviz.Source(tree_data)
graph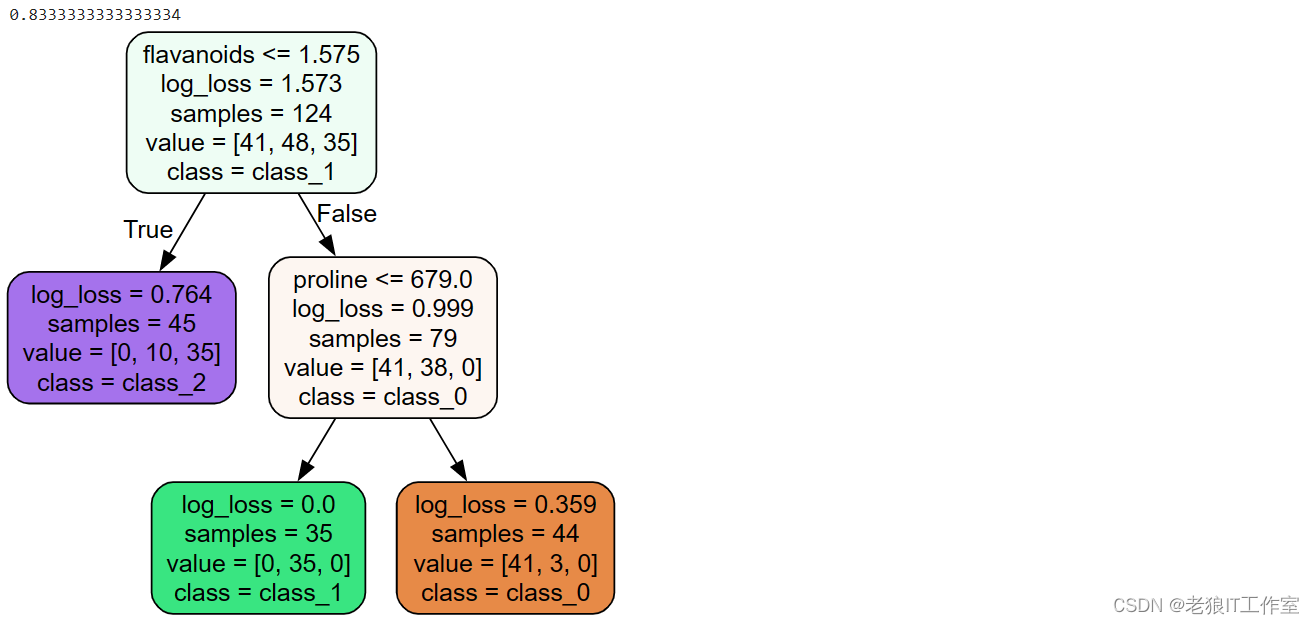
剪枝策略参数 - min_samples_leaf

用于指定每个叶子节点上最少样本数。可以是一个整数,表示最少样本数;也可以是一个浮点数,表示最少样本数的百分比。默认值为1。
min_samples_leaf限定一个节点在分枝后的每个子节点都必须包含至少min_samp|es_leaf个训练样本,否则分枝就不会发生,或者,分枝会朝着满足每个子节点都包含min_sampies_leaf个样本的方向去发生。
一般搭配max_depth使用,在回归树中有神奇的效果,可以让模型变得更加平滑。这个参数的数量设置得太小会引起过拟合,设置得太大就会阻止模型学习数据。一般来说建议从5开始使用。如果叶节点中含有的样本量变化很大,建议输入浮点数作为样本量的百分比来使用。同时,这个参数可以保证每个叶子的最小尺寸,可以在回归问题中避免低方差,过以合的叶子节点出现。对于类别不多的分类问题,设置为1通常就是最佳选择。
clf = DecisionTreeClassifier(criterion='log_loss', random_state=30, min_samples_leaf=2)  # 实例化分类器
clf = clf.fit(x_train, y_train)  # 通过模型接口fit使用训练集进行训练
fit_score = clf.score(x_test, y_test)  # 使用score方法输入测试集查看训练拟合度百分比
print(fit_score)
tree_data = tree.export_graphviz(clf,
                                 feature_names = feature_names,
                                 class_names = target_names,
                                 filled=True,
                                 rounded=True)
graph = graphviz.Source(tree_data)
graph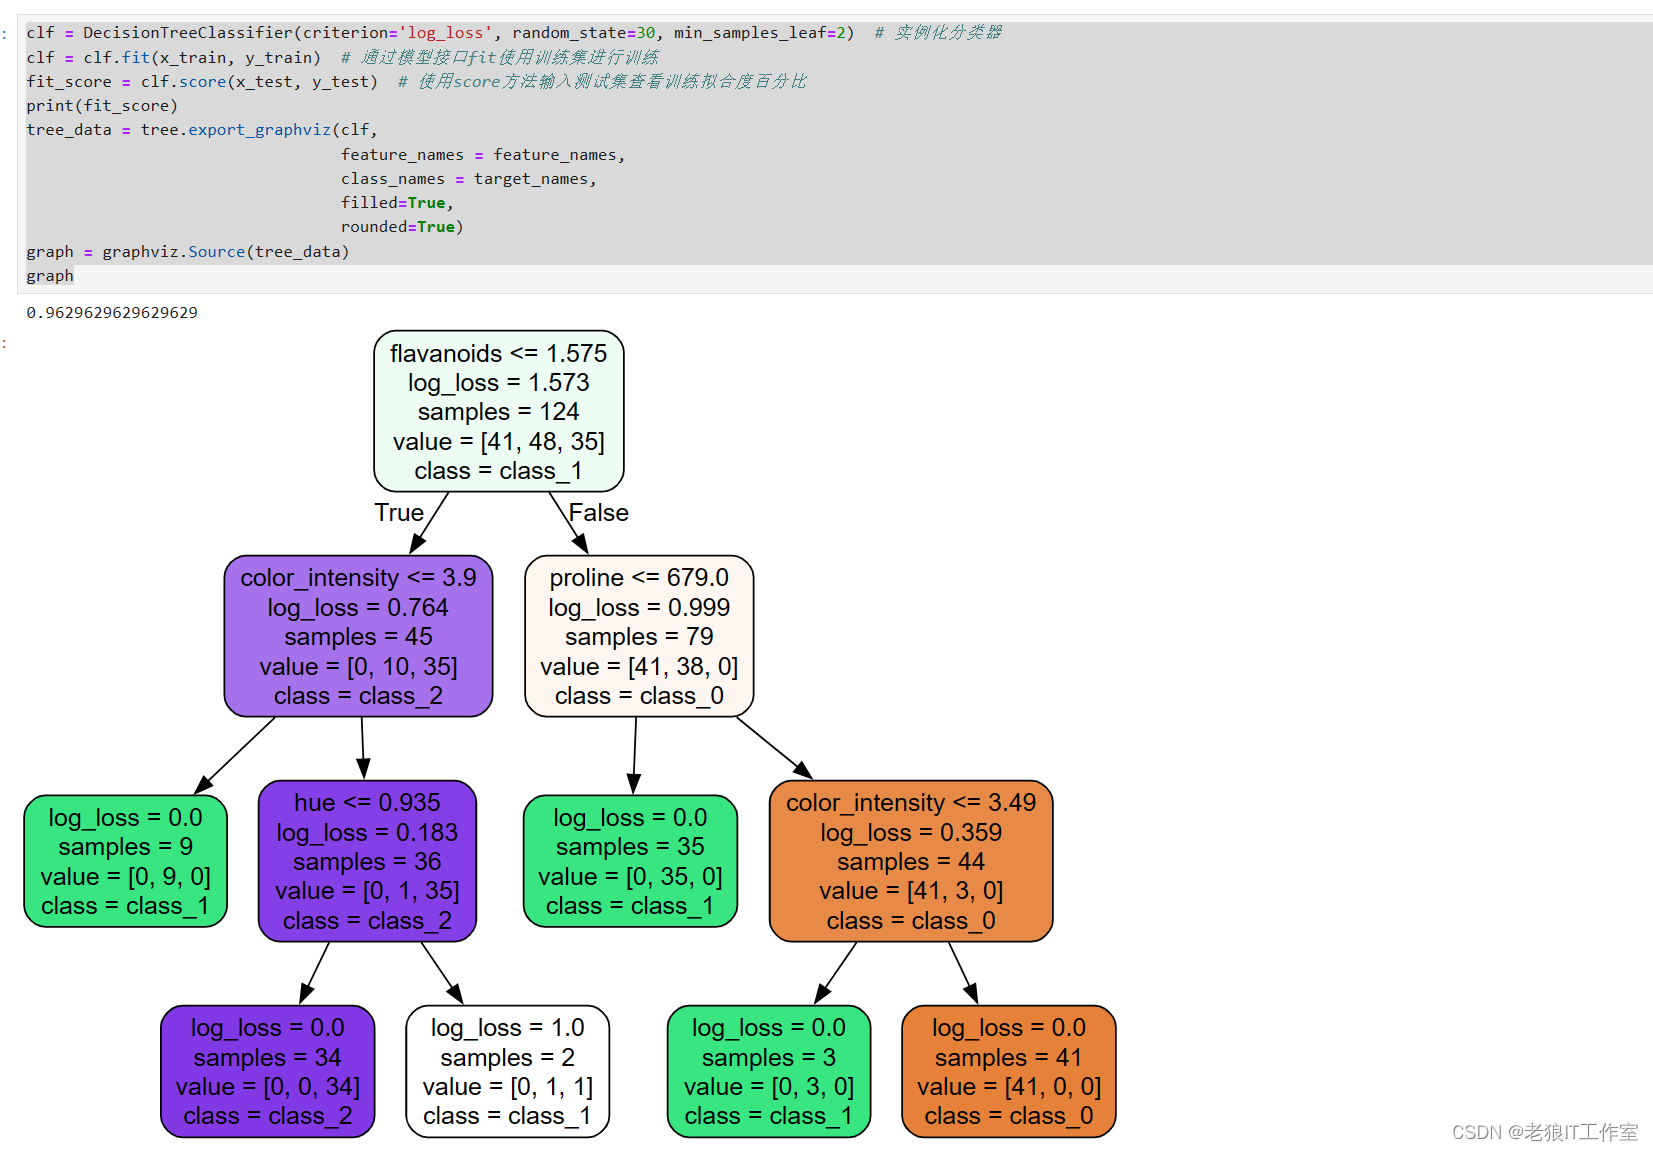
clf = DecisionTreeClassifier(criterion='log_loss', random_state=30, min_samples_leaf=5)  # 实例化分类器
clf = clf.fit(x_train, y_train)  # 通过模型接口fit使用训练集进行训练
fit_score = clf.score(x_test, y_test)  # 使用score方法输入测试集查看训练拟合度百分比
print(fit_score)
tree_data = tree.export_graphviz(clf,
                                 feature_names = feature_names,
                                 class_names = target_names,
                                 filled=True,
                                 rounded=True)
graph = graphviz.Source(tree_data)
graph 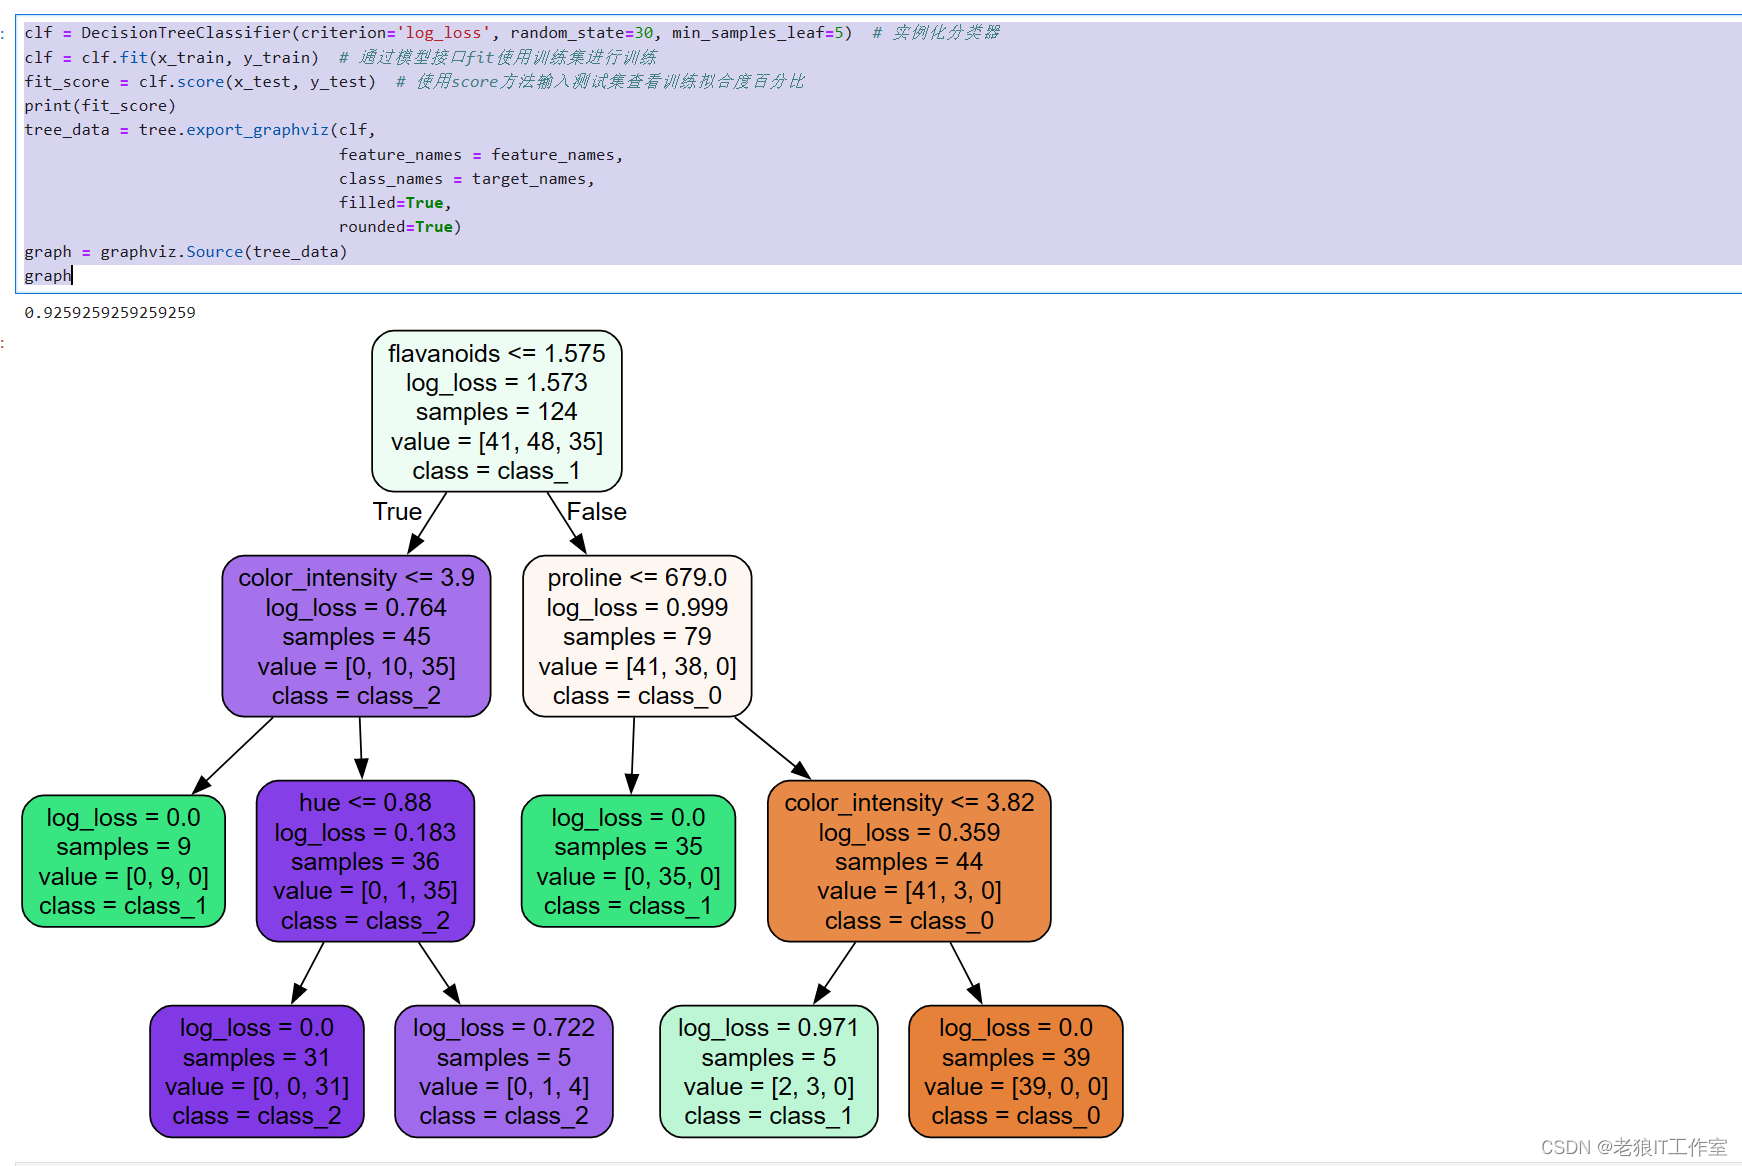
min_weight_fraction_leaf

在所有叶节点处(所有输入样本)的权重总和中的最小加权分数。 如果未提供sample_weight,则样本的权重相等。
剪枝策略参数 - max_features

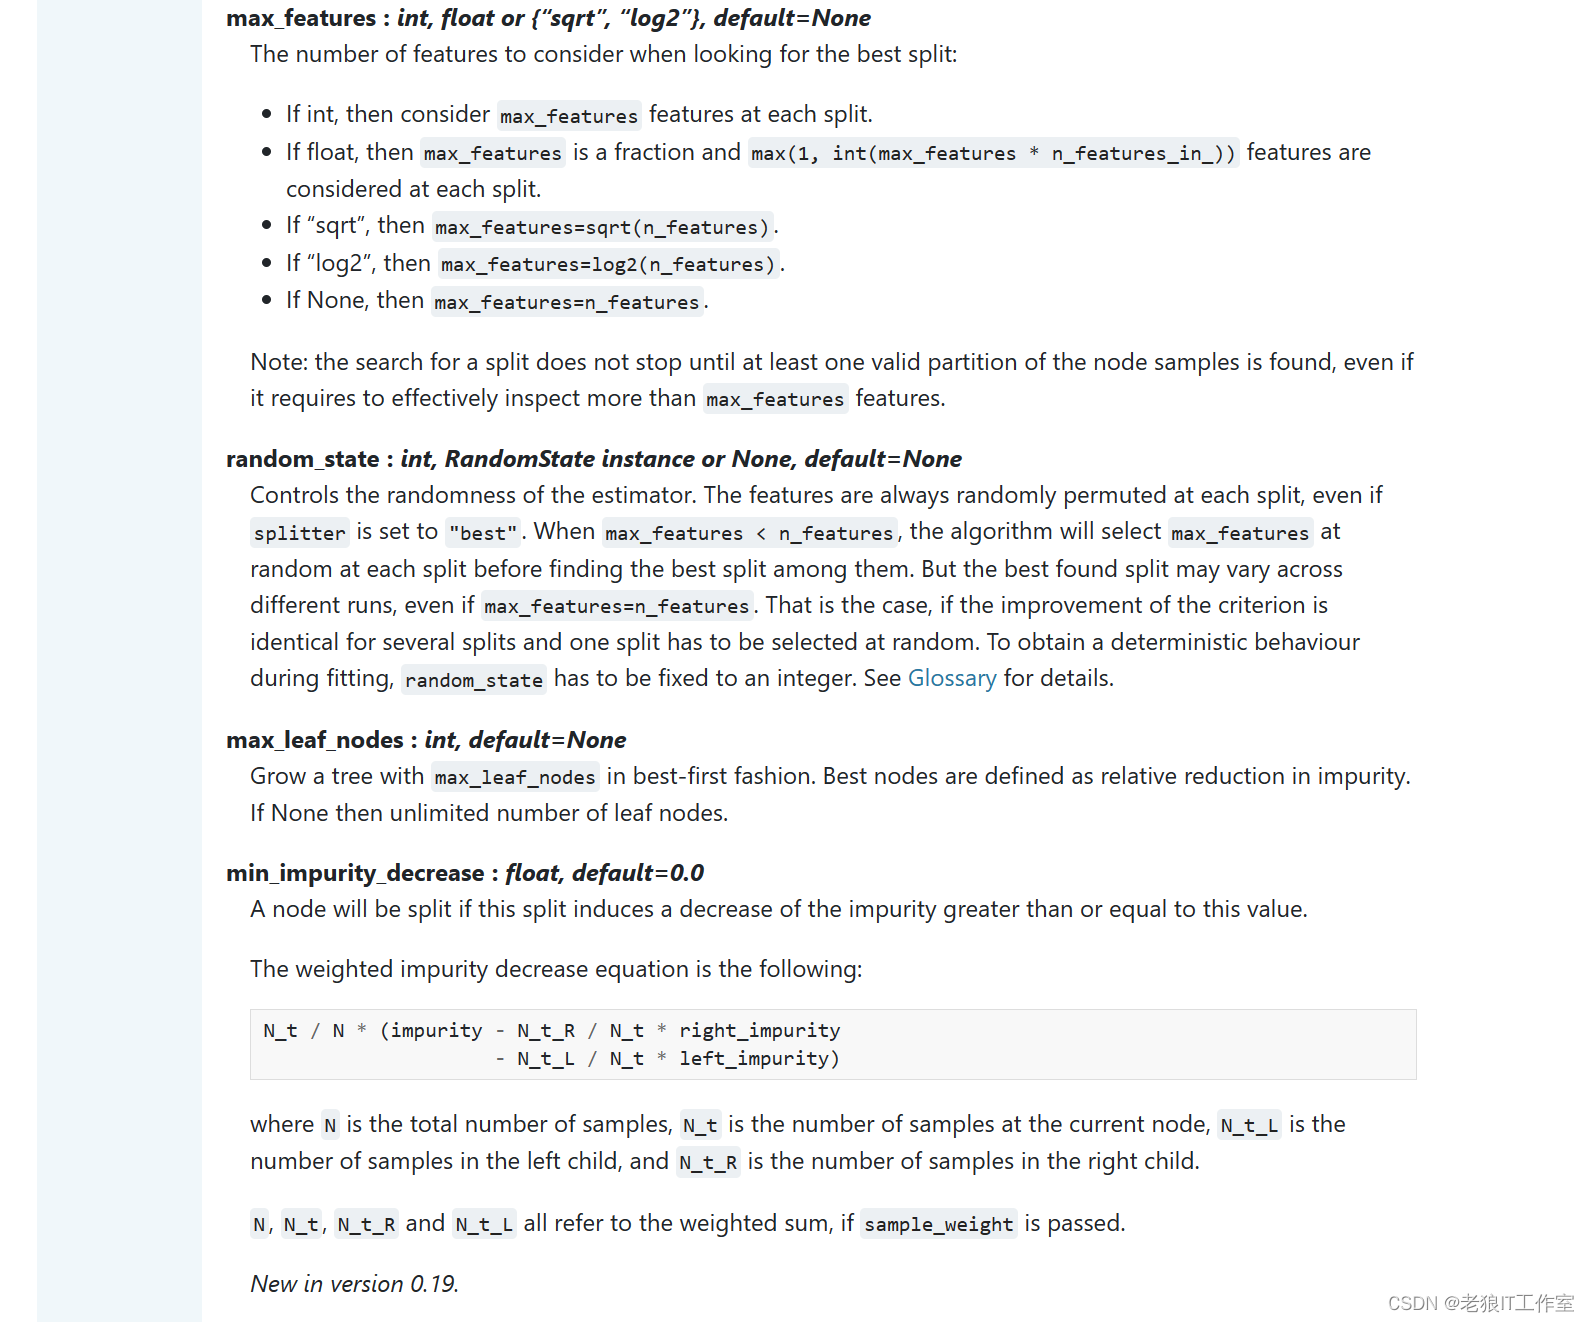
用于限制特征的最大数量。可以选择"auto"、"sqrt"、"log2",表示自动选择特征数量;也可以选择一个整数或浮点数,表示具体的特征数量。默认值为None,表示不限制特征数量。
max_features限制分枝时考虑的特征个数,超过限制个数的特征都会被舍弃。和max-depth异曲同工。
max_features是用来限制高维度特征数据的过拟合的剪枝参数,但具方法比较暴力,是直接限制可以使用的特征数量而强行使决策树停下的参数,在不知道决策树中的各个特征的重要性的情况下,强行设定这个参数可能会导致模型学习不足。如果希望通过降维的方式防止过拟合,建议使用PCA,ICA或者特征选择模块中的降维算法。
clf = DecisionTreeClassifier(criterion='log_loss', random_state=30, max_features=3)  # 实例化分类器
clf = clf.fit(x_train, y_train)  # 通过模型接口fit使用训练集进行训练
fit_score = clf.score(x_test, y_test)  # 使用score方法输入测试集查看训练拟合度百分比
print(fit_score)
tree_data = tree.export_graphviz(clf,
                                 feature_names = feature_names,
                                 class_names = target_names,
                                 filled=True,
                                 rounded=True)
graph = graphviz.Source(tree_data)
graph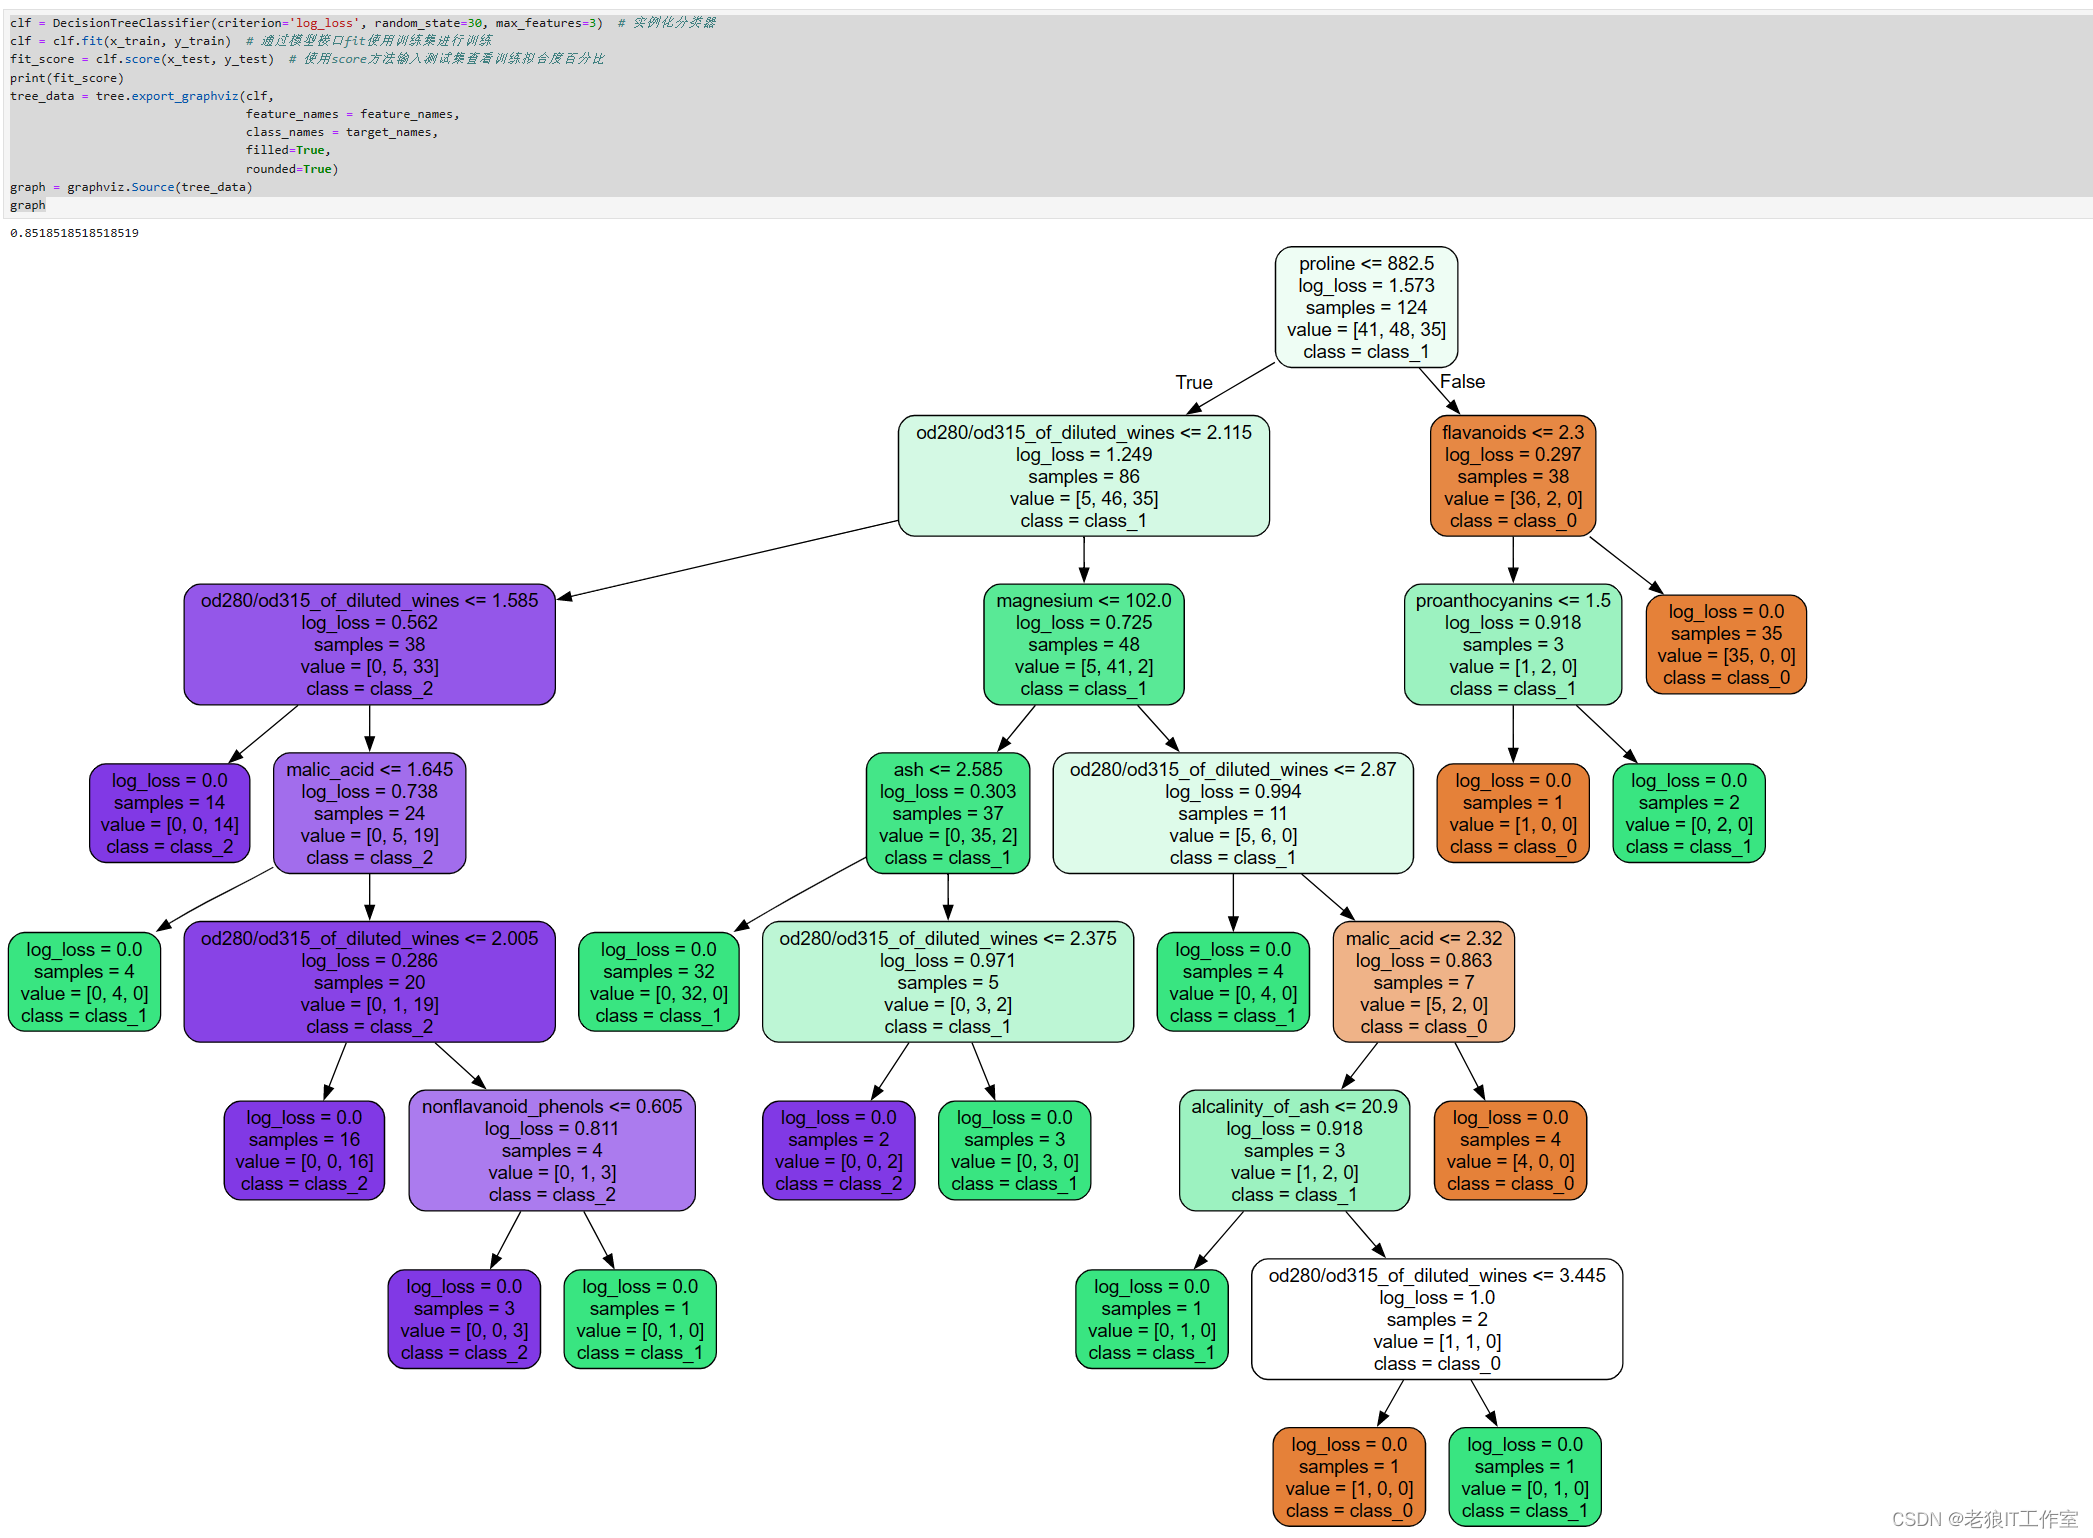
clf = DecisionTreeClassifier(criterion='log_loss', random_state=30, max_features=8)  # 实例化分类器
clf = clf.fit(x_train, y_train)  # 通过模型接口fit使用训练集进行训练
fit_score = clf.score(x_test, y_test)  # 使用score方法输入测试集查看训练拟合度百分比
print(fit_score)
tree_data = tree.export_graphviz(clf,
                                 feature_names = feature_names,
                                 class_names = target_names,
                                 filled=True,
                                 rounded=True)
graph = graphviz.Source(tree_data)
graph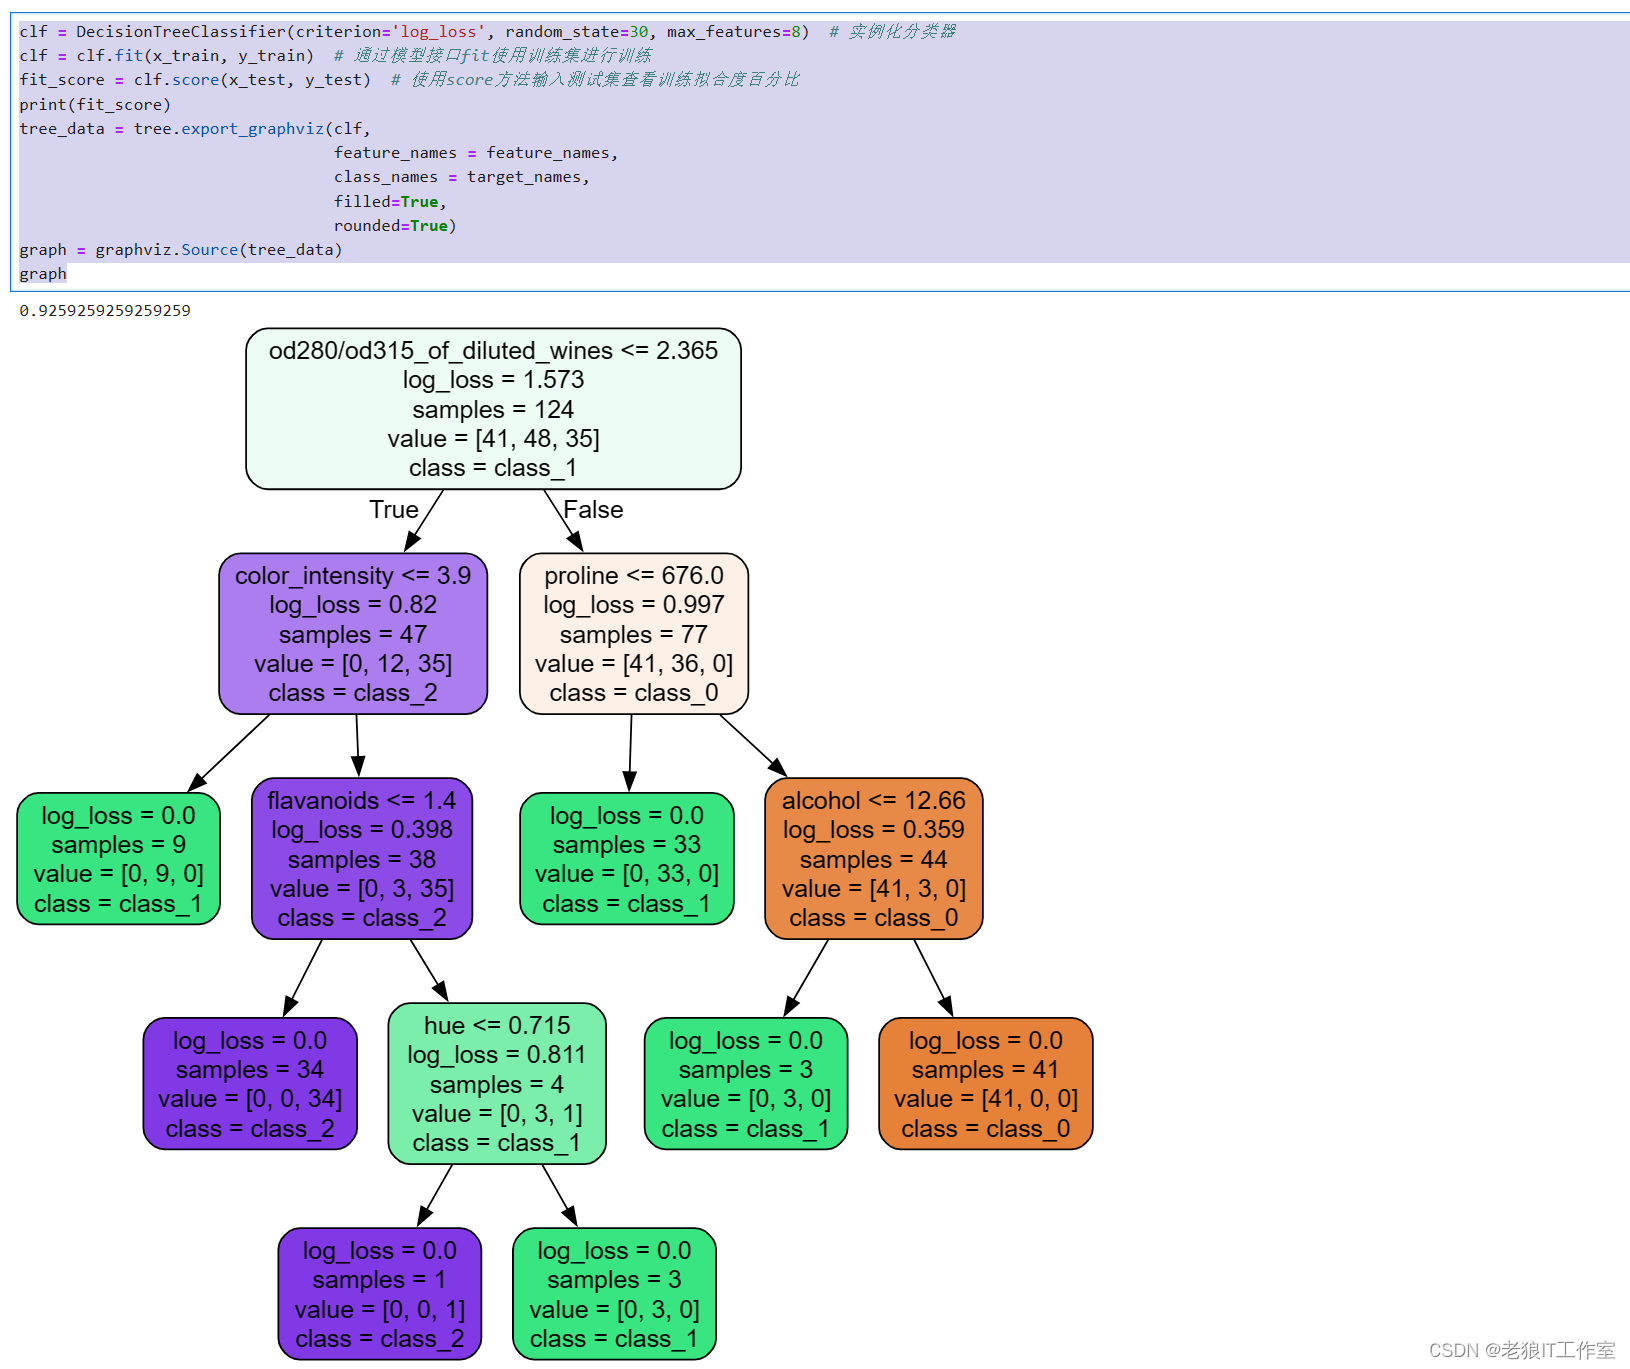
clf = DecisionTreeClassifier(criterion='log_loss', random_state=30, max_features=1.0)  # 实例化分类器
clf = clf.fit(x_train, y_train)  # 通过模型接口fit使用训练集进行训练
fit_score = clf.score(x_test, y_test)  # 使用score方法输入测试集查看训练拟合度百分比
print(fit_score)
tree_data = tree.export_graphviz(clf,
                                 feature_names = feature_names,
                                 class_names = target_names,
                                 filled=True,
                                 rounded=True)
graph = graphviz.Source(tree_data)
graph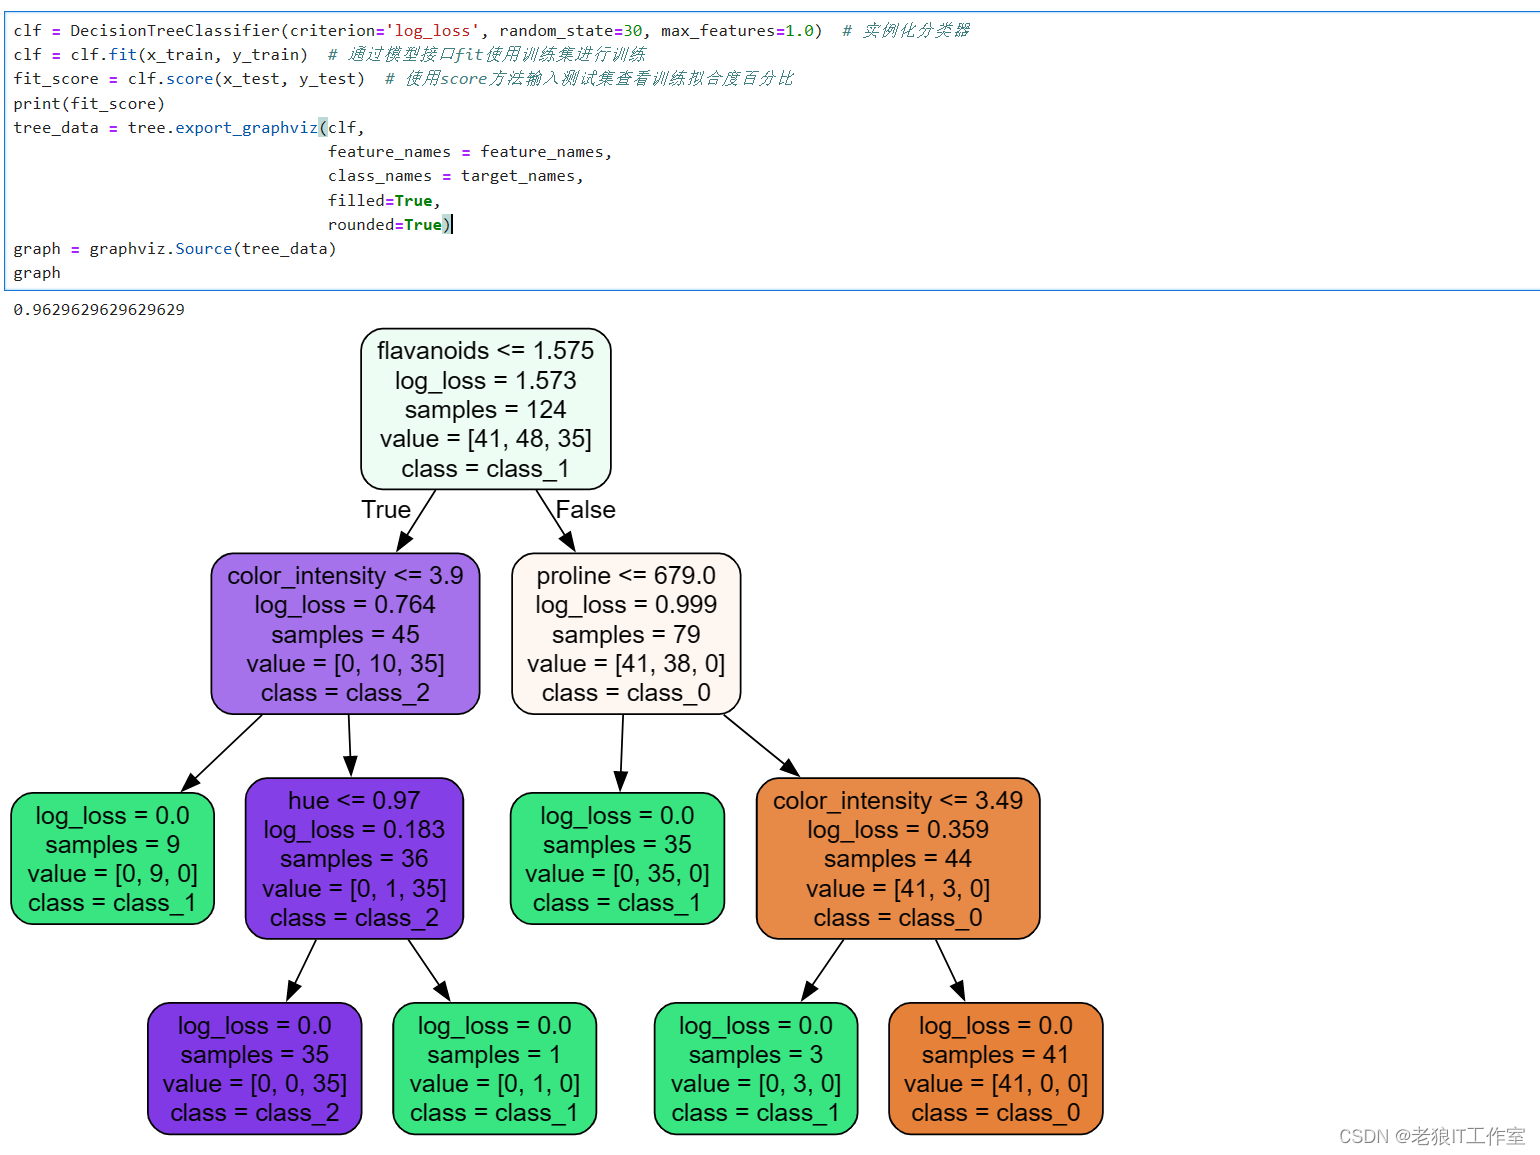
剪枝策略参数 - min_impurity_decrease
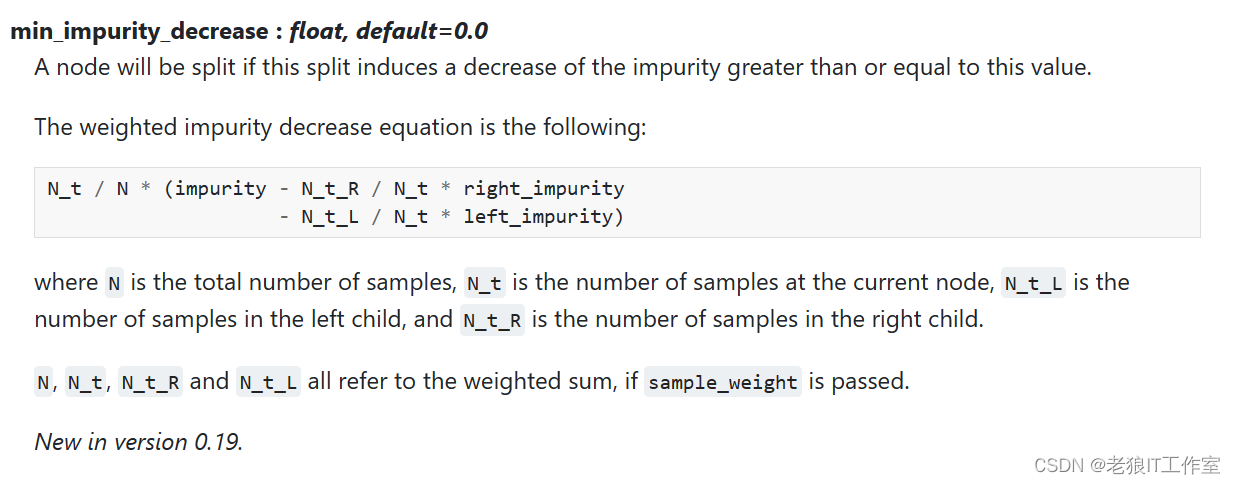
如果节点分裂会导致不纯度的减少大于或等于该值,则该节点将被分分枝。
min_impurity_decrease限制信息蹭益的大小,信息增益小于设定数值的分枝不会发生。
clf = DecisionTreeClassifier(criterion='log_loss', random_state=30, min_impurity_decrease=0.1)  # 实例化分类器
clf = clf.fit(x_train, y_train)  # 通过模型接口fit使用训练集进行训练
fit_score = clf.score(x_test, y_test)  # 使用score方法输入测试集查看训练拟合度百分比
print(fit_score)
tree_data = tree.export_graphviz(clf,
                                 feature_names = feature_names,
                                 class_names = target_names,
                                 filled=True,
                                 rounded=True)
graph = graphviz.Source(tree_data)
graph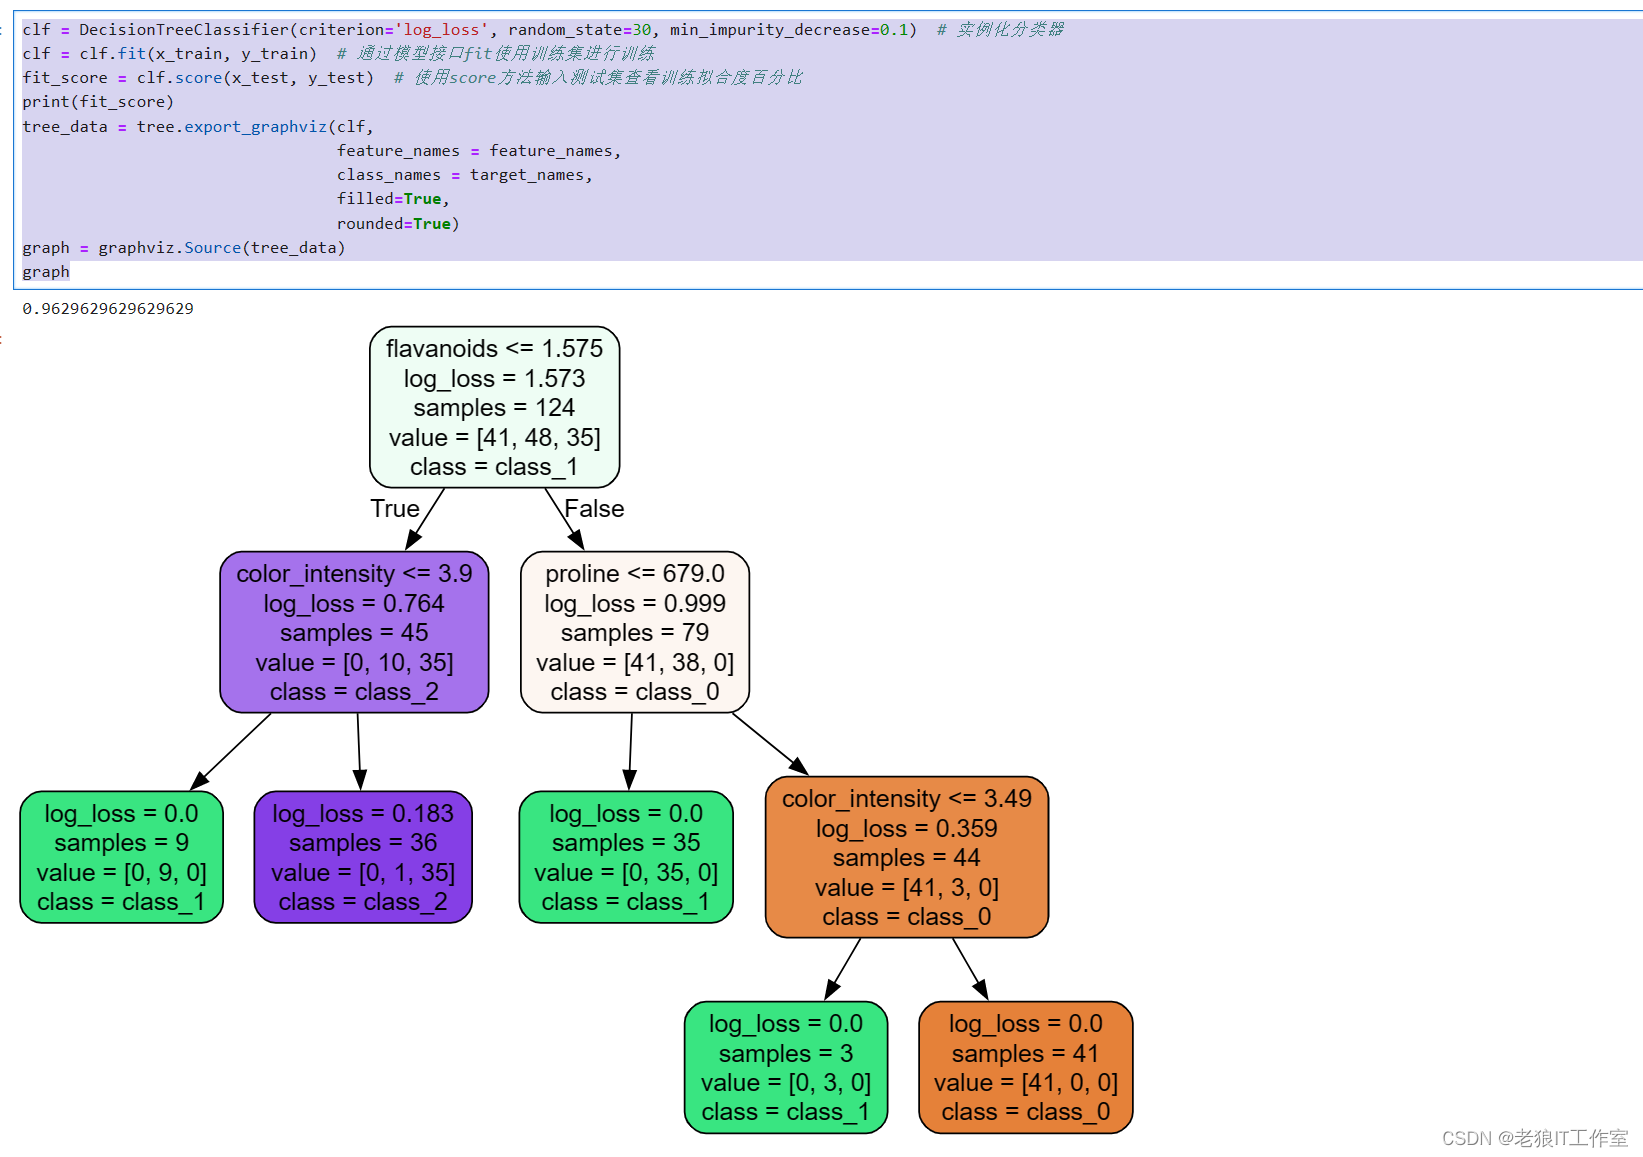
clf = DecisionTreeClassifier(criterion='log_loss', random_state=30, min_impurity_decrease=0.5)  # 实例化分类器
clf = clf.fit(x_train, y_train)  # 通过模型接口fit使用训练集进行训练
fit_score = clf.score(x_test, y_test)  # 使用score方法输入测试集查看训练拟合度百分比
print(fit_score)
tree_data = tree.export_graphviz(clf,
                                 feature_names = feature_names,
                                 class_names = target_names,
                                 filled=True,
                                 rounded=True)
graph = graphviz.Source(tree_data)
graph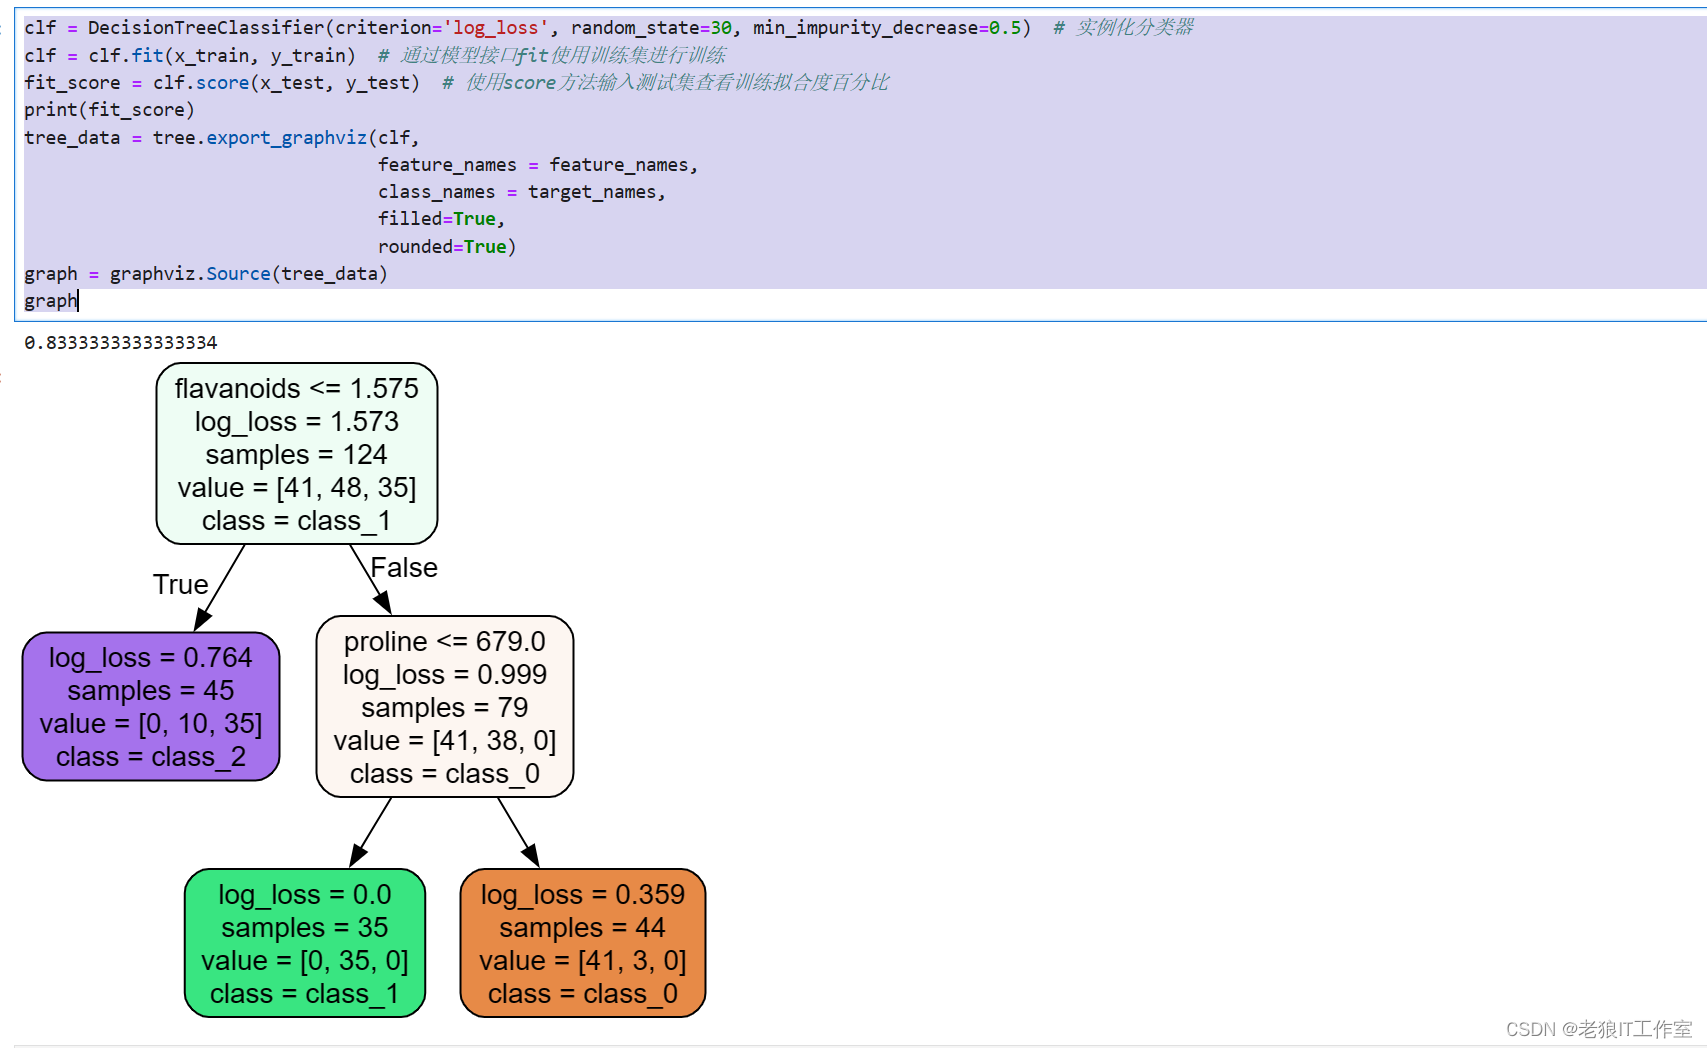
max_leaf_nodes
 优先以最佳方式生成带有
max_leaf_nodes的树。 最佳节点定义为不纯度的相对减少。 如果为None,则叶节点数不受限制。
class_weight
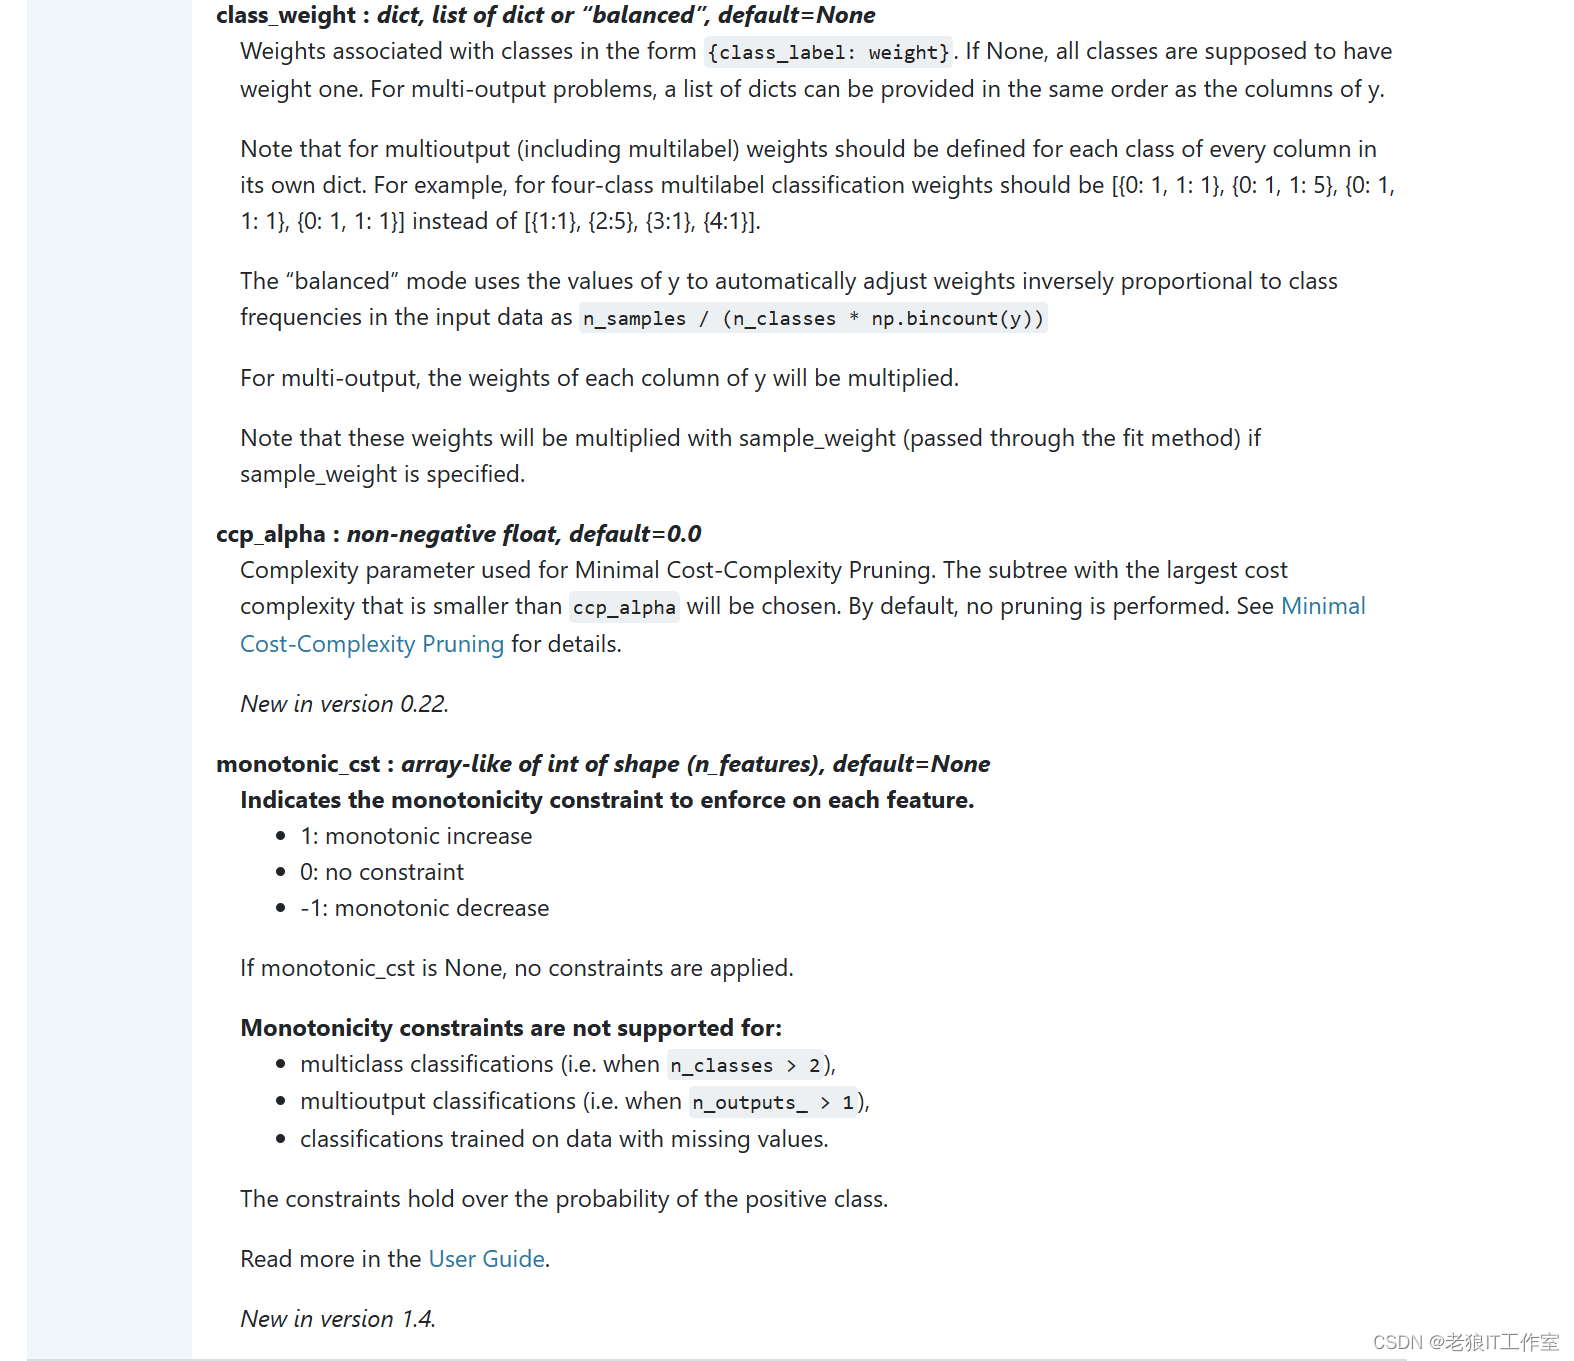
dict, list of dict or “balanced”, default=None
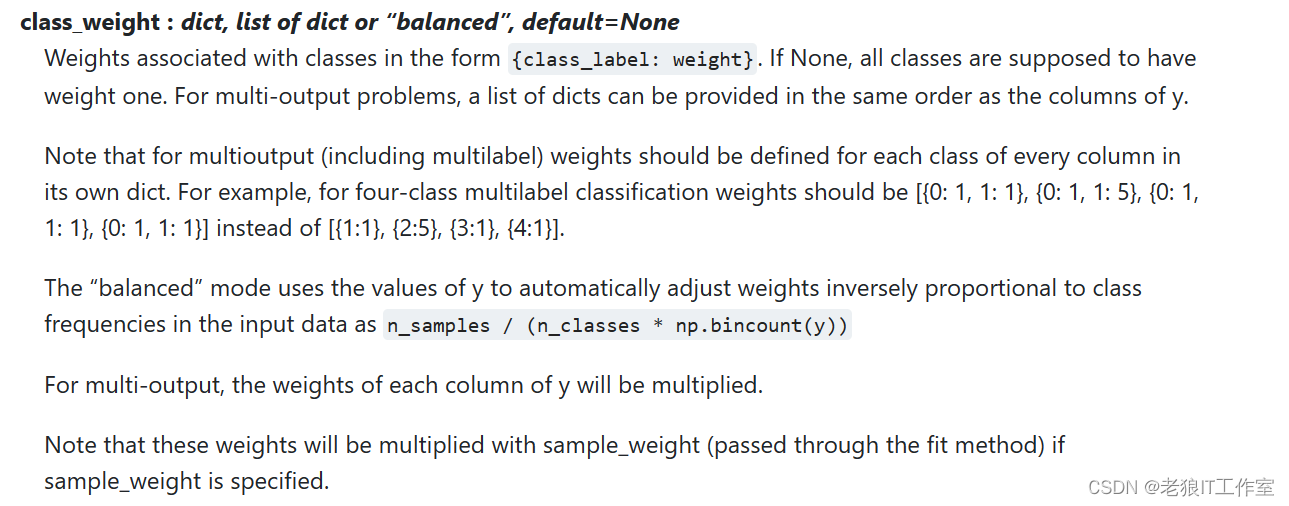
以{class_label: weight}的形式表示与类别关联的权重。如果取值None,所有分类的权重为1。对于多输出问题,可以按照y的列的顺序提供一个字典列表。
注意多输出(包括多标签) ,应在其自己的字典中为每一列的每个类别定义权重。例如:对于四分类多标签问题, 权重应为[{0:1、1:1:1],{0:1、1:5},{0:1、1:1:1},{0:1、1: 1}],而不是[{1:1},{2:5},{3:1},{4:1}]。
“平衡”模式使用y的值自动将权重与输入数据中的类频率成反比地调整为n_samples /(n_classes * np.bincount(y))。
对于多输出,y的每一列的权重将相乘。
请注意,如果指定了sample_weight,则这些权重将与sample_weight(通过fit方法传递)相乘。
用于指定每个类别的权重。可以选择"balanced",表示根据样本的频数自动调整权重;也可以选择一个字典,表示每个类别的权重。
ccp_alpha

用于最小化成本复杂性修剪的复杂性参数。 将选择成本复杂度最大且小于ccp_alpha的子树。 默认情况下,不执行修剪。 有关详细信息,请参见最小成本复杂性修剪。
monotonic_cst
如何确定最优剪枝策略参数 ?
我们可以通过针对某个剪枝参数进行动态设置值,然后使用matplotlib来绘制图像,观察那个取值可以获取到最好的准确值,下面使用max_depth来举例说明:
import matplotlib.pyplot as plt
test_scores = []
for i in range(10):
    clf = DecisionTreeClassifier(criterion='entropy'
                                 , max_depth=i + 1
                                 , random_state=30
                                 , splitter='random')  # 实例化分类器
    clf = clf.fit(x_train, y_train)  # 通过模型接口fit使用训练集进行训练
    fit_score = clf.score(x_test, y_test)  # 使用score方法输入测试集查看训练拟合度百分比
    test_scores.append(fit_score)

plt.plot(range(1, 11), test_scores, color='red', label='max_depth')
plt.legend()
plt.show()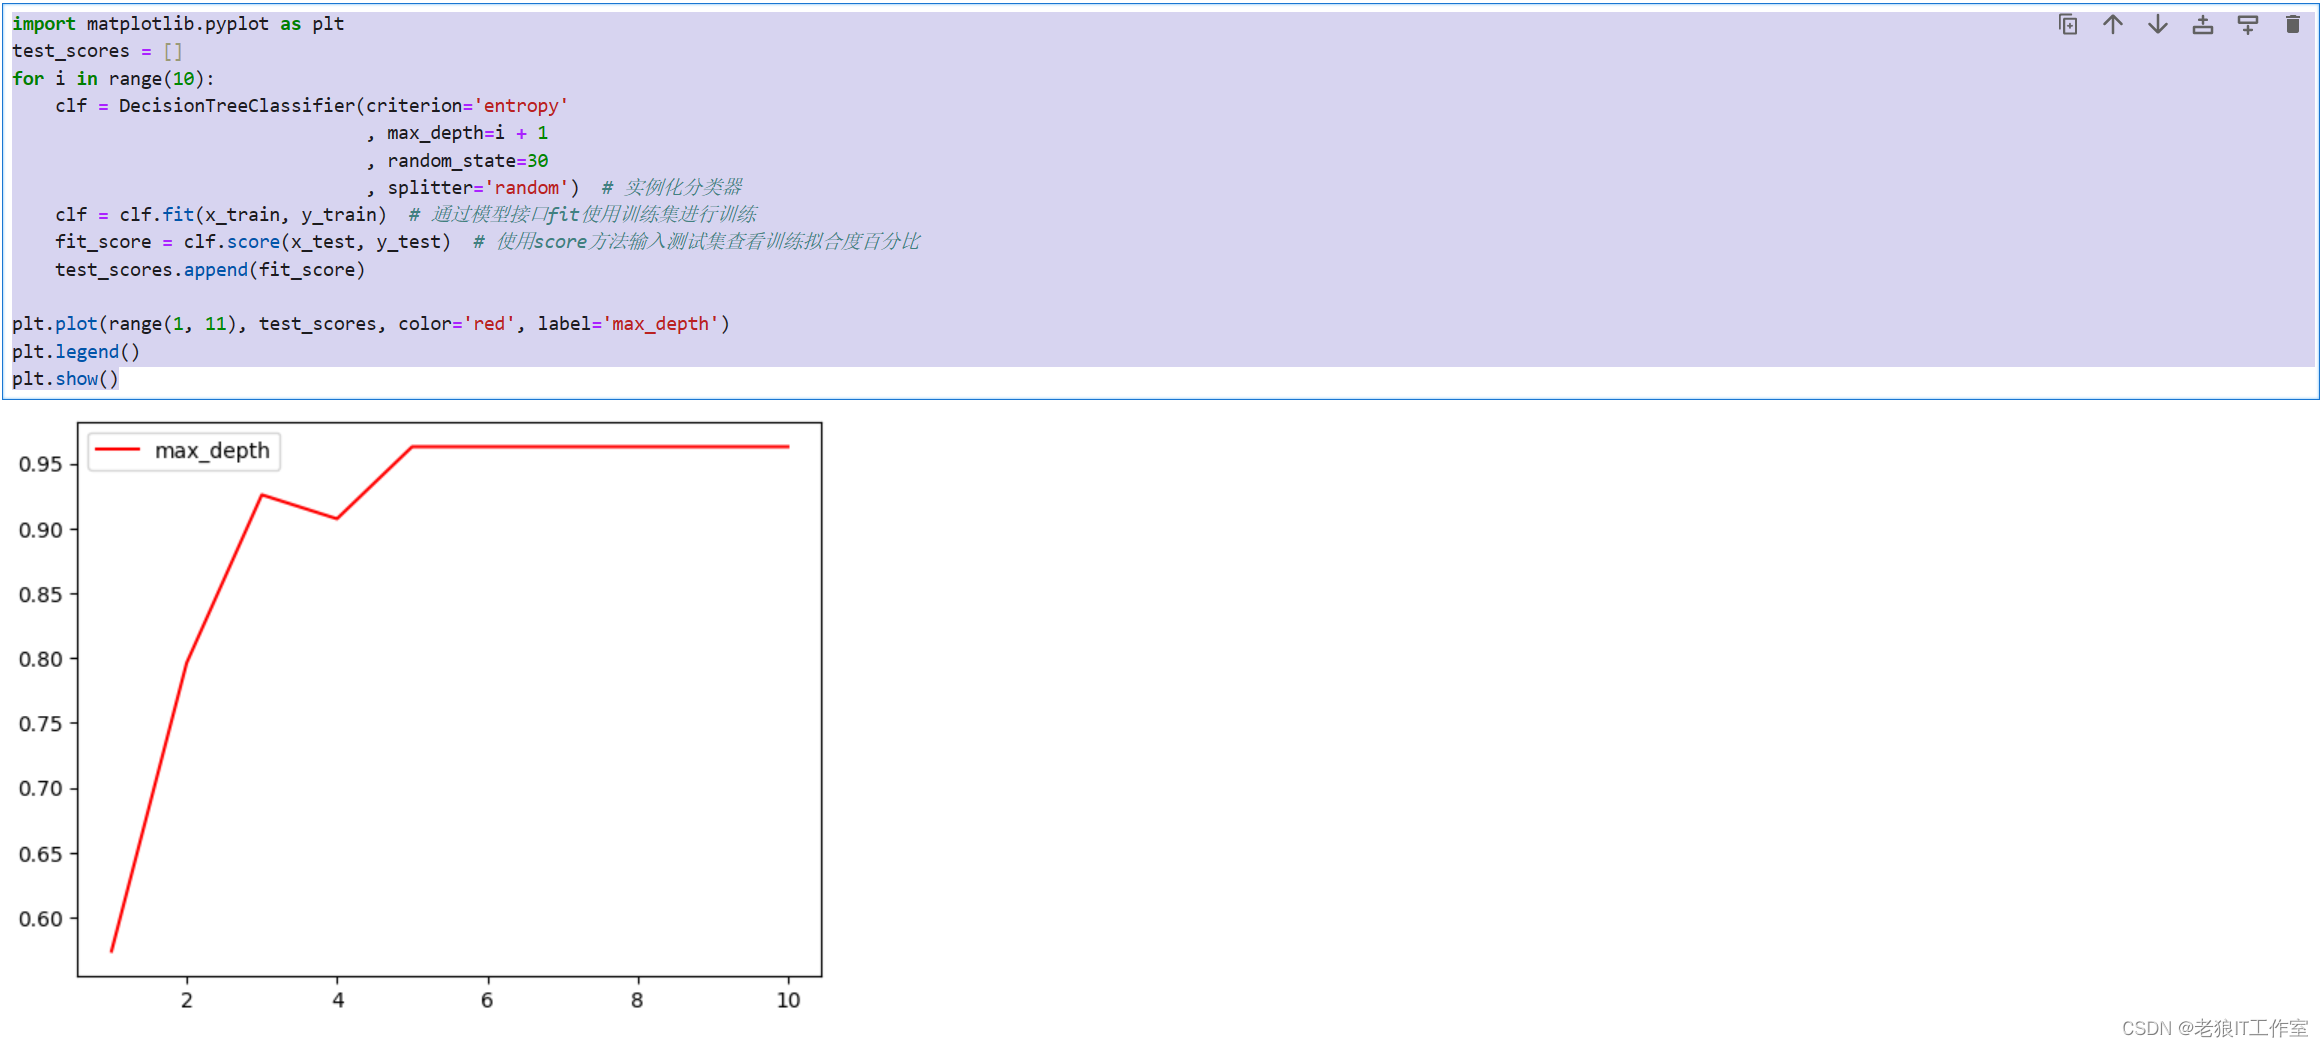
2个小思考:
1、剪枝参数一定能够提升模型在测试集上的表现吗?调参没有绝对的答案,一切都是看数据本身,对于比较小的数据集,很多情况下使用默认的剪枝策略参数就能获取到最好的准确度。
2、这么多参数,我们需要一个一个画学习曲线?后续会介绍怎么使用“网格搜索”来进行多个参数进行组合。
剪枝策略参数的默认值是会让树不断地生长,会导致决策树在某些数据集上可能会非常巨大,对内存的消耗也会非常巨大。因此如果你手中的数据集非常巨大,并且你已经预测到无论如何都是要剪枝的,那提前设定这些剪枝优化参数来控树的复杂性和大小会比较好。
参考资料
标签:
相关文章
最新发布
- 光流法结合深度学习神经网络的原理及应用(完整代码都有Python opencv)
- Python 图像处理进阶:特征提取与图像分类
- 大数据可视化分析-基于python的电影数据分析及可视化系统_9532dr50
- 【Python】入门(运算、输出、数据类型)
- 【Python】第一弹---解锁编程新世界:深入理解计算机基础与Python入门指南
- 华为OD机试E卷 --第k个排列 --24年OD统一考试(Java & JS & Python & C & C++)
- Python已安装包在import时报错未找到的解决方法
- 【Python】自动化神器PyAutoGUI —告别手动操作,一键模拟鼠标键盘,玩转微信及各种软件自动化
- Pycharm连接SQL Sever(详细教程)
- Python编程练习题及解析(49题)
点击排行
- 版本匹配指南:Numpy版本和Python版本的对应关系
- 版本匹配指南:PyTorch版本、torchvision 版本和Python版本的对应关系
- Python 可视化 web 神器:streamlit、Gradio、dash、nicegui;低代码 Python Web 框架:PyWebIO
- 相关性分析——Pearson相关系数+热力图(附data和Python完整代码)
- Anaconda版本和Python版本对应关系(持续更新...)
- Python与PyTorch的版本对应
- Windows上安装 Python 环境并配置环境变量 (超详细教程)
- Python pyinstaller打包exe最完整教程

