首页 > Python资料 博客日记
[深度学习入门案例2]基于卷积神经网络与Keras构建人脸识别模型
2024-06-27 13:00:07Python资料围观357次
文章目录
第一步:采集自己和他人的人脸特征数据,分别对应数据标签0和1
第二步:训练识别人脸特征的模型,并将模型保存为.h5格式的文件
第三步:读取.h5文件格式的人脸识别模型,对摄像头录入的人脸图像进行识别
第一步:采集本人与他人的人脸特征数据(注意需要打开电脑摄像头,否则会报错!)
一、工具与环境
- Pycharm 2022.1.4
- conda version : 4.5.4
- python version : 3.6.5.final.0
- platform : win-64
二、深度学习环境的搭建
详情见我写的这篇文章的第二部分,这里不再赘述
[深度学习入门案例1]基于Keras的手写数字图像识别![]() https://blog.csdn.net/qq_52487066/article/details/131048466?spm=1001.2014.3001.5501环境搭建好之后,还需要额外下载下面的工具包,依次在Anaconda Prompt 中执行以下命令
https://blog.csdn.net/qq_52487066/article/details/131048466?spm=1001.2014.3001.5501环境搭建好之后,还需要额外下载下面的工具包,依次在Anaconda Prompt 中执行以下命令
conda install py-opencv -i https://pypi.tuna.tsinghua.edu.cn/simple
pip install dlib==19.7.0 -i https://pypi.tuna.tsinghua.edu.cn/simple
pip install face_recognition -i https://pypi.tuna.tsinghua.edu.cn/simple
pip install Pillow -i https://pypi.tuna.tsinghua.edu.cn/simple
工具包下载导入完成,下面进行项目的构建与运行
三、基于卷积神经网络人脸识别模型的构建与测试
1.核心代码
第一步:采集自己和他人的人脸特征数据,分别对应数据标签0和1
get_my_face.py
import cv2
import dlib
import os
import random

output_dir = './my_crop_faces'
size = 160
if not os.path.exists(output_dir):
    os.makedirs(output_dir)

# 改变图片的亮度与对比度
def relight(img, light=1, bias=0):
    w = img.shape[1]
    h = img.shape[0]
    #image = []
    for i in range(0,w):
        for j in range(0,h):
            for c in range(3):
                tmp = int(img[j,i,c]*light + bias)
                if tmp > 255:
                    tmp = 255
                elif tmp < 0:
                    tmp = 0
                img[j,i,c] = tmp
    return img

#使用dlib自带的frontal_face_detector作为我们的特征提取器
detector = dlib.get_frontal_face_detector()
# 打开摄像头 参数为输入流,可以为摄像头或视频文件
camera = cv2.VideoCapture(0)

index = 0
while True:
    if (index <= 1000):
        print('Being processed picture %s' % index)
        # 从摄像头读取照片
        success, img = camera.read()
        # 转为灰度图片
        gray_img = cv2.cvtColor(img, cv2.COLOR_BGR2GRAY)
        # 使用detector进行人脸检测
        dets = detector(gray_img, 1)

        for i, d in enumerate(dets):
            x1 = d.top() if d.top() > 0 else 0
            y1 = d.bottom() if d.bottom() > 0 else 0
            x2 = d.left() if d.left() > 0 else 0
            y2 = d.right() if d.right() > 0 else 0

            face = img[x1:y1,x2:y2]
            # 调整图片的对比度与亮度, 对比度与亮度值都取随机数,这样能增加样本的多样性
            face = relight(face, random.uniform(0.5, 1.5), random.randint(-50, 50))
            face = cv2.resize(face, (size,size))
            cv2.imshow('image', face)
            cv2.imwrite(output_dir+'/'+str(index)+'.jpg', face)
            index += 1
        key = cv2.waitKey(30) & 0xff
        if key == 27:
            break
    else:
        print('Finished!')
        break
第二步:训练识别人脸特征的模型,并将模型保存为.h5格式的文件
model_train.py
#-*- coding: utf-8 -*-
from keras.models import Sequential
from keras.layers import Dense, Dropout, Activation, Flatten
from keras.layers import Convolution2D, MaxPooling2D
from keras.optimizers import SGD
from keras.utils import np_utils
import os
import cv2
import numpy as np
from sklearn.model_selection import train_test_split
import random

def get_files(input_dir):
    file_list = []
    for (path, dirnames, filenames) in os.walk(input_dir):
        # print(path) #输出对应顶层文件夹
        # print(dirnames)#在当前文件夹下的文件夹
        # print(filenames)#在当前文件夹下的文件夹
        for filename in filenames:
            if filename.endswith('.jpg') or filename.endswith('.bmp'):
                # print(filename)
                full_path = os.path.join(path, filename)
                # print(full_path)
                file_list.append(full_path)
    return file_list

#设置hujianhua文件夹的对应标签为0
def getPaddingSize(img):
    h, w, _ = img.shape
    top, bottom, left, right = (0,0,0,0)
    longest = max(h, w)

    if w < longest:
        tmp = longest - w
        # //表示整除符号
        left = tmp // 2
        right = tmp - left
    elif h < longest:
        tmp = longest - h
        top = tmp // 2
        bottom = tmp - top
    else:
        pass
    return top, bottom, left, right

def read_img_label(file_list, label):
    size = 64
    imgs = []
    labs = []
    #01
    num = 0
    for filename in file_list:
        # print(filename)
        img = cv2.imread(filename)
        # print(img.shape)
        top, bottom, left, right = getPaddingSize(img)
        # 将图片放大, 扩充图片边缘部分
        img = cv2.copyMakeBorder(img, top, bottom, left, right, cv2.BORDER_CONSTANT, value=[0, 0, 0])
        img = cv2.resize(img, (size, size))
        imgs.append(img)
        labs.append(label)
        num = num + 1

    # print(len(imgs))
    # print(len(labs))
    return imgs, labs


def read_dataset():
    input_dir = "./data_collection/my_crop_faces"


    all_imgs_list = []
    all_label_list = []
    my_file_list = get_files(input_dir)
    # 0->[0,1] 1->[1,0]
    label = 0 #[0, 1]
    my_imgs_list, my_labs_list = read_img_label(my_file_list, label)

    input_dir = "./data_collection/others_img_crop"

    others_file_list = get_files(input_dir)
    label = 1 #[1, 0] #->0
    others_imgs_list, others_labs_list = read_img_label(others_file_list, label)

    for img in my_imgs_list:
        all_imgs_list.append(img)
    for img in others_imgs_list:
        all_imgs_list.append(img)

    for label in my_labs_list:
        all_label_list.append(label)
    for label in others_labs_list:
        all_label_list.append(label)

    imgs_array = np.array(all_imgs_list)
    # print(imgs_array.shape)

    labs_array = np.array(all_label_list)
    # print(labs_array.shape)

    return imgs_array,labs_array


#加载数据集并按照交叉验证的原则划分数据集并进行相关预处理工作
def load_data(img_rows = 64, img_cols = 64,
         img_channels = 3, nb_classes = 2):
    #加载数据集到内存
    images, labels = read_dataset()
    print(images.shape)
    print(labels.shape)

    train_images, valid_images, train_labels, valid_labels = train_test_split(images, labels, test_size = 0.3, random_state = random.randint(0, 100))
    _, test_images, _, test_labels = train_test_split(images, labels, test_size = 0.5, random_state = random.randint(0, 100))

    train_images = train_images.reshape(train_images.shape[0], img_rows, img_cols, img_channels)
    valid_images = valid_images.reshape(valid_images.shape[0], img_rows, img_cols, img_channels)
    test_images = test_images.reshape(test_images.shape[0], img_rows, img_cols, img_channels)
    input_shape = (img_rows, img_cols, img_channels)

    #输出训练集、验证集、测试集的数量
    print(train_images.shape[0], 'train samples')
    print(valid_images.shape[0], 'valid samples')
    print(test_images.shape[0], 'test samples')

    #我们的模型使用categorical_crossentropy作为损失函数,因此需要根据类别数量nb_classes将
    #类别标签进行one-hot编码使其向量化,在这里我们的类别只有两种,经过转化后标签数据变为二维
    train_labels = np_utils.to_categorical(train_labels, nb_classes)
    valid_labels = np_utils.to_categorical(valid_labels, nb_classes)
    test_labels = np_utils.to_categorical(test_labels, nb_classes)
    print(train_labels.shape)
    print(valid_labels.shape)
    print(test_labels.shape)
    #像素数据浮点化以便归一化
    train_images = train_images.astype('float32')
    valid_images = valid_images.astype('float32')
    test_images = test_images.astype('float32')

    #将其归一化,图像的各像素值归一化到0~1区间
    train_images /= 255
    valid_images /= 255
    test_images /= 255

    return train_images, train_labels, valid_images, valid_labels, test_images, test_labels

#建立模型
def build_model(nb_classes = 2):
    #构建一个空的网络模型,它是一个线性堆叠模型,各神经网络层会被顺序添加,专业名称为序贯模型或线性堆叠模型
    model = Sequential()

    #以下代码将顺序添加CNN网络需要的各层,一个add就是一个网络层
    model.add(Convolution2D(32, 3, 3, border_mode='same',
                                 input_shape =  (64, 64, 3)))    #1 2维卷积层
    model.add(Activation('relu'))                                  #2 激活函数层

    model.add(Convolution2D(32, 3, 3))                             #3 2维卷积层
    model.add(Activation('relu'))                                  #4 激活函数层

    model.add(MaxPooling2D(pool_size=(2, 2)))                      #5 池化层
    model.add(Dropout(0.25))                                       #6 Dropout层

    model.add(Convolution2D(64, 3, 3, border_mode='same'))         #7  2维卷积层
    model.add(Activation('relu'))                                  #8  激活函数层

    model.add(Convolution2D(64, 3, 3))                             #9  2维卷积层
    model.add(Activation('relu'))                                  #10 激活函数层

    model.add(MaxPooling2D(pool_size=(2, 2)))                      #11 池化层
    model.add(Dropout(0.25))                                       #12 Dropout层

    model.add(Flatten())                                           #13 Flatten层
    model.add(Dense(512))                                          #14 Dense层,又被称作全连接层
    model.add(Activation('relu'))                                  #15 激活函数层
    model.add(Dropout(0.5))                                        #16 Dropout层
    model.add(Dense(nb_classes))                                   #17 Dense层
    model.add(Activation('softmax'))                               #18 分类层,输出最终结果
    #输出模型概况
    print(model.summary())
    return model

model = build_model()

sgd = SGD(lr=0.01, decay=1e-6,
          momentum=0.9, nesterov=True)  # 采用SGD+momentum的优化器进行训练,首先生成一个优化器对象
model.compile(loss='categorical_crossentropy',
                   optimizer=sgd,
                   metrics=['accuracy'])  # 完成实际的模型配置工作

train_images, train_labels, valid_images, valid_labels, test_images, test_labels = load_data()

batch_size = 20
nb_epoch = 10
train_history = model.fit(train_images,
               train_labels,
               batch_size=batch_size,
               nb_epoch=nb_epoch,
               validation_data=(valid_images, valid_labels),
               shuffle=True)

scores = model.evaluate(test_images, test_labels)
print('accuracy=', scores[1])
prediction = model.predict_classes(test_images)
# print(prediction)
model.save('./me.face.model.h5')
第三步:读取.h5文件格式的人脸识别模型,对摄像头录入的人脸图像进行识别
video_predict.py
import cv2
import dlib
from keras.models import load_model
import sys

size = 64

# 使用dlib自带的frontal_face_detector作为我们的特征提取器
detector = dlib.get_frontal_face_detector()

cam = cv2.VideoCapture(0)

model = load_model('./me.face.model.h5')

while True:
    _, img = cam.read()
    gray_image = cv2.cvtColor(img, cv2.COLOR_BGR2GRAY)
    dets = detector(gray_image, 1)
    for i, d in enumerate(dets):
        x1 = d.top() if d.top() > 0 else 0
        y1 = d.bottom() if d.bottom() > 0 else 0
        x2 = d.left() if d.left() > 0 else 0
        y2 = d.right() if d.right() > 0 else 0
        face = img[x1:y1, x2:y2]
        # 调整图片的尺寸
        face = cv2.resize(face, (size, size))
        shape_img = (face.reshape(1, size, size, 3)).astype('float32') / 255

        prediction = model.predict_classes(shape_img)
        print(prediction[0])
        name = "unknown"
        if prediction[0] == 0:
            print("识别出本人")
            name = "Aricl."
        else:
            print("不是本人")
            name = "unknown"
        cv2.rectangle(img, (x2, x1), (y2, y1), (255, 0, 0), 3)
        font = cv2.FONT_HERSHEY_SIMPLEX
        cv2.putText(img, name, (x2, x1), font, 0.8, (255, 255, 255), 1)

    cv2.imshow('image', img)
    key = cv2.waitKey(30) & 0xff
    if key == 27:
        sys.exit(0)
2.识别的基本原理
核心之一是使用OpenCV(Open source Computer Vision Library),即开放源代码计算机视觉库进行图像的处理。
它是一套关于计算机视觉的开放源代码的API函数库。这也就意味着,(1)不管是科学研究,还是商业应用,都可以利用它来作开发;(2)所有API函数的源代码都是公开的,你可以看到其内部实现的程序步骤;(3)你可以修改OpenCV的源代码,编译生成你需要的特定API函数。但是,作为一个库,它所提供的,仅仅是一些常用、经典、大众化算法的API。
一个典型的计算机视觉算法,一般包含以下步骤:
- 数据获取
- 预处理
- 特征提取
- 特征选择
- 分类器设计与训练
- 分类判别
而OpenCV对这六个部分,都分别提供了API以供开发者调用。
核心之二是使用Keras搭建卷积神经网络。
Keras对人工智能来说,是一款比较好的入门框架。它是一个高级的Python神经网络框架,已经被添加到TensorFlow中,成为其默认的框架,为TensorFlow提供更高级的API。
如果将TensorFlow比喻为编程界的Java或者C++,那么Keras就是编程界的Python,它作为TensorFlow的高层封装,可以与TensorFlow联合使用,用它可以快速搭建模型。
并且Keras是TensorFlow官方支持的。当机器上有可用的GPU时,代码会自动调用GPU进行并行计算,功能十分强大!
3.运行与测试
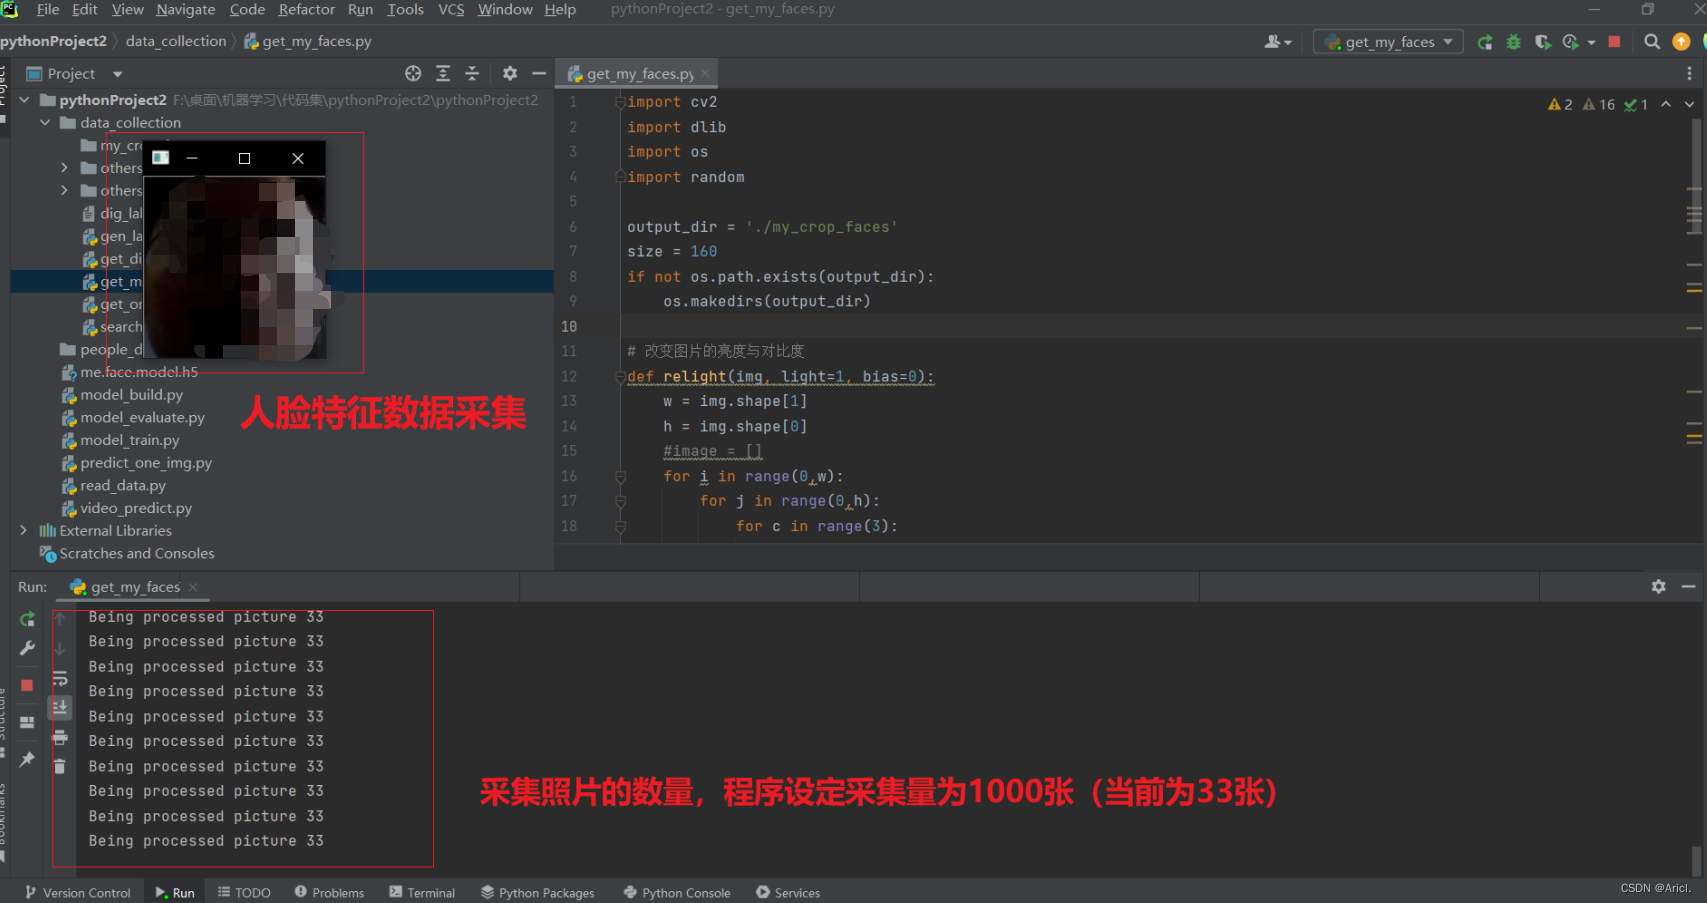
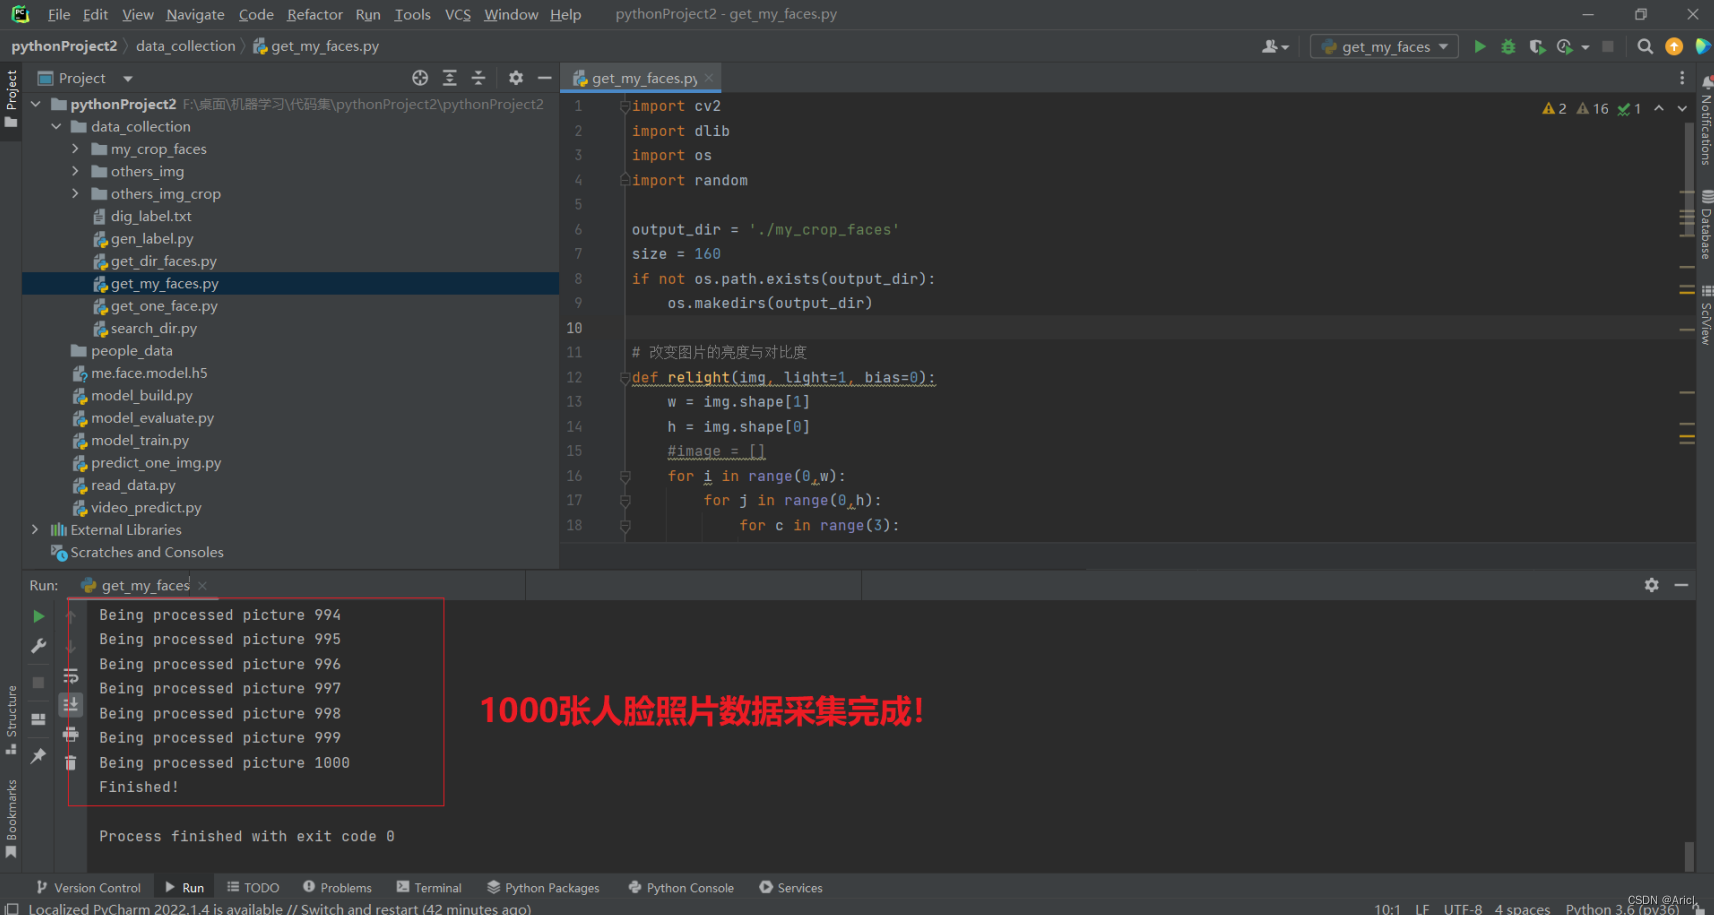
第一步:采集本人与他人的人脸特征数据(注意需要打开电脑摄像头,否则会报错!)
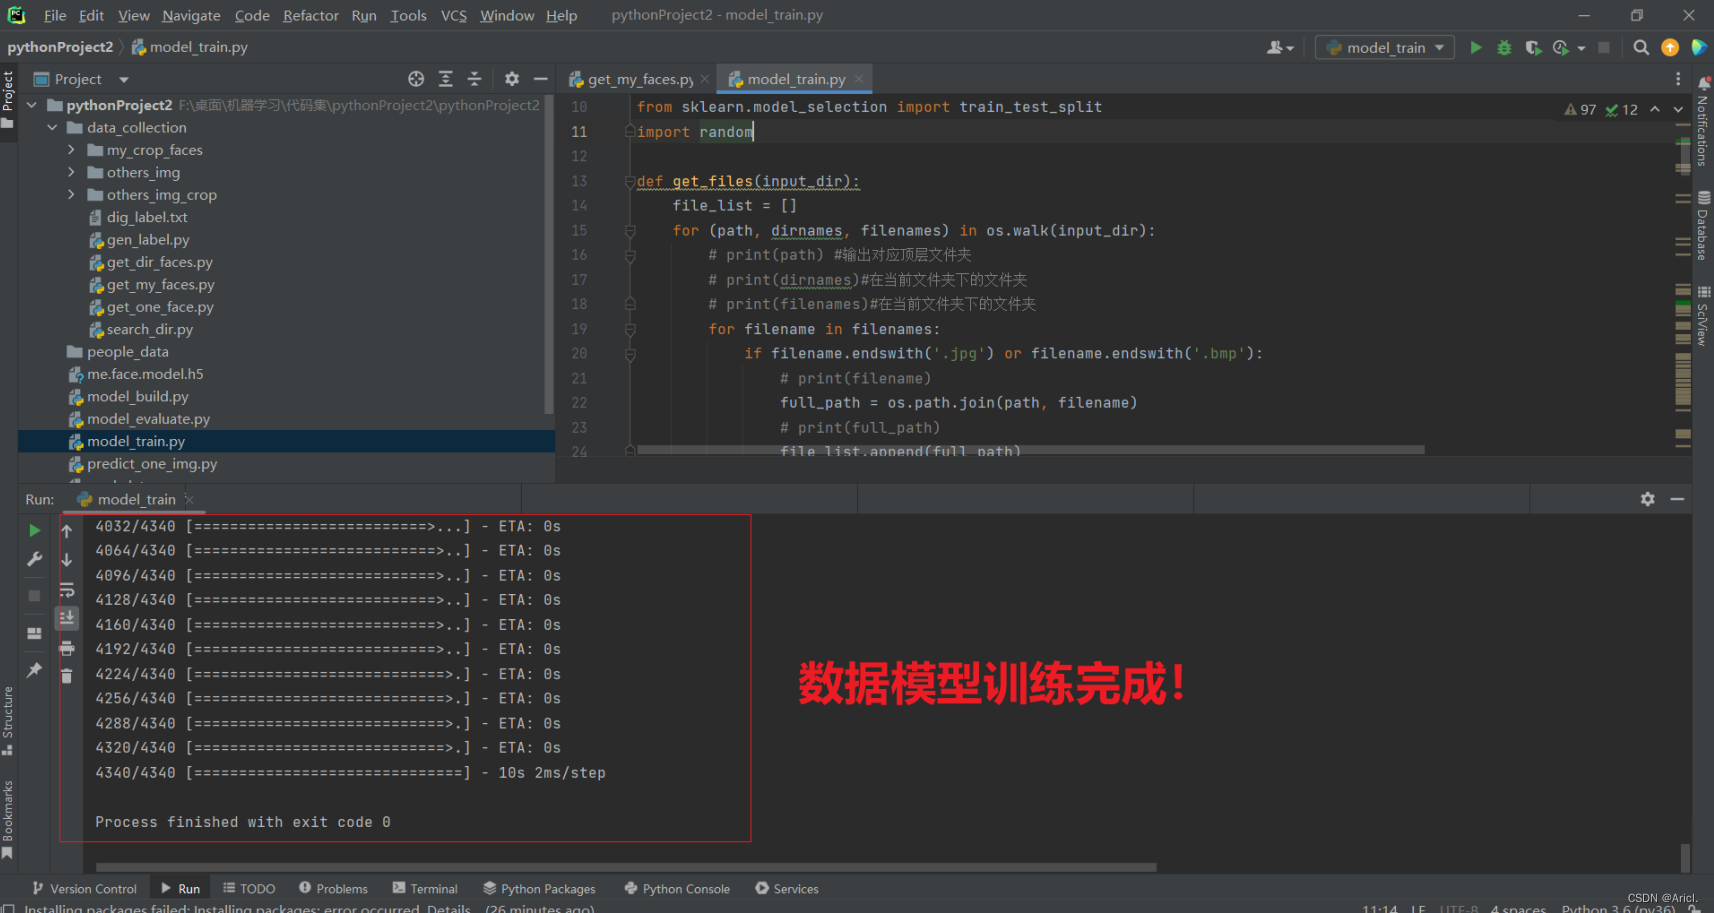
第二步:进行10轮次的人脸数据模型的训练
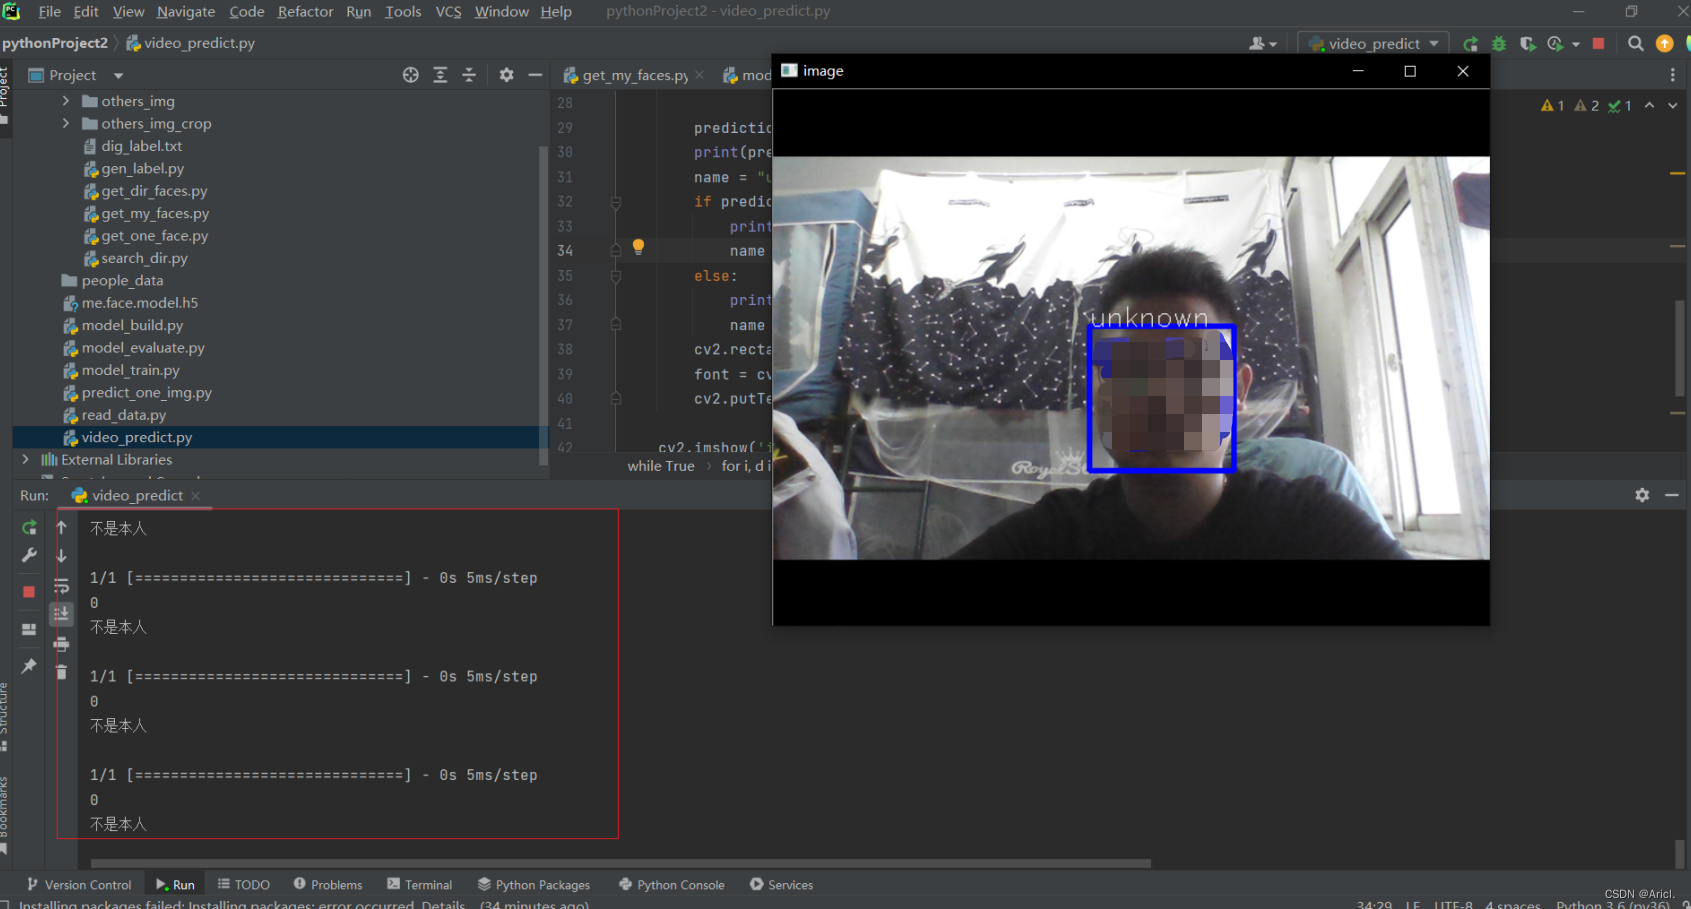
第三步:人脸识别与比对测试
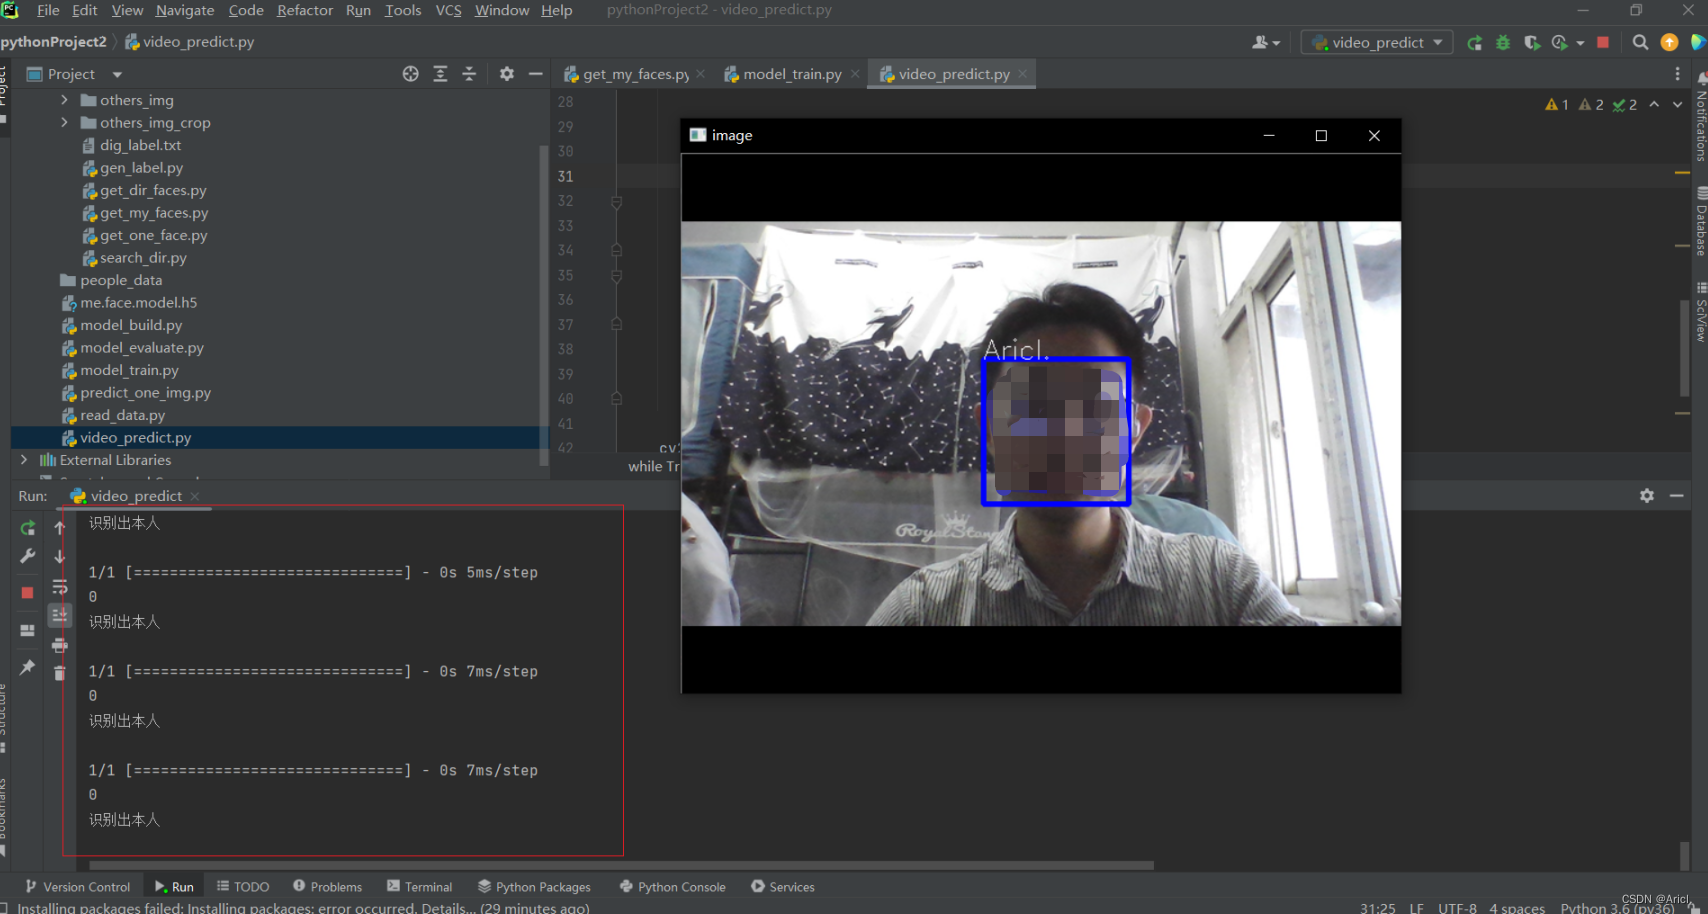
上图是本人(博主Aricl.),下图是我室友(未知人脸),可见人脸识别的准确率还是不错的!
四、分析与小结
本次通过构建基于卷积神经网络与Keras的人脸识别模型,实现的基本原理是:引用Python中的OpenCV库,调用其中的人脸分类器,然后调用电脑的摄像头循环读取单帧数据,进行实时人脸检测,并框出人脸,标注信息。
首先我们需要进行人脸数据的采集,总共采集了1000张本人与他人的人脸特征数据,采集完毕后,进行数据模型的训练,共训练了10轮次,每轮次六千多,将训练好的模型保存为.h5格式的文件。然后调用摄像头读取每一帧的人脸照片,对图片进行灰度化处理,检测出人脸并框出对应的区域,读取.h5人脸识别模型文件进行人脸识别与比对,并在上方标注出是本人或者未知等信息。
另外,采集时对被采集人和环境有一定要求,光线应该明亮使得摄像头能看清楚人脸,并且人脸应该正对着摄像头,这样采集得到的人脸特征数据才较为准确,识别的效果就越好。
本次仅仅是人脸识别的一次初步入门,我对此也产生了浓厚的学习兴趣,但博主正在备战考研,只能初步了解,后续有机会再继续学习与研究该领域相关技术,加油!!
参考文章
Python+Keras+opencv实现人脸识别![]() https://blog.csdn.net/gf19960103/article/details/91038858?ops_request_misc=&request_id=&biz_id=102&utm_term=%E4%BD%BF%E7%94%A8Keras%E6%9E%84%E5%BB%BA%E4%BA%BA%E8%84%B8%E8%AF%86%E5%88%AB%E6%A8%A1%E5%9E%8B&utm_medium=distribute.pc_search_result.none-task-blog-2~all~sobaiduweb~default-3-91038858.nonecase&spm=1018.2226.3001.4187人脸检测及识别python实现系列(5)——利用keras库训练人脸识别模型
https://blog.csdn.net/gf19960103/article/details/91038858?ops_request_misc=&request_id=&biz_id=102&utm_term=%E4%BD%BF%E7%94%A8Keras%E6%9E%84%E5%BB%BA%E4%BA%BA%E8%84%B8%E8%AF%86%E5%88%AB%E6%A8%A1%E5%9E%8B&utm_medium=distribute.pc_search_result.none-task-blog-2~all~sobaiduweb~default-3-91038858.nonecase&spm=1018.2226.3001.4187人脸检测及识别python实现系列(5)——利用keras库训练人脸识别模型![]() https://blog.csdn.net/weixin_44491431/article/details/113839543?ops_request_misc=%257B%2522request%255Fid%2522%253A%2522168601107216800185824691%2522%252C%2522scm%2522%253A%252220140713.130102334..%2522%257D&request_id=168601107216800185824691&biz_id=0&utm_medium=distribute.pc_search_result.none-task-blog-2~all~sobaiduend~default-1-113839543-null-null.142^v88^control_2,239^v2^insert_chatgpt&utm_term=%E4%BD%BF%E7%94%A8Keras%E6%9E%84%E5%BB%BA%E4%BA%BA%E8%84%B8%E8%AF%86%E5%88%AB%E6%A8%A1%E5%9E%8B&spm=1018.2226.3001.4187手把手教你使用Keras进行人脸检测和识别
https://blog.csdn.net/weixin_44491431/article/details/113839543?ops_request_misc=%257B%2522request%255Fid%2522%253A%2522168601107216800185824691%2522%252C%2522scm%2522%253A%252220140713.130102334..%2522%257D&request_id=168601107216800185824691&biz_id=0&utm_medium=distribute.pc_search_result.none-task-blog-2~all~sobaiduend~default-1-113839543-null-null.142^v88^control_2,239^v2^insert_chatgpt&utm_term=%E4%BD%BF%E7%94%A8Keras%E6%9E%84%E5%BB%BA%E4%BA%BA%E8%84%B8%E8%AF%86%E5%88%AB%E6%A8%A1%E5%9E%8B&spm=1018.2226.3001.4187手把手教你使用Keras进行人脸检测和识别![]() https://blog.csdn.net/m0_55479420/article/details/115268470?ops_request_misc=%257B%2522request%255Fid%2522%253A%2522168601107216800185824691%2522%252C%2522scm%2522%253A%252220140713.130102334..%2522%257D&request_id=168601107216800185824691&biz_id=0&utm_medium=distribute.pc_search_result.none-task-blog-2~all~sobaiduend~default-2-115268470-null-null.142^v88^control_2,239^v2^insert_chatgpt&utm_term=%E4%BD%BF%E7%94%A8Keras%E6%9E%84%E5%BB%BA%E4%BA%BA%E8%84%B8%E8%AF%86%E5%88%AB%E6%A8%A1%E5%9E%8B&spm=1018.2226.3001.4187
https://blog.csdn.net/m0_55479420/article/details/115268470?ops_request_misc=%257B%2522request%255Fid%2522%253A%2522168601107216800185824691%2522%252C%2522scm%2522%253A%252220140713.130102334..%2522%257D&request_id=168601107216800185824691&biz_id=0&utm_medium=distribute.pc_search_result.none-task-blog-2~all~sobaiduend~default-2-115268470-null-null.142^v88^control_2,239^v2^insert_chatgpt&utm_term=%E4%BD%BF%E7%94%A8Keras%E6%9E%84%E5%BB%BA%E4%BA%BA%E8%84%B8%E8%AF%86%E5%88%AB%E6%A8%A1%E5%9E%8B&spm=1018.2226.3001.4187
标签:
相关文章
最新发布
- 光流法结合深度学习神经网络的原理及应用(完整代码都有Python opencv)
- Python 图像处理进阶:特征提取与图像分类
- 大数据可视化分析-基于python的电影数据分析及可视化系统_9532dr50
- 【Python】入门(运算、输出、数据类型)
- 【Python】第一弹---解锁编程新世界:深入理解计算机基础与Python入门指南
- 华为OD机试E卷 --第k个排列 --24年OD统一考试(Java & JS & Python & C & C++)
- Python已安装包在import时报错未找到的解决方法
- 【Python】自动化神器PyAutoGUI —告别手动操作,一键模拟鼠标键盘,玩转微信及各种软件自动化
- Pycharm连接SQL Sever(详细教程)
- Python编程练习题及解析(49题)
点击排行
- 版本匹配指南:Numpy版本和Python版本的对应关系
- 版本匹配指南:PyTorch版本、torchvision 版本和Python版本的对应关系
- Python 可视化 web 神器:streamlit、Gradio、dash、nicegui;低代码 Python Web 框架:PyWebIO
- Anaconda版本和Python版本对应关系(持续更新...)
- 相关性分析——Pearson相关系数+热力图(附data和Python完整代码)
- Python与PyTorch的版本对应
- Windows上安装 Python 环境并配置环境变量 (超详细教程)
- Python pyinstaller打包exe最完整教程

