首页 > Python资料 博客日记
【Python】 剪辑法欠采样 CNN压缩近邻法欠采样
2024-02-25 21:00:04Python资料围观306次
借鉴:关于K近邻(KNN),看这一篇就够了!算法原理,kd树,球树,KNN解决样本不平衡,剪辑法,压缩近邻法 - 知乎
但是不要看他里面的代码,因为作者把代码里的一些符号故意颠倒了 ,比如“==”改成“!=”,还有乱加“~”,看明白逻辑才能给他改过来
一、剪辑法
当训练集数据中存在一部分不同类别数据的重叠时(在一部分程度上说明这部分数据的类别比较模糊),这部分数据会对模型造成一定的过拟合,那么一个简单的想法就是将这部分数据直接剔除掉即可,也就是剪辑法。
剪辑法将训练集 D 随机分成两个部分,一部分作为新的训练集 Dtrain,一部分作为测试集 Dtest,然后基于 Dtrain,使用 KNN 的方法对 Dtest 进行分类,并将其中分类错误的样本从整体训练集 D 中剔除掉,得到 Dnew。
由于对训练集 D 的划分是随机划分,难以保证数据重叠部分的样本在第一次剪辑时就被剔除,因此在得到 Dnew 后,可以对 Dnew 继续进行上述操作数次,这样可以得到一个比较清爽的类别分界。
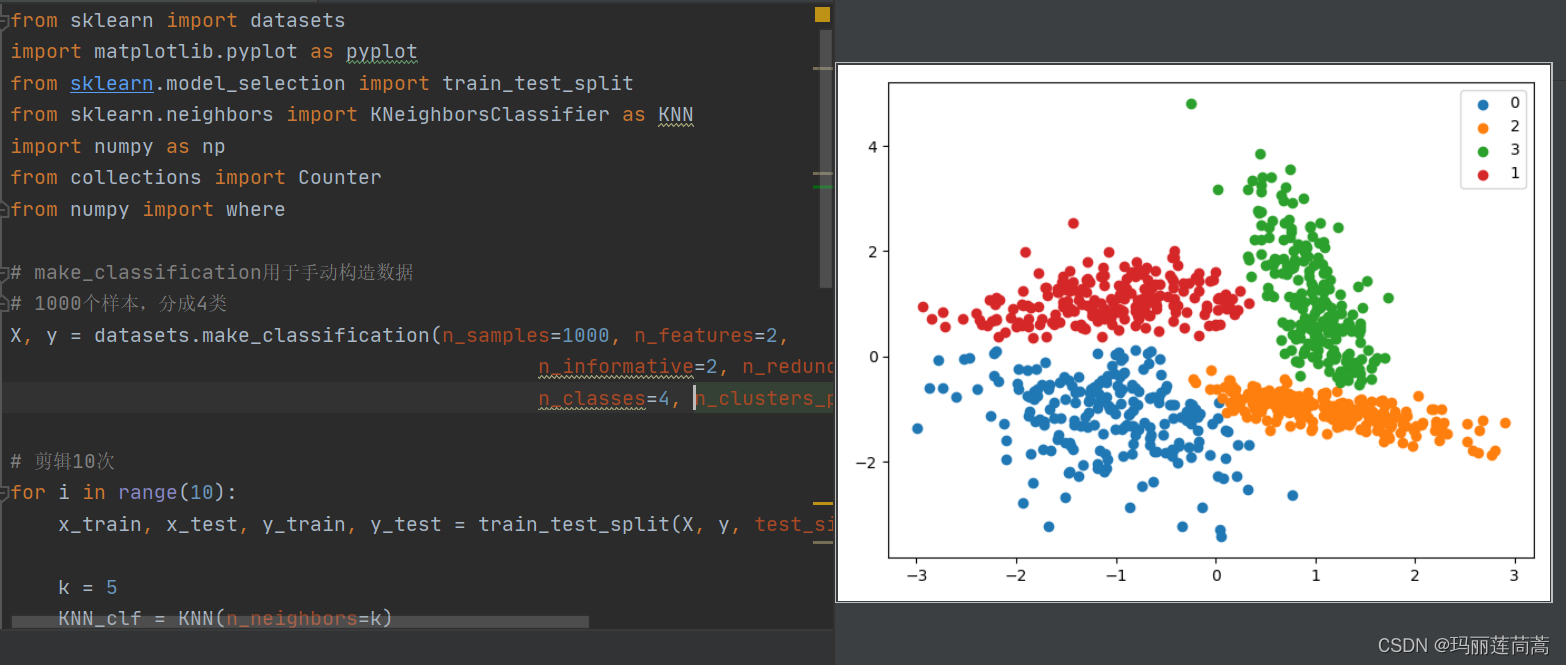
效果如下图:

附上可直接运行的代码:
from sklearn import datasets
import matplotlib.pyplot as pyplot
from sklearn.model_selection import train_test_split
from sklearn.neighbors import KNeighborsClassifier as KNN
import numpy as np
from collections import Counter
from numpy import where

# make_classification用于手动构造数据
# 1000个样本,分成4类
X, y = datasets.make_classification(n_samples=1000, n_features=2,
                                            n_informative=2, n_redundant=0, n_repeated=0,
                                            n_classes=4, n_clusters_per_class=1)

# # # 画出二维散点图
# for label, _ in counter.items():
# 	row_ix = where(y == label)[0]
# 	pyplot.scatter(X[row_ix, 0], X[row_ix, 1], label=str(label))
# pyplot.legend()
# pyplot.show()

# 剪辑10次
for i in range(10):
    x_train, x_test, y_train, y_test = train_test_split(X, y, test_size=0.5)

    k = 5
    KNN_clf = KNN(n_neighbors=k)
    KNN_clf.fit(x_train, y_train)  # 用训练集训练KNN
    y_predict = KNN_clf.predict(x_test)  # 用测试集测试

    cond = y_predict == y_test
    x_test = x_test[cond]  # 把预测错误的从整体数据集中剔除掉
    y_test = y_test[cond]  # 把预测错误的从整体数据集中剔除掉

    X = np.vstack([x_train, x_test])  # 为下一次循环做准备(剔除掉本轮预测错误的
    y = np.hstack([y_train, y_test])  # 为下一次循环做准备(剔除掉本轮预测错误的

# summarize the new class distribution
counter = Counter(y)
print(counter)

# 画出二维散点图
for label, _ in counter.items():
	row_ix = where(y == label)[0]
	pyplot.scatter(X[row_ix, 0], X[row_ix, 1], label=str(label))
pyplot.legend()
pyplot.show()
以上使用了k=20的参数进行剪辑的结果,循环了10次,一般而言,k越大,被抛弃的样本会越多,因为被分类的错误的概率更大。
二、CNN压缩近邻法欠采样
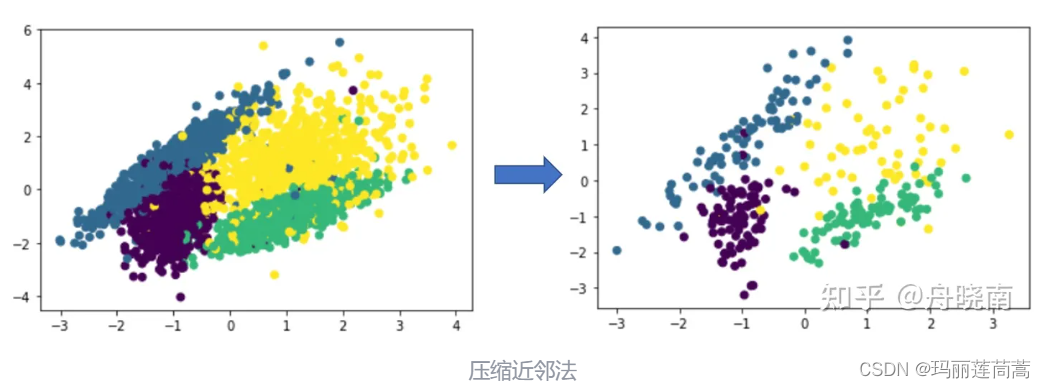
压缩近邻法的想法是认为同一类型的样本大量集中在类簇的中心,而这些集中在中心的样本对分类没有起到太大的作用,因此可以舍弃掉这些样本。
其做法是将训练集随机分为两个部分,第一个部分为 store,占所有样本的 10% 左右,第二个部分为 grabbag,占所有样本的 90% 左右,然后将 store 作为训练集训练 KNN 模型,grabbag 作为测试集,将分类错误的样本从 grabbag 中移动到 store 里,然后继续用增加了样本的 store 和减少了样本的 grabbag 再次训练和测试 KNN 模型,直到 grabbag 中所有样本被分类正确,或者 grabbag 中样本数为0。
在压缩结束之后,store 中存储的是初始化时随机选择的 10% 左右的样本,以及在之后每一次循环中被分类错误的样本,这些被分类错误的样本集中在类簇的边缘,认为是对分类作用较大的样本。

CNN欠采样已经有相应的Python实现库了,相应的方法是CondensedNearestNeighbour(),下面是可直接运行的代码。
# Undersample and plot imbalanced dataset with the Condensed Nearest Neighbor Rule
from collections import Counter
from sklearn.datasets import make_classification
from imblearn.under_sampling import CondensedNearestNeighbour
from matplotlib import pyplot
from numpy import where

# make_classification方法用于生成分类任务的人造数据集
# X是数据,几维都可以,n_features=4表示4维
# y用0/1表示类别,weights调整0和1的占比
X, y = make_classification(n_samples=500, n_classes=2, n_features=3, n_redundant=0,
	# n_clusters_per_class表示每个类别多少簇  # flip_y噪声,增加分类难度
	n_clusters_per_class=2, weights=[0.5], flip_y=0, random_state=1)

# summarize class distribution
counter = Counter(y)  # {0: 990, 1: 10} counter是一个字典,value存储类别,key存储类别个数
print(counter)

# ==================CNN有直接可以调用的包  n_neighbors设置k值,k值越小越省时间,就设置为1吧
undersample = CondensedNearestNeighbour(n_neighbors=1)
# transform the dataset
X, y = undersample.fit_resample(X, y)

# summarize the new class distribution
counter = Counter(y)
print(counter)

# scatter plot of examples by class label
for label, _ in counter.items():
	row_ix = where(y == label)[0]
	pyplot.scatter(X[row_ix, 0], X[row_ix, 1], label=str(label))
pyplot.legend()
pyplot.show()
但是我觉得这个CondensedNearestNeighbour()方法的可操作性太低,所以没用这个方法,而是根据CNN的原理(CNN底层是训练KNN)去写的
from sklearn import datasets
import matplotlib.pyplot as pyplot
from sklearn.model_selection import train_test_split
from sklearn.neighbors import KNeighborsClassifier as KNN
import numpy as np
from collections import Counter
from numpy import where

# make_classification用于手动构造数据
# 1000个样本,分成4类
X, y = datasets.make_classification(n_samples=1000, n_features=2,
                                            n_informative=2, n_redundant=0, n_repeated=0,
                                            n_classes=4, n_clusters_per_class=1, random_state=1)
counter = Counter(y)
# 画出二维散点图
for label, _ in counter.items():
	row_ix = where(y == label)[0]
	pyplot.scatter(X[row_ix, 0], X[row_ix, 1], label=str(label))
pyplot.legend()
pyplot.show()

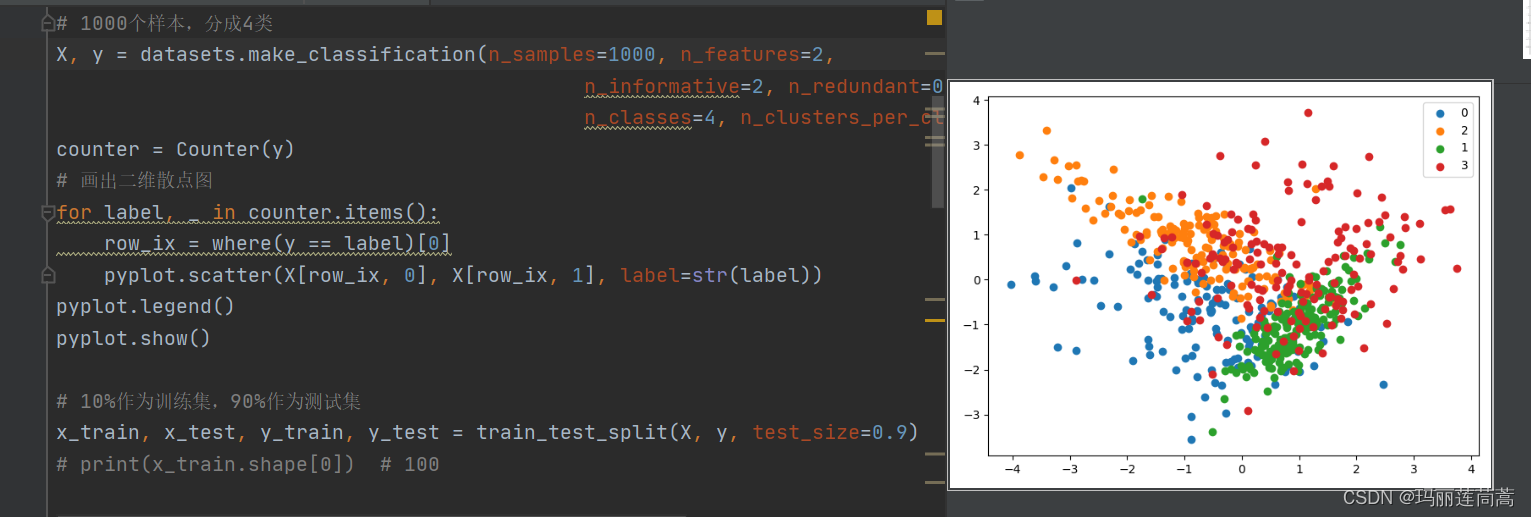
# 10%作为训练集,90%作为测试集
x_train, x_test, y_train, y_test = train_test_split(X, y, test_size=0.9)


while True:
	k = 1
	KNN_clf = KNN(n_neighbors=k)
	KNN_clf.fit(x_train, y_train)
	y_predict = KNN_clf.predict(x_test)

	cond = y_predict == y_test  # cond记录分类的对与错,分类错是False,正确是True
	# 都分类正确,退出
	if  cond.all():
		print('所有测试集都分类正确,CNN正常结束')
		break

	x_train = np.vstack([x_train, x_test[~cond]])  # 把分类错误(cond的值是False)的移动到训练集里
	y_train = np.hstack([y_train, y_test[~cond]])
	x_test = x_test[cond]  # 把分类对的继续作为下一轮的测试集
	y_test = y_test[cond]

	if len(x_test) == 0:
		print("所有样本都能做到分类错误,也就是结果集=原始数据集,一般不会出现这种情况")
		break


# summarize the new class distribution
counter = Counter(y_train)
print(counter)

# 画出二维散点图
for label, _ in counter.items():
	row_ix = where(y_train == label)[0]
	pyplot.scatter(x_train[row_ix, 0], x_train[row_ix, 1], label=str(label))
pyplot.legend()
pyplot.show()
2.1 改进版——指定压缩后样本大小的CNN
在如下代码中,用sampleNum指定全体样本数量,用endNum指定压缩后样本数量
from sklearn import datasets
import matplotlib.pyplot as pyplot
from sklearn.model_selection import train_test_split
from sklearn.neighbors import KNeighborsClassifier as KNN
import numpy as np
from collections import Counter
from numpy import where


sampleNum = 1000
endNum = 500
k = 1  # KNN算法的K值
# make_classification用于手动构造数据
# 1000个样本,分成4类
X, y = datasets.make_classification(n_samples=sampleNum, n_features=2,
                                            n_informative=2, n_redundant=0, n_repeated=0,
                                            n_classes=4, n_clusters_per_class=1, random_state=1)
# counter = Counter(y)
# # 画出二维散点图
# for label, _ in counter.items():
# 	row_ix = where(y == label)[0]
# 	pyplot.scatter(X[row_ix, 0], X[row_ix, 1], label=str(label))
# pyplot.legend()
# pyplot.show()

# 10%作为训练集,90%作为测试集
x_train, x_test, y_train, y_test = train_test_split(X, y, test_size=0.9)
# print(x_train.shape[0])  # 100

nowNum = x_train.shape[0]  # 用来控制 训练集/筛选后的样本数 满足resultNum就停下, 初始有x_train这么多个

while True:
	KNN_clf = KNN(n_neighbors=k)
	KNN_clf.fit(x_train, y_train)
	y_predict = KNN_clf.predict(x_test)
	cond = y_predict == y_test  # cond记录分类的对与错,分类错是False,正确是True
	# 都分类正确,退出
	if cond.all():
		print('所有测试集都分类正确,CNN自动结束,但是结果集没凑够呢!')
		break

	# 如果结果集数量不够要求的endNum,继续下一轮
	if nowNum+y_test[~cond].shape[0] < endNum:
		nowNum = nowNum+y_test[~cond].shape[0]
		print("目前结果集数量:", nowNum)
		x_train = np.vstack([x_train, x_test[~cond]])  # 把分类错误(cond的值是False)的移动到训练集里
		y_train = np.hstack([y_train, y_test[~cond]])
		x_test = x_test[cond]  # 把分类对的继续作为下一轮的测试集
		y_test = y_test[cond]
	# 如果结果集数量超过endNum,我们只要测试集里分类错误的前endNum-nowNum个
	else:
		# 记录前endNum-nowNum个的位置(截取位置
		condCut = 0  # 记录截取位置
		for i in range(cond.shape[0]):
			if not cond[i]:
				nowNum = nowNum + 1
			if nowNum == endNum:
				condCut = i  # 在cond[condCut]处刚好是我们要的第endNum个结果集样本
				break
		# 把cond[condCut]后面的都设置成True
		cond[condCut+1:] = True
		x_train = np.vstack([x_train, x_test[~cond]])  # 把分类错误(cond的值是False)的移动到训练集里
		y_train = np.hstack([y_train, y_test[~cond]])
		print("结果集的数量为", x_train.shape[0], "满足endNum=", endNum)
		break

	if len(x_test) == 0:
		print("所有样本都能做到分类错误,也就是结果集=原始数据集,一般不会出现这种情况")
		break


# summarize the new class distribution
counter = Counter(y_train)
print(counter)

# 画出二维散点图
for label, _ in counter.items():
	row_ix = where(y_train == label)[0]
	pyplot.scatter(x_train[row_ix, 0], x_train[row_ix, 1], label=str(label))
pyplot.legend()
pyplot.show()
标签:
相关文章
最新发布
- 光流法结合深度学习神经网络的原理及应用(完整代码都有Python opencv)
- Python 图像处理进阶:特征提取与图像分类
- 大数据可视化分析-基于python的电影数据分析及可视化系统_9532dr50
- 【Python】入门(运算、输出、数据类型)
- 【Python】第一弹---解锁编程新世界:深入理解计算机基础与Python入门指南
- 华为OD机试E卷 --第k个排列 --24年OD统一考试(Java & JS & Python & C & C++)
- Python已安装包在import时报错未找到的解决方法
- 【Python】自动化神器PyAutoGUI —告别手动操作,一键模拟鼠标键盘,玩转微信及各种软件自动化
- Pycharm连接SQL Sever(详细教程)
- Python编程练习题及解析(49题)
点击排行
- 版本匹配指南:Numpy版本和Python版本的对应关系
- 版本匹配指南:PyTorch版本、torchvision 版本和Python版本的对应关系
- Python 可视化 web 神器:streamlit、Gradio、dash、nicegui;低代码 Python Web 框架:PyWebIO
- 相关性分析——Pearson相关系数+热力图(附data和Python完整代码)
- Anaconda版本和Python版本对应关系(持续更新...)
- Python与PyTorch的版本对应
- Windows上安装 Python 环境并配置环境变量 (超详细教程)
- Python pyinstaller打包exe最完整教程

