首页 > Python资料 博客日记
Python 一步一步教你用pyglet制作汉诺塔游戏
2024-03-12 21:00:04Python资料围观207次

目录
汉诺塔游戏
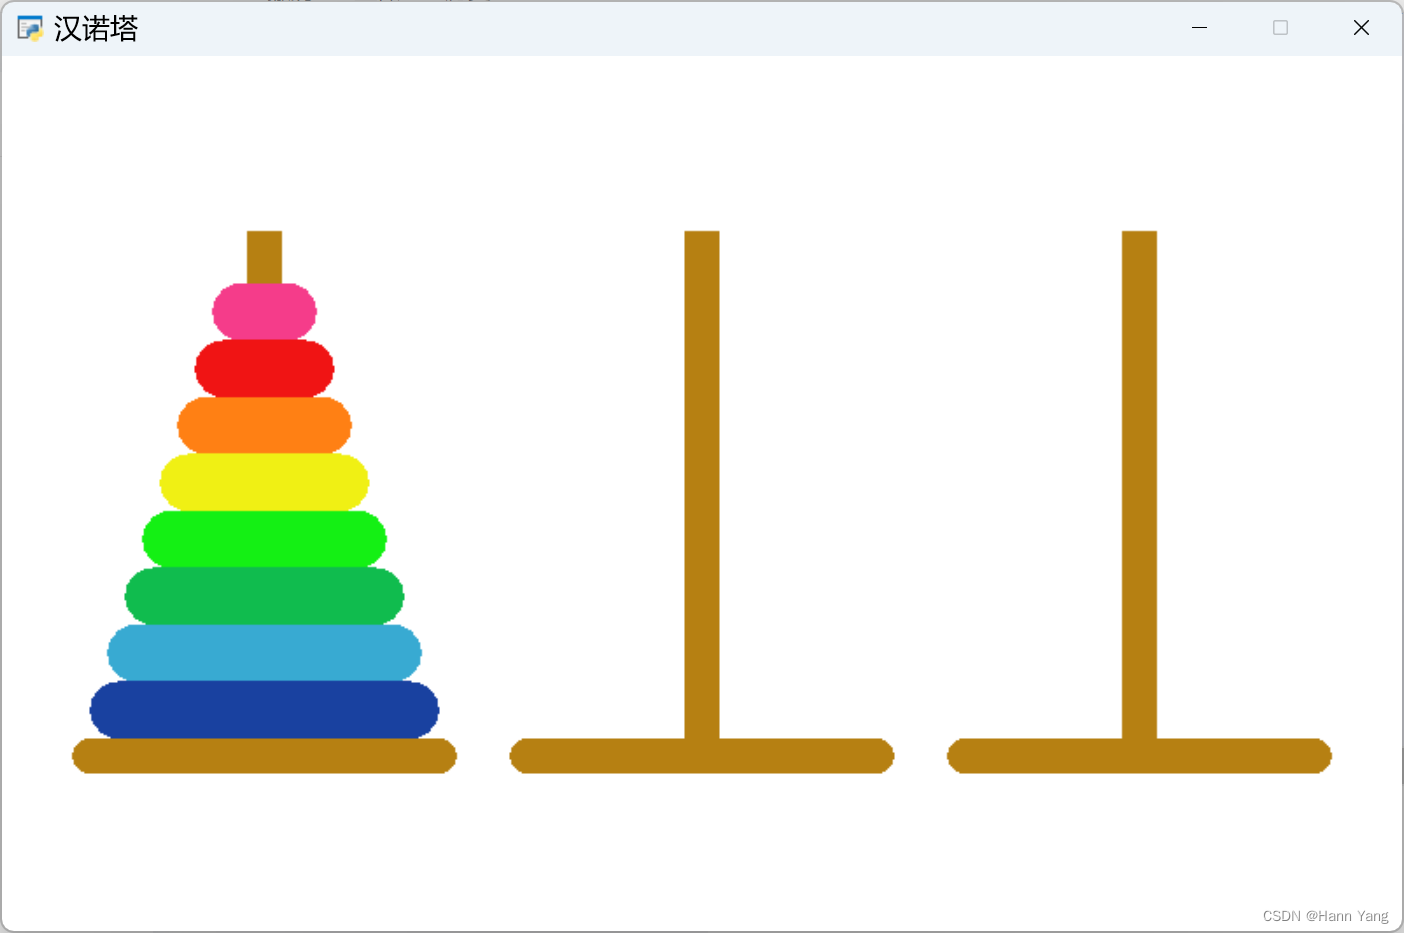
汉诺塔(Tower of Hanoi),是一个源于印度古老传说的益智玩具。这个传说讲述了大梵天创造世界的时候,他做了三根金刚石柱子,并在其中一根柱子上从下往上按照大小顺序摞着64片黄金圆盘。大梵天命令婆罗门将这些圆盘从下面开始按大小顺序重新摆放在另一根柱子上,并规定在小圆盘上不能放大圆盘,同时在三根柱子之间一次只能移动一个圆盘。当盘子的数量增加时,移动步骤的数量会呈指数级增长,圆盘数为n时,总步骤数steps为2^n - 1。
n = 64, steps = 2^64 - 1 = 18446744073709551616 ≈ 1.845 x 10^19
汉诺塔问题是一个递归问题,也可以使用非递归法来解决,例如使用栈来模拟递归过程。这个问题不仅是一个数学和逻辑问题,也是一个很好的教学工具,可以用来教授递归、算法和逻辑思考等概念。同时,汉诺塔游戏也具有一定的娱乐性,人们可以通过解决不同规模的汉诺塔问题来挑战自己的智力和耐心。
1. 抓取颜色
本篇将展示如何用python pyglet库制作这个小游戏,首先在上图中抓取出需要用到的颜色RGB值,每种颜色画一个矩形块:
Rectangle(x, y, width, height, color=color)

代码:
import pyglet

window = pyglet.window.Window(800, 500, caption='汉诺塔')
pyglet.gl.glClearColor(1, 1, 1, 1)
batch = pyglet.graphics.Batch()

Color = (182,128,18),(25,65,160),(56,170,210),(16,188,78),(20,240,20),(240,240,20),(255,128,20),(240,20,20),(245,60,138)

class Rect:
    def __init__(self, x, y, color=(0,0,0), width=180, height=60):
        self.rect = pyglet.shapes.Rectangle(x, y, width, height, color=color, batch=batch)

@window.event
def on_draw():
    window.clear()
    batch.draw()

rectangle = [None]*9
for i,color in enumerate(Color):
    rectangle[i] = Rect(110+i//3*200, 120+i%3*100, color)

pyglet.app.run()
2. 绘制圆盘
圆盘用矩形加2个半圆表示,半圆用扇形控件绘制:
Sector(x, y, radius=R, angle=pi, start_angle=-pi/2, color=color)
注意圆盘类中的矩形的宽度和坐标需要调整,整个圆盘类的宽度是矩形宽度加2倍扇形半径,圆盘的中心是矩形的中心而不是矩形左下角。

import pyglet

window = pyglet.window.Window(800, 500, caption='汉诺塔')
pyglet.gl.glClearColor(1, 1, 1, 1)
batch = pyglet.graphics.Batch()

pi = 3.141592653589793
Color = (182,128,18),(25,65,160),(56,170,210),(16,188,78),(20,240,20),(240,240,20),(255,128,20),(240,20,20),(245,60,138)

class Bead:
    def __init__(self, x, y, width=180, height=60):
        self.sec1 = pyglet.shapes.Sector(x+width/2-height/2, y, radius=height/2, angle=pi, start_angle=-pi/2, color=Color[5], batch=batch)
        self.sec2 = pyglet.shapes.Sector(x-width/2+height/2, y, radius=height/2, angle=pi, start_angle=pi/2, color=Color[5], batch=batch)
        self.rect = pyglet.shapes.Rectangle(x-width/2+height/2, y-height/2, width-height, height, color=Color[1], batch=batch)

@window.event
def on_draw():
    window.clear()
    batch.draw()

ead1 = Bead(window.width/2, window.height/2)

pyglet.app.run()
3. 九层汉塔
叠加多个圆盘,绘制出汉诺塔的样子:

代码:
import pyglet

window = pyglet.window.Window(800, 500, caption='汉诺塔')
pyglet.gl.glClearColor(1, 1, 1, 1)
batch = pyglet.graphics.Batch()

pi = 3.141592653589793
Color = (182,128,18),(25,65,160),(56,170,210),(16,188,78),(20,240,20),(240,240,20),(255,128,20),(240,20,20),(245,60,138)

class Disk:
    def __init__(self, x, y, color=(0,0,0), width=200, height=20):
        self.sec1 = pyglet.shapes.Sector(x+width/2-height/2, y, radius=height/2, angle=pi, start_angle=-pi/2, color=color, batch=batch)
        self.sec2 = pyglet.shapes.Sector(x-width/2+height/2, y, radius=height/2, angle=pi, start_angle=pi/2, color=color, batch=batch)
        self.rect = pyglet.shapes.Rectangle(x-width/2+height/2, y-height/2, width-height, height, color=color, batch=batch)
        assert(width>height and x-width/2+height/2>0)

@window.event
def on_draw():
    window.clear()
    batch.draw()

x, y = window.width/2, window.height/2
width, height = 200, 40
disk = []
for i in range(9):
    disk.append(Disk(x, y+height*(i-4), Color[i], width=width-20*(i-1), height=height))

pyglet.app.run()
4. 绘制塔架
把圆盘变簿(高度换成厚度),再加一条粗直线(直线的宽度等于圆盘的厚度)表示出“竖杆”,就画出叠放的架子来:
self.pole = pyglet.shapes.Line(x, y, x, y+height, width=thickness, color=color)
self.disk = Disk(x, y, color=color, width=width, height=thickness)

代码:
import pyglet

window = pyglet.window.Window(800, 500, caption='汉诺塔')
pyglet.gl.glClearColor(1, 1, 1, 1)
batch = pyglet.graphics.Batch()

pi = 3.141592653589793
Color = (182,128,18),(25,65,160),(56,170,210),(16,188,78),(20,240,20),(240,240,20),(255,128,20),(240,20,20),(245,60,138)

class Disk:
    def __init__(self, x, y, color=(0,0,0), width=200, height=20):
        self.sec1 = pyglet.shapes.Sector(x+width/2-height/2, y, radius=height/2, angle=pi, start_angle=-pi/2, color=color, batch=batch)
        self.sec2 = pyglet.shapes.Sector(x-width/2+height/2, y, radius=height/2, angle=pi, start_angle=pi/2, color=color, batch=batch)
        self.rect = pyglet.shapes.Rectangle(x-width/2+height/2, y-height/2, width-height, height, color=color, batch=batch)
        assert(width>height and x-width/2+height/2>0)

class Hann:
    def __init__(self, x, y, color=(0,0,0), width=220, height=300, thickness=20):
        self.pole = pyglet.shapes.Line(x, y, x, y+height, width=thickness, color=color, batch=batch)
        self.disk = Disk(x, y, color=color, width=width, height=thickness)

@window.event
def on_draw():
    window.clear()
    batch.draw()

pole1 = Hann(window.width/2-250, 100)
pole2 = Hann(window.width/2, 100, color=Color[0])
pole3 = Hann(window.width/2+250, 100, color=Color[1])

pyglet.app.run()
5. 叠加圆盘
把多个圆盘叠加磊在塔架上,圆盘数至少为2。 注意Color颜色列表共有9种颜色,Color[i%8+1]只取后8种颜色,Color[0]仅用于塔架的涂色。
Hann类中各控件的坐标计算有点复杂,以下方案可以解决问题但未必是最佳方案:
self.x, self.y = x, y
self.width = width
self.height = (height-thickness*2)/order
self.step = (width-thickness)/(order+1)
self.beads = []
self.coordinates = []
for i in range(order):
self.coordinates.append([self.x, self.y+(i+1)*self.height-(self.height-thickness)/2])

代码:
import pyglet

window = pyglet.window.Window(800, 500, caption='汉诺塔')
pyglet.gl.glClearColor(1, 1, 1, 1)
batch = pyglet.graphics.Batch()

pi = 3.141592653589793
Color = (182,128,18),(25,65,160),(56,170,210),(16,188,78),(20,240,20),(240,240,20),(255,128,20),(240,20,20),(245,60,138)

class Disk:
    def __init__(self, x, y, color=(0,0,0), width=200, height=20):
        self.sec1 = pyglet.shapes.Sector(x+width/2-height/2, y, radius=height/2, angle=pi, start_angle=-pi/2, color=color, batch=batch)
        self.sec2 = pyglet.shapes.Sector(x-width/2+height/2, y, radius=height/2, angle=pi, start_angle=pi/2, color=color, batch=batch)
        self.rect = pyglet.shapes.Rectangle(x-width/2+height/2, y-height/2, width-height, height, color=color, batch=batch)
        assert(width>height and x-width/2+height/2>0)

class Hann:
    def __init__(self, x, y, order=2, thickness=20, width=220, height=300):
        assert(order>1)
        self.pole = pyglet.shapes.Line(x, y, x, y+height, width=thickness, color=Color[0], batch=batch)
        self.disk = Disk(x, y, color=Color[0], width=width+thickness, height=thickness)
        self.x, self.y = x, y
        self.width = width
        self.height = (height-thickness*2)/order
        self.step = (width-thickness)/(order+1)
        self.beads = []
        self.coordinates = []
        for i in range(order):
            self.coordinates.append([self.x, self.y+(i+1)*self.height-(self.height-thickness)/2])
        self.fillup()
    def fillup(self):
        for i,xy in enumerate(self.coordinates):
            self.beads.append(Disk(*xy, Color[i%8+1], width=self.width-i*self.step, height=self.height))

@window.event
def on_draw():
    window.clear()
    batch.draw()

hann1 = Hann(window.width/2-260, 100, 2)
hann2 = Hann(window.width/2-22, 180, 5, 25)
hann3 = Hann(window.width/2+230, 80, 10, 15, 300, 380)

pyglet.app.run()
6. 游戏框架
画三个相同的塔架,左边的磊放好圆盘。另外用两个圆代替两个扇形,效果一样却省了pi常量。
Circle(x+width/2-height/2, y, radius=height/2, color=color)

代码:
import pyglet

window = pyglet.window.Window(800, 500, caption='汉诺塔')
pyglet.gl.glClearColor(1, 1, 1, 1)
batch = pyglet.graphics.Batch()

Color = (182,128,18),(25,65,160),(56,170,210),(16,188,78),(20,240,20),(240,240,20),(255,128,20),(240,20,20),(245,60,138)

class Disk:
    def __init__(self, x, y, color=(0,0,0), width=200, height=20):
        self.cir1 = pyglet.shapes.Circle(x+width/2-height/2, y, radius=height/2, color=color, batch=batch)
        self.cir2 = pyglet.shapes.Circle(x-width/2+height/2, y, radius=height/2, color=color, batch=batch)
        self.rect = pyglet.shapes.Rectangle(x-width/2+height/2, y-height/2, width-height, height, color=color, batch=batch)
        assert(width>height and x-width/2+height/2>0)

class Hann:
    def __init__(self, x, y, order=2, thickness=20, width=200, height=300):
        assert(order>1)
        self.pole = pyglet.shapes.Line(x, y, x, y+height, width=thickness, color=Color[0], batch=batch)
        self.disk = Disk(x, y, color=Color[0], width=width+thickness, height=thickness)
        self.x, self.y = x, y
        self.width = width
        self.height = (height-thickness*2)/order
        self.step = (width-thickness)/(order+1)
        self.beads = []
        self.coordinates = []
        for i in range(order):
            self.coordinates.append([self.x, self.y+(i+1)*self.height-(self.height-thickness)/2])
    def fillup(self):
        for i,xy in enumerate(self.coordinates):
            self.beads.append(Disk(*xy, Color[i%8+1], width=self.width-i*self.step, height=self.height))

class Game:
    def __init__(self, x, y, order=2, space=250):
        self.x, self.y = x, y
        self.space = space
        self.order = order
        self.hanns = Hann(x-space, y, order), Hann(x, y, order), Hann(x+space, y, order)
        self.hanns[0].fillup()

@window.event
def on_draw():
    window.clear()
    batch.draw()

hann = Game(window.width/2, 100, 8)

pyglet.app.run()
接下来就要添加鼠标和键盘事件,用于操作在塔架上移动圆盘。本篇完,下期继续......
标签:
相关文章
最新发布
- 光流法结合深度学习神经网络的原理及应用(完整代码都有Python opencv)
- Python 图像处理进阶:特征提取与图像分类
- 大数据可视化分析-基于python的电影数据分析及可视化系统_9532dr50
- 【Python】入门(运算、输出、数据类型)
- 【Python】第一弹---解锁编程新世界:深入理解计算机基础与Python入门指南
- 华为OD机试E卷 --第k个排列 --24年OD统一考试(Java & JS & Python & C & C++)
- Python已安装包在import时报错未找到的解决方法
- 【Python】自动化神器PyAutoGUI —告别手动操作,一键模拟鼠标键盘,玩转微信及各种软件自动化
- Pycharm连接SQL Sever(详细教程)
- Python编程练习题及解析(49题)
点击排行
- 版本匹配指南:Numpy版本和Python版本的对应关系
- 版本匹配指南:PyTorch版本、torchvision 版本和Python版本的对应关系
- Anaconda版本和Python版本对应关系(持续更新...)
- 相关性分析——Pearson相关系数+热力图(附data和Python完整代码)
- Python 可视化 web 神器:streamlit、Gradio、dash、nicegui;低代码 Python Web 框架:PyWebIO
- Windows上安装 Python 环境并配置环境变量 (超详细教程)
- Python与PyTorch的版本对应
- 安装spacy+zh_core_web_sm避坑指南

